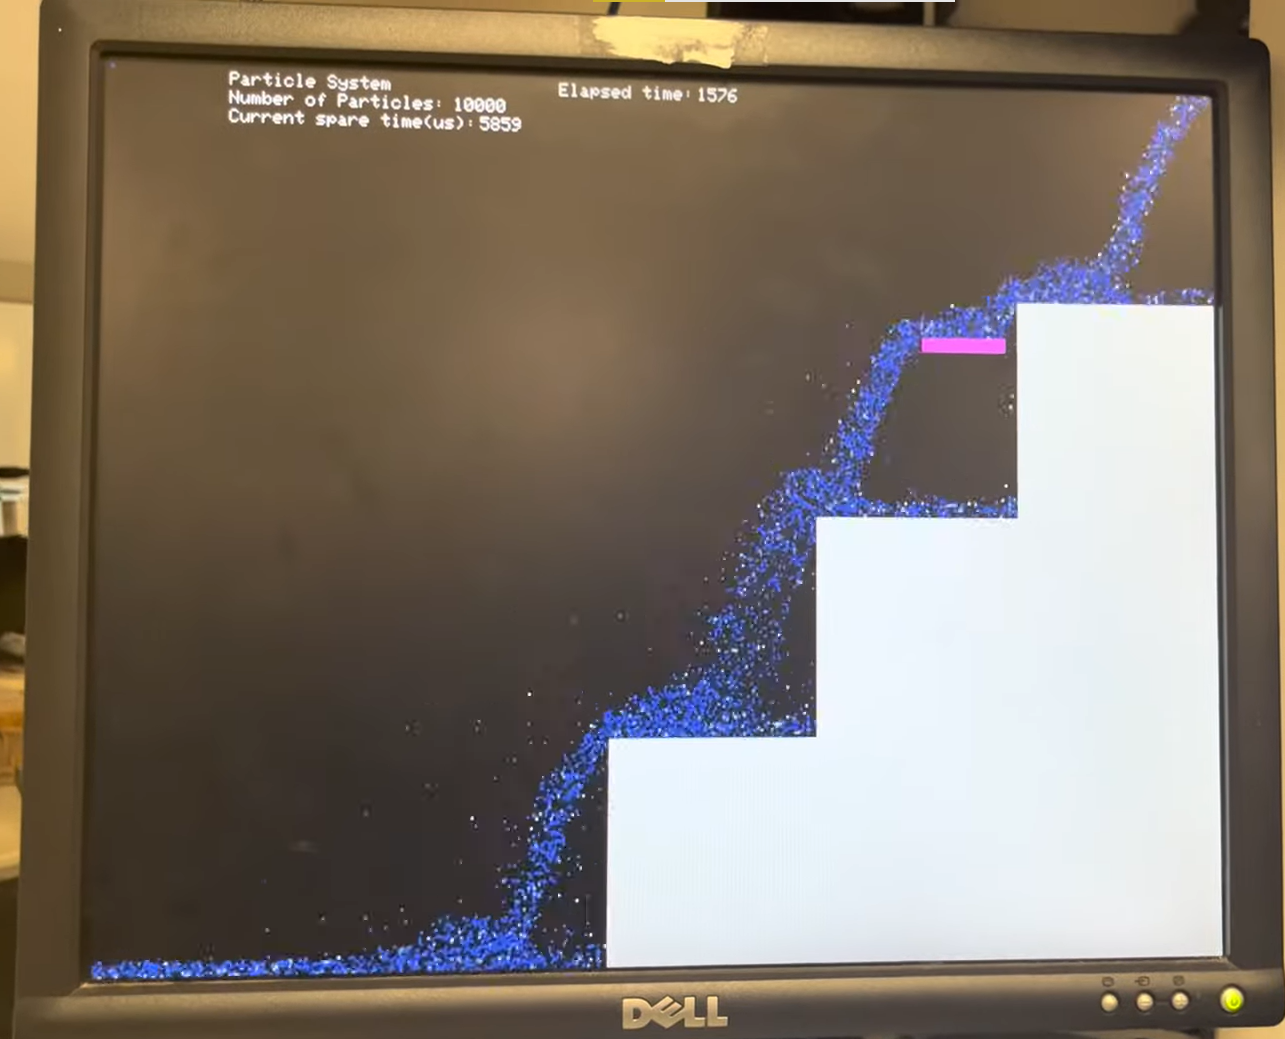
Water particle system animation
[Fall 2022] This project aims at simulating a realistic waterfall animation with user interaction. We’re interested to learn how a particle system works and see how realistic it can be. We chose to build a waterfall that flows downstairs and added a moveable bar controlled by the user to bring some interactivity to this system. Here is the Youtube link of the.
- Suitable forB.Tech/B.E Embedded Systems students
- Build time4-6 weeks
- LevelBeginner
- Available atAjvika Labs, Kakinada
About this project
Final Project: Water Particle System Animation Implemented on RP2040
1. Project Introduction
This project aims at simulating a realistic waterfall animation with user interaction. We’re interested to learn how a particle system works and see how realistic it can be. We chose to build a waterfall that flows downstairs and added a moveable bar controlled by the user to bring some interactivity to this system. Here is the Youtube link of the
demo video
Fig 1.Waterfall Simulation
2. Design Overview
2.1. Rationale
The idea for this project came from Hunter’s possible project list demonstration. We found the particle system topic very interesting and attractive during his introduction. The particle system can be so versatile that it can realize so many different visually authentic effects like fireworks and candlelights. This kind of authenticity is achieved through a large number of pixels that can reveal the details of these effects. Based on experience, considering that the particle system involves less interactivity since the overall effect won’t change greatly as time passes by, it is possible to achieve a great number of pixels displayed on the VGA screen while maintaining appropriate FPS.
After talking with Hunter and Bruce about this idea, they suggested that we can make the system more visually appealing by animating some natural-world effects that people have been quite familiar with so that it's easy to tell whether the animation is vivid. Combined with all these thoughts, we felt that it would be a great idea to simulate the waterfall, just like the Ithaca Fall, which is a water particle system. To add more interactivity to this system, we designed a stair on the right side of the screen so that after the water falls from the left top corner, it will reach the stairs and then flow down the stairs.
2.2. Background Information
A waterfall is a point in a river or stream where water flows over a vertical drop or a series of steep drops. It is made up of countless water molecules, each of which behaves independently and interactively. Each particle can be regarded as ‘independent’ before it hits and is blended with other elements, and the process of fusion is where the interactivity exists. Besides, when taking interacting with external system objects like stones at the bottom of the waterfall, or the stairs in this project, many other important factors are playing important role in making the scene around that area appear to be chaotic. With the naked eye, we may observe that there are boiling masses of water at the bottom of the waterfall, and it seems to be very powerful. So how does this happen?
The whole animation process can be divided into two main parts, which are the free fall in the horizontal direction and the interaction of water particles with stairs. The free fall process for each particle will follow the physical rule, meaning that each particle will have an original horizontal velocity, given the characteristics of the realistic waterfall, but zero vertical velocity at the beginning. With it falling freely in the air, due to its motion, it will gain kinetic energy from gravitational force(which is the force that pulls all the objects towards the ground) that is doing work on it. The work of a gravitational force is a form of energy transformation since While the waterfall's vertical velocity increases and its height decreases, so the kinetic energy increases and the gravitational potential energy decreases, and this happens in a way that the total energy is always the same. After the particle hits the stairs’ surface, since it is not an elastic collision and friction does exist, there will be some energy loss every time that the particle bumps onto the surface. Given that the stairs have both vertical and horizontal surfaces, we used two different resistance coefficients to calculate the energy loss. This will be introduced in detail in the particle motion simulation part later.
2.3. Software Overview
As we can see from this flowchart, the waterfall simulation system starts with the initialization, including standard input/output and VGA, then core-0 launches core 1. Core 0 is responsible for the interrupt setup as well as the update for even-number indexed water particles, while Core 1 is responsible for odd-indexed ones. Also, the serial input handler is set to run on core 1, so it can take user input from the serial interface to change the parameters for the user-interactive bar and control its position.
Fig 2.Software Diagram
2.4. Hardware Overview
Only two parts of hardware are involved with the system: the VGA driver and the UART serial input/output. The VGA driver is implemented by the PIO state machines, used to display the simulated waterfall, and the UART is used for debugging and user input.
Fig 3.Hardware Diagram
3. Detailed Design
3.1. Hardware
3.1.1. VGA Interface
We adopted the VGA interface developed by Hunter[1], which uses the three PIO state machines to drive a VGA screen. Three bits are used to represent one pixel, and we hold all the information for 640*480 pixels in a large memory, which the DMA channel will read data from and transport to the PIO state machines for VGA output.
3.1.2. UART
The UART is used both for printing debugging information as well as the user interface. Since this system requires a constant frame rate of the simulation, the serial read and serial write operation must not block the program. Therefore, we’re using the ProtoThreads for Pi Pico RP2040[2], which defines the non-blocking version of serial read and serial write. The thread for read and write yields until the UART channel is readable/writable, instead of outputting all characters at once or checking for “enter”, so to avoid blocking other important threads.
The logic for using the UART to control the small block in the simulation is a little different. Instead of reading the whole string which ends with an “enter”, we want the block reacts whenever the user puts a character of “A”, “W”, “S”, or “D”. In this case, we simply use a uart_getc() when the UART channel is readable, and then change the block’s position according to the input character. In this way, the reaction becomes more direct and instant.
3.1.3. Mouse
I tried to develop a PS/2 protocol to add a mouse to our system using the Programmable I/O since this would be more instinctive than simply using the keyboard. I managed to build up the open collector circuit needed for the interface and wrote the basic structure of the PIO assembly program, but it takes way longer than I thought it would. So I just dropped this and used the UART instead. Maybe I would continue on this at a later time.
3.2. Software
3.2.1. Particle System
The simulated waterfall is a particle system with a very large number of particles to make it as realistic as possible. Every particle has four characteristics: x position, y position, x velocity, and y velocity. We created a struct in C that holds these four values for each particle. Since all the data is preallocated, we had to keep the struct as small as possible to create as many particles as possible. The size of the screen requires at least 10 bits (29 < 640 < 210) for the position, therefore we defined a “fix5” data type: 11 bits for the integer part and 5 bits for the fraction part. Related calculations are defined as macros as shown in Figure 4.
Fig 4.Macros define for calculations in the “fix5” data type
In this way, the largest number of particles that we achieved is 12000, which is quite enough to simulate a realistic waterfall.
3.2.2. Particle Motion Simulation
To correctly simulate the motion of particles according to real-world physics rules, we design the motion update function such that it includes the following feature:
Air-drag in the horizontal direction.
Air-drag in the vertical direction.
Gravitational acceleration in the vertical direction.
Restitution coefficient when a particle bounced back from a collision with a wall.
After every collision, the particle switch color from white to blue or the other way around
We started the design by assigning real-world values to the system such as using 9.81 m/s^2 for gravitational acceleration and 0.67 for air drag in both directions. But since the VGA screen is limited at 640 x 480, all these real-world values do not simulate the particles realistically, therefore we started to tune our system.
For the vertical speed, we set it up such that it always has a downward acceleration but also an upward air drag proportional to the current vertical velocity as follows where G30 stands for gravity factor and CD stands for Coefficient of Drag:
After testing we found that to simulate the gravity and air-drag properly on the VGA screen, the best values for G30 and CD are 1.1 and 0.1. With this, we can simulate free fall motion for the particles.
For the horizontal velocity, it should only include an air drag in the opposite direction of the current horizontal velocity. Therefore we set up the velocity update as follows where CDx stands for Coefficient of Drag in the x-direction:
Originally, we were using the same drag coefficient for both horizontal and vertical velocity. But unlike vertical velocity, there is no constant force like gravity acting on the particle in the horizontal direction therefore using the same drag coefficient will cause the particle slows down in the horizontal direction way faster than in the vertical horizontal and even stop moving at the middle of the screen. Therefore for CDx, we use only 0.03 to represent the horizontal air drag.
For the collision cases, we only need to consider 2 cases which are collision with a horizontal wall and collision with a vertical wall. To simulate this collision properly, we set up the position update as follows. If there is a collision between a horizontal wall:
RC stands for restitution
Technologies used
Hardware components
- RP2040
- IMU
Software & tools
- C
- Arduino IDE
Project demo video
What you get
- Working project / hardware kit, tested before delivery
- Complete source code with explanation
- Project demo and guidance for your viva
- Project report, PPT and IEEE paper support (on request)
Related Embedded Systems projects

Gas Leakage Detector Using Arduino
A budget-friendly LPG gas leak detector built with an Arduino and MQ-5 gas sensor, triggering a buzzer and LED when unsafe gas levels are de...
View project
Simple Alarm System
A beginner-friendly home alarm with PIR motion sensing, keypad PIN entry, and separate entry/exit timing delays, built to be easy to expand.
View project
Ultrasonic Sensor Project with Arduino UNO Q
A beginner-friendly first Arduino UNO Q project: a servo-swept ultrasonic sensor that renders a live sweeping radar display in a web browser...
View project
3D Audio Localization
[Fall 2025] We designed a real-time embedded system that localizes sound sources in three dimensions and visualizes them live using a four-m...
View project