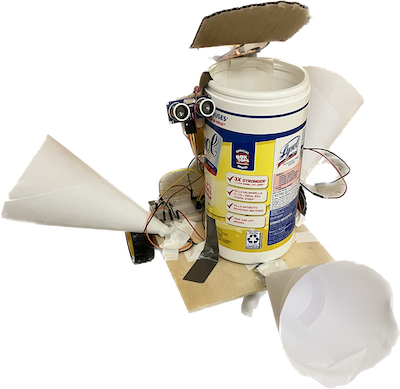
Trash dog
[Fall 2022] For this project,we built a trash can that come to you.Throwing trash is hard, especially when you are too lazy to walk to the trash can. To solve this problem, we want to build a robot that can help people throw trash more efficiently. In other words, it’s an intelligent mobile trash can that can move to wherever the user is located by identifying where the user's sound is coming from and open/close its lid before/after trash is thrown
- Suitable forB.Tech/B.E Embedded Systems students
- Build time4-6 weeks
- LevelBeginner
- Available atAjvika Labs, Kakinada
About this project
Introduction
For this project,
we built a trash can that come to you.
Throwing trash is hard, especially when you
are too lazy to walk to the trash can. To solve this problem, we want to build a robot that can help people
throw trash more efficiently. In other words, it’s an intelligent mobile trash can that can move to wherever
the user is located by identifying where the user's sound is coming from and open/close its lid before/after
trash is thrown. From a technical perspective, this project will demonstrate many topics we have discussed
in class/labs, such as audio data manipulation, multithreading, etc. From a practical perspective, this will
be a useful project because we will be able to use it in our homes if implemented successfully.
High Level Design
Rationale
For this project we wanted to build something fun and useful. As college students, trivial tasks such as
throwing trash could often distract us from studying, so we see the need in building a mobile robot trash
can that makes this process simpler. The cricket synthesis lab has provided us with necessary knowledge to
build another sound-based project, and we also wanted to experiment with implementing simple intelligence on
the RP2040, such as target phrase recognition.
Background Math
Sound Localization: Ideally if we had three identical microphones we could find the direction of the sound
source by tracing out a locus for each (3) pair of microphones on which the distance to the two endpoints
are of a fixed ratio (determined by the actual intensity received). Below is an example of how the exact
location (and hence the direction) of the sound source can be calculated with given intensity. Direct
calculation is expensive, but we could work on the path later to find cheaper ways to approach this. In our
demo we used ratio of intensities to approximate ratio of the angles, and it seems to work well provided
that the data collected were accurate.
Distance sensing: to determine when the robot has reached the target, we used an ultrasonic sensor to
measure the distance. More is covered later in the design sections, but the basic principle of the sensor
sends a signal that bounces back from the closest surface and gets picked up again, so knowing the speed of
sound, we can calculate the distance traveled based on the length of the echo signal.
Logical Structure
Below is a flowchard of our original logical design.
Hardware/software Tradeoffs
There were several key tradeoffs and our decisions led to our final design. When we first looked at the
samples collected from the two microphones, we could not observe a significant difference in amplitude or
intensity of the microphones. We first tried to amplify the signal physically by using op amps, but it
didn’t work well. Therefore, we decided to de-noise and compare the maximum magnitude of signals at the
desired frequency range digitally.
To further alleviate the problems of the great amount of noise and low amplitude of collected samples from
the microphones, we folded paper into cone shapes and surrounded our microphones with them, which helped to
some degree. We discussed more about the things we tried to compensate for the hardware problems in the
following section.
Hardware
The schematic for our hardware setup. We have a 4.5V battery to power the pico, distance sensor, and
microphones, and a 9V battery to power the motor driver.
List of Essential Parts
Design Details
The motors, breadboard, batteries are secured on a piece of wood. We were able to control the direction and
speed of the motors with the L298N motor driver. Each motor is controlled by 3 pins. 2 for direction and 1
for speed.
Parts of our hardware setup:
Software
Below is a detailed account of the implementation of our core functionalities.
Collect Sample
To collect sound samples from the three microphones, we set up three adc channels and a FIFO from which a
DMA channel can get the data, increasing the speed of the program. We alternated the collection of samples
from the microphones by giving them each an id and changed the input selection for adc to different channels
based on the current id. This works since the time needed for each iteration is very short and we can view
the samples as being collected at the same time. To fix issues that may occur due to this setup, we also
consider multiple sets of data before deciding that a sound is detected (discussed below). When enough
samples are collected (which is 1024 in our case), we stored them into a fixed-point array and calculated
the FFT. We used the same FFT code from lab 1, which performs a FFT using fixed points.
Sound and Frequency Detection
From the FFT, we computed the highest magnitude within the desired frequency range (500 - 550 Hz range) and
stored it in an array. The value from the last collection is also stored. The index of the arrays
corresponds to the id of a microphone, and whenever a set of samples are collected, we compare all the
values in the two arrays. First the maximum value in the two arrays is found, and if it exceeds a certain
threshold (we experimented with), the series of actions of moving toward the sound source would be taken.
Otherwise, the next iteration in the while loop is entered. A counter is also set up to maintain some time
interval between sound collection and detection routine.
Angle Calculation and Rotation
The final way we decided to use for angle calculation is using the proportion of the two largest magnitudes
out of the three microphones. We calculate the proportions to determine the angle the robot should rotate,
relative to the head of the robot. Based on which two microphones get the highest magnitudes, the proportion
is multiplied by 120 degrees and manipulated with positive/negative values so that the resulting value would
let the robot turn towards the sound sources reasonably. It would rotate clockwise with a positive angle,
and counterclockwise with a negative angle.
From the calculated angle, the rotation of the robot is controlled by setting the GPIOs to the motor driver.
The plus or minus sign of the angle determines which inputs to the driver would be set high, and the
magnitude of the angle determines how long the GPIOs would stay high. We use the sleep_ms() function and the
magnitude is multiplied by a multiplier (which is a parameter we can adjust and experiment with) to get the
right amount of time needed.
Move Forward and Distance Detection
After identifying the direction, we want the robot to move towards the sound. We used an infrared distance
sensor mounted next to the trash can. Trashdog will move forward until it senses an obstacle within around
15 cm. Since we only run this one thread on the core, we decided to simply use a counter to represent the
distance and experimented to get an estimated counter value for the distance. TRIG and ECHO are connected to
GPIOs of our pico, and pull-down is set up for the ECHO pin. To get data from the sensor, we set the GPIO
for TRIG signal high for 10 us and then set it back to low. Then we wait (using a while loop) until the GPIO
for ECHO signal goes from 0 to 1, at which point we start incrementing the counter. The counter would keep
incrementing as long as the ECHO stays high, thus giving a value that is proportional to the distance.
Lid Opening
We use an extra motor to open the lid. We could have used a servo but we chose the motor because of ease of
implementation due to time constraints. The motor is directly controlled by a GPIO pin using a BJT. The
collector of the npn transistor is connected to the system 3.3V, and its emitter is connected to the
positive terminal of the motor. Its base is connected to the GPIO with a resistor in between. In this way,
we could set the GPIO high to turn on the motor whenever the robot stops moving after it gets close to the
obstacle.
Things We Tried
This particular project is challenging for both the hardware limitations and the approach we decided to
take, so we have tried many solutions. While a lot of them have failed, they nonetheless provided valuable
insights and helped us to understand the system better.
Sound Localization
Our design uses 3 microphones and computes directional information based on the differences in their data
collected. Initially we wanted to use the time difference between when a signal is first observed relative
to the microphones to determine direction, but realized that the signal was too noisy for the system to make
any useful predictions. We decided that intensity could be another basis to perform calculations upon, since
it requires less accuracy in the time division and should be relatively easy to obtain usable values. Of
course, this involves some complex calculations and again, the challenge of dealing with noisy and
inconsistent data, but we tried our best to derive an approximation that yielded satisfactory results.
Python code to Read From Serial
To investigate how to make the best use of our poor sound samples, we decided to output the raw numerical
values and saw that noise. To get the sound s
Technologies used
Hardware components
- RP2040
- IMU
- ultrasonic sensor
- microphone
- ADC
- L298N
- motor driver
Software & tools
- Python
Project demo video
What you get
- Working project / hardware kit, tested before delivery
- Complete source code with explanation
- Project demo and guidance for your viva
- Project report, PPT and IEEE paper support (on request)
Related Embedded Systems projects

Gas Leakage Detector Using Arduino
A budget-friendly LPG gas leak detector built with an Arduino and MQ-5 gas sensor, triggering a buzzer and LED when unsafe gas levels are de...
View project
Simple Alarm System
A beginner-friendly home alarm with PIR motion sensing, keypad PIN entry, and separate entry/exit timing delays, built to be easy to expand.
View project
Ultrasonic Sensor Project with Arduino UNO Q
A beginner-friendly first Arduino UNO Q project: a servo-swept ultrasonic sensor that renders a live sweeping radar display in a web browser...
View project
3D Audio Localization
[Fall 2025] We designed a real-time embedded system that localizes sound sources in three dimensions and visualizes them live using a four-m...
View project