Star tracker
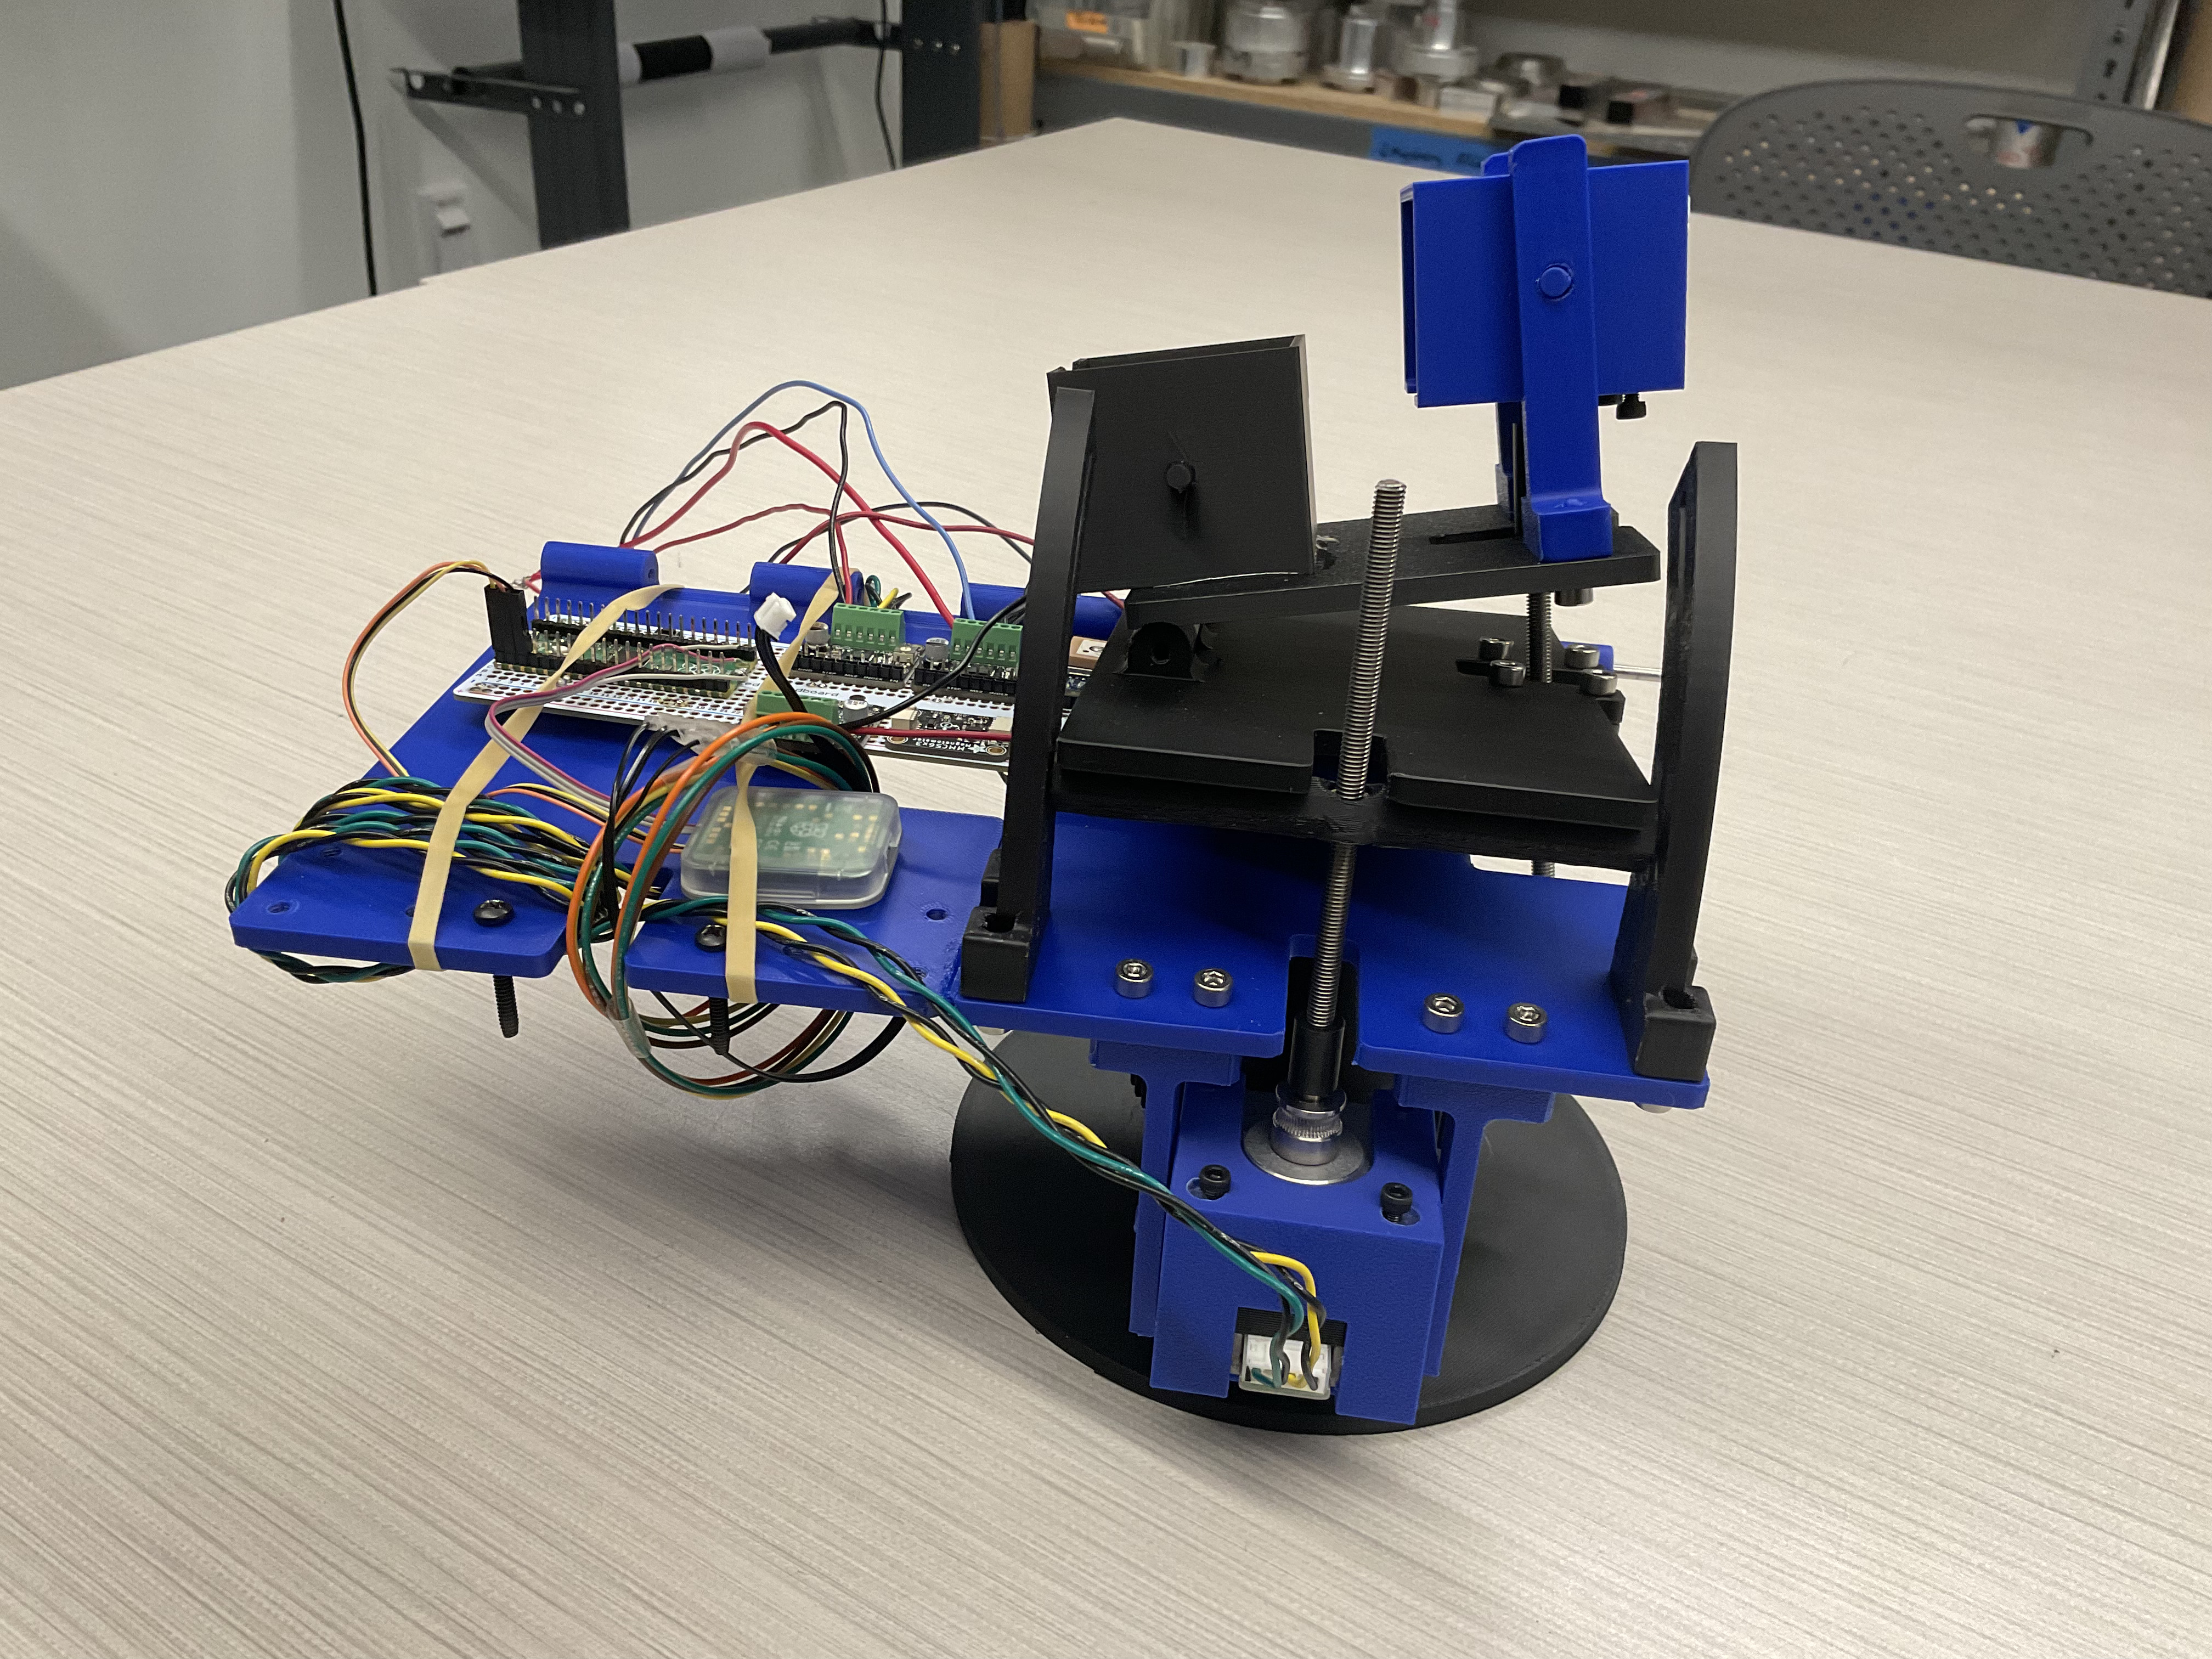
[Fall 2025] For this project, we made a 3-axis gimbal to be used as a star tracker for astrophotography. Although a traditional ground based star tracker only requires 2 axis of rotation (one to align with Earth's pole and another to rotate to follow a star's path across the sky), we chose to design a 3 axis gimbal…
- Suitable forB.Tech/B.E Embedded Systems students
- Build time4-6 weeks
- LevelBeginner
- Available atAjvika Labs, Kakinada
About this project
Introduction
High-Level Design
Program/Hardware Design
Results
Conclusions
Appendices
References
Star Tracker
1. Introduction
For this project, we made a 3-axis gimbal to be used as a star tracker for astrophotography.
Although a traditional ground based star tracker only requires 2 axis of rotation (one to align with Earth's pole and another to rotate to follow a star's path across the sky),
we chose to design a 3 axis gimbal…
The star tracker uses stepper motors to control each axis of rotation due to their precise, incremental motion control and their ability to count their steps,
thus avoiding the possible need for a motor encoder. We used a magnetometer to rotate our star tracker around the z-axis to align with Earth's pole and a GPS module to rotate our star tracker
around the y-axis to follow a star across the sky
Our current implementation did not make use of the ability to rotate around the x-axis, however the combination of the GPS module and magnetometer would theoretically allow us to use this third axis
to eliminate the drift that occurs and keep the camera sensor aligned in the same orientation.
2. High-Level Design
Rationale
The original idea behind this project was to design a device that was capable of being placed anywhere on earth, and automatically stay locked onto a position in the night sky
by compensating for the rotation of the Earth. To do this, it would require an electrically controlled gimbal which could in some way match the angular velocity of the Earth by means of GPS and magnetometer data.
Background Math
One of the most complicated parts of the original design was going to be the math required to achieve this. First off, we have to understand that every star in the night sky is actually moving at vastly diverse velocities,
and are spaced apart up to billions of light years away, but the light makes it all to the same spot: the surface of the earth.
So why don't we see this with the naked eye? It's all about perspective: imagine you're on a roadtrip in Colorado and as you're driving North, the Rocky Mountains are to your left.
From your perspective, how fast are the mile markers moving? What about the mountains in the background?
This effect is called parallax, and is exactly the same reason why the stars in the night sky all seem to move together, even though they really aren't.
If that's the case, then we surely can't use the star as a reference frame… or can we? Enter celestial coordinates.
In the below image from the University of Central Florida, we can see that there is some sort of imaginary sphere placed conspherically around the Earth.
Figure 1: The Celestial Sphere
This is what we call the celestial sphere. Similarly to Earth, we can define both the celestial poles and the celestial equator.
As for the radius of the celestial sphere, we consider it to be infinite, but it is required as a reference point for angles based on our zenith.
With all of this in mind, we can now see how to implement this mathematical approach into a digital design.
Hardware/Software Tradeoffs
One thing that is important to keep in mind is the general complexity of this project. There are many extremely advanced designs that utilize statistical approaches with error calculations to consistently ensure alignment.
Our system was originally designed to be as simple as possible, ensuring functionality and alignment for much shorter time periods than a typical astronomical image requires.
For example, there are some commercially available products, such as arcsec's Saggita startracker, that have extremely high precision (2 arcseconds) and are specialized for harsh space weather conditions.
However, these types of devices have been designed by a team of specialized engineers over a long period of time, making an implementation of accurate star tracking software far beyond our scope.
Another important thing to note here is that the concept of "star tracking" isn't what's being copyrighted or patented. Instead, it's the specific algorithms that are used at the industry level.
For example, most notably would be Raytheon's patent #12442642, "Star trackers for range determination in rendezvous and proximity operations",
which details information on a new system using two star trackers for high precision operations at close proximity in orbit.
3. Program/Hardware Design
Magnetometer
The magnetometer calibration was a critical step in ensuring the accuracy of our star tracking system, this was particularly important because we used the sensor in multiple environments such as my apartment, duffield atrium and the lab.
The raw readings from the magnetometer are affected by both hard iron offsets, caused by permanent magnetic materials near the sensor, and soft iron effects caused by ferromagnetic materials that distort magnetic fields such as our phones, lab speakers, screws etc.
Initially, we manually rotated the sensor through all orientations in each environment, collected raw X, Y, and Z readings, and applied corrections to compensate for these effects.
To remove the hard iron offsets, we calculated the center of the measurement ellipses and subtracted it from all readings, while for soft iron offsets, we corrected them by applying scaling factors to normalize the axis.
This process was time consuming and manually tiring as we had to do this every testing session.
We decided to write a python calibration script that automated these steps by having us just rotate the sensor once while logging data, compute the necessary hard and soft iron corrections and apply them in real time.
GPS
The next device that was required to set up was the Adafruit Ultimate GPS v3 breakout board, hosting an on-chip antenna and the actual PA1616S GPS module.
Communication with this device for our purposes required a unidirectional UART connection.
At no point would the pico need to send data to the GPS, therefore only requiring the Tx (GPS) to Rx (Pico), and of course power and ground.
The next step would be to decode, or parse, the information being sent through the UART channel to the pico as usable data for certain calculations as mentioned in the mathematics.
In order to do this, we must first understand the format of the raw data being presented to the MCU.
The National Marine Electronics Association, or NMEA, has a standard for GPS data, namely, NMEA-0183.
The basic structure of this format revolves around NMEA sentences, at maximum 82 characters, with specific tags and delimiters, as seen in Table 1.
Table 1: NMEA-0183 Delimiters
ASCII
Hex
Dec
Use
<CR>
0x0d
Carriage return
<LF>
0x0a
Line feed, end delimiter
!
0x21
Start of encapsulation sentence delimiter
$
0x24
Start delimiter
*
0x2a
Checksum delimiter
0x2c
Field delimiter
\
0x5c
TAG block delimiter
^
0x5e
Code delimiter for HEX representation of ISO/IEC 8859-1 (ASCII) characters
~
0x7e
Reserved
Having a standardized format makes string parsing much easier. Luckily, only one type of NMEA sentence was required for purposes of this design, tagged “$GPGGA”, signifying that this sentence will be a GPS Fix sentence, meaning that it includes UTC, latitude, and longitude.
This is exactly what is needed in order to find our zenith and allow for the program to work anywhere on the surface of the earth.
This all did not go without its struggles, however.
String parsing in C is such a challenge because of the versatility of strings and how C allocates memory for them. Ensuring the correct char pointers were being accessed between dependencies was incredibly challenging, so in the end, the GPS software was all written in the main file tracker.c.
Stepper Drivers
The last, and probably most important component of this device was the TMC2209 Stepper Driver. Without this, we would not be able to accurately control the rotation of each motor.
Though it does allow for a UART connection, 3 stepper drivers and a gps would need 4 isolated UART channels, which is only possible on the RP2040 through means of a PIO program to simulate the protocol using software on any other GPIO.
The way around this was to manually control the driver by its STEP and DIR pins. For example, when a pulse (rising edge) is sent to the driver into the STEP pin, it will step the motor once, in our case 1.8 degrees.
DIR is automatically LOW, so when set HIGH, will reverse the direction of the step. With just these two connections on each driver, we can now allocate enough GPIOs from the Pico to be able to communicate with all other peripheral devices.
HOW DOES THIS ALL COME TOGETHER?
As seen below, the RP2040 uses the GPS positioning data to get our zenith and celestial poles. Originally, the idea was to align with magnetic north and then find Polaris based on the position obtained from the GPS, which is also celestial north.
Once the device is pointing straight towards celestial north, it would just need to rotate about the celestial north axis.
From here, we’d only need one stepper to control the rotation at 15.041 degrees per hour to perfectly compensate for the rotation of the Earth.
Hardware implementation
The hardware of our star tracker would allow anyone to easily replicate our project. The entire structure of our 3-axis gimbal was 3D printed from basic materials such as PLA and PETG.
We used heat set inserts and socket head bolts to fasten the parts together, aluminum rod to connect the hinges, and threaded rod to connect to the motor output shafts.
For the electrical side of the hardware, we used commonly used stepper motors, stepper motor drivers (TMC2209), a GPS module (PA1616S), a magnetometer (MMC5603), and the Raspberry Pi Pico, which are all als
Technologies used
Hardware components
- RP2040
- Raspberry Pi Pico
- stepper motor
- IMU
- speaker
- GPS module
- motor driver
Software & tools
- Python
Project demo video
What you get
- Working project / hardware kit, tested before delivery
- Complete source code with explanation
- Project demo and guidance for your viva
- Project report, PPT and IEEE paper support (on request)
Related Embedded Systems projects

Gas Leakage Detector Using Arduino
A budget-friendly LPG gas leak detector built with an Arduino and MQ-5 gas sensor, triggering a buzzer and LED when unsafe gas levels are de...
View project
Simple Alarm System
A beginner-friendly home alarm with PIR motion sensing, keypad PIN entry, and separate entry/exit timing delays, built to be easy to expand.
View project
Ultrasonic Sensor Project with Arduino UNO Q
A beginner-friendly first Arduino UNO Q project: a servo-swept ultrasonic sensor that renders a live sweeping radar display in a web browser...
View project
3D Audio Localization
[Fall 2025] We designed a real-time embedded system that localizes sound sources in three dimensions and visualizes them live using a four-m...
View project