RP2040 Camera
ECE 4760 Final Project: RP2040 Camera Project Introduction The goal of our project was to implement an interface for the Arducam OV5642 with the Raspberry Pi Pico.
- Suitable forB.Tech/B.E Embedded Systems students
- Build time4-6 weeks
- LevelAdvanced
- Available atAjvika Labs, Kakinada
About this project
ECE 4760 Final Project: RP2040 Camera
Project Introduction
The goal of our project was to implement an interface for the Arducam OV5642
with the Raspberry Pi Pico. We want it to be able to store image pixel information
and to be able to display images taken with the camera on a VGA. Our intent for
this project is to get it working and well documented so that it can be used for
future RP2040 projects that may want to integrate a camera. We also wanted to develop
a way to take information from the camera, identify useful information, and save it
on the RP2040's limited memory.
High Level Design
Our initial idea for our project was to implement eye tracking using the
Raspberry Pi Pico. However, as we researched this option further, we realized
that just getting the camera to work would be a massive endeavor on its own.
So, we adjusted our goal to be to implement an interface for a camera for the
RP2040, specifically the ArduCam OV5642. This program must read an image from
the camera, draw its result on a VGA screen, and be able to store some image data,
which could then be hypothetically used for some rudimentary object detection or
similar applications.
High Level Diagram
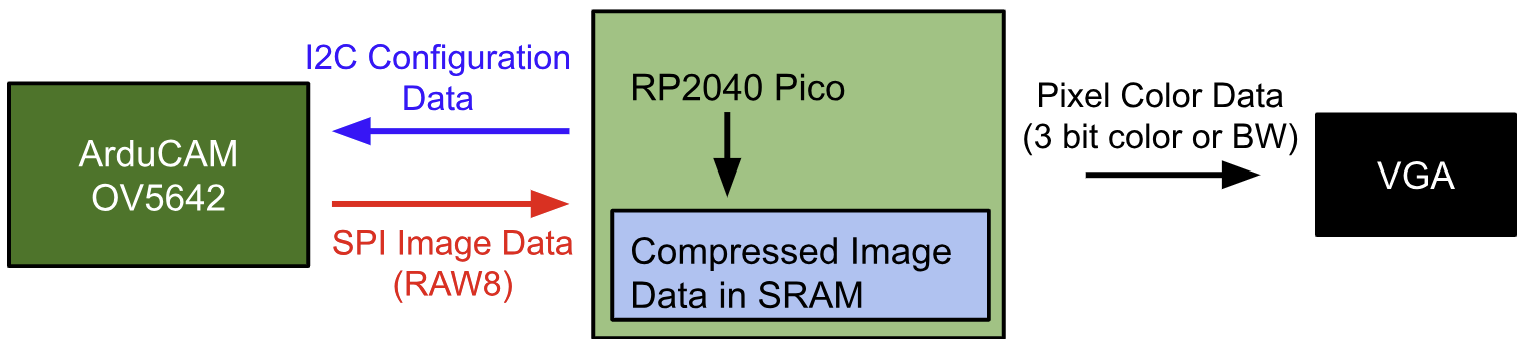
The OV5642 camera communicates with the RP2040 using 2 different methods: an I2C
interface is used to configure the camera (eg. writing to registers that control
image format, camera settings, number of frames to capture, etc.), and an SPI
interface is used to transfer image data from the camera to the RP2040. For each
capture, the RP2040 then reads the data for each pixel from the SPI FIFO, which
is then compressed to be stored and drawn on the VGA (depending on the mode). If
the program is configured to just draw the image capture on the VGA, the RAW8 8
bit color format must be compressed down to 3 bits, and the image is not stored.
Otherwise, if the image is stored, the image must be compressed to a black and
white image with a minimal number of pixels. The camera settings are also
adjustable via serial terminal.
A major hardware/software tradeoff we had to work around was the RP2040's
extremely limited memory. The microcontroller has only 264 kB of SRAM memory to
work with, which wasn't even enough to store a single black and white image of
640x480 resolution (the resolution of our VGA). Because of this, we had to find
a way to significantly compress image data from the camera. Rather than reduce
the resolution of the image, we opted to capture only the notable features of
the image, such as lines and edges. This way, the image is still decently clear
and recognizable, while also taking up significantly less space in memory.
Additionally, this has the added benefit of capturing the notable features
that may be needed for object detection. Another possible workaround for this
memory issue could be to use some form of external memory such as an SD card or
external SRAM, but we did not have time or resources to implement this.
ArduCAM has some demo code for the camera for the RP2040, which we used as a
starting point [1]. However, there were some major changes we had to make to
this code to make it usable for our purposes. The demo merely takes a capture
with the camera and sends it to a program on an external computer (via USB) to be
displayed. We had to change this so that instead, the image is stored and
processed locally on the RP2040 so that it can then be directly drawn on the VGA.
This entailed not only getting rid of the USB protocols that were implemented,
but also replacing the JPEG format that the demo uses with RAW8. Since JPEG is
already compressed, it will be very hard to parse into pixel data, hence why we
use RAW8 instead. Additionally, we referenced some code written by an MEng
student, Yibo Yang, which implemented a PIO driver for the OV5642 camera to be
used with the RP2040 [2]. While this code was not complete, it was a valuable
resource to us for understanding how the camera interface works.
Program/Hardware Design
We only had 3 main hardware components that were used in our final project: the
Pico, the ArduCAM, and the VGA monitor. We connected the VGA monitor to the Pico
the same way we did in Labs 2 and 3, as is shown in the schematic below. The
ArduCAM has both SPI and I2C connections to the Pico which is also shown below.
Schematic
To get started with communicating with the ArduCAM, we referenced the ArduCAM
example code available on their Git (
github.com/ArduCAM/PICO_SPI_CAM
). This code
is set up for an RP2040 to communicate with the camera, and then forward the
picture information to a computer over UART for the computer to process the image.
The main part that we used this code for was the initialization of the camera,
as we wanted to either send the pixel information to the VGA driver, or find a way
to save important information onto the RP2040 and the rest of this code immediately
forwarded compressed JPEG information to the computer to be uncompressed.
The other code that we used was Professor Adams' VGA graphics driver for the RP2040
and the associated PIO programs. This was used as it was the quickest way for us to
get set up with getting visual feedback from the ArduCAM. We also used Bruce Land's
protothreads implementation to allow us to have one thread for serial communication
to change camera parameters and program functionality and another thread for processing
camera information. Other than those programs, we used the Pico C SDK for other
functionality like SPI and I2C.
From examining the example code, we decided to write our main project code in C++, as
the ArduCAM example code uses a camera object for its functions to control the camera,
and we wanted to keep the camera controls to be similar to the examples for the highest
chance of working. This decision was tricky at first, as we were attempting to add VGA
functionality to the provided C++ code from ArduCAM, but we eventually found out it was
easier to start with a VGA demo and changing the file type to C++ (this didn't break the
functionality) and then adding the Arducam code to it. We did learn that you have to add
an ' extern “C” ' to the includes when the included files are written in C and you are
including it in a C++ file.
As for the code's structure itself, we had one thread that was for serial communication
over PuTTY and another for the actual camera setup and image capturing. As we did not
want our communication over serial to affect the speed of the camera transferring data
to the RP2040, we only had the camera's thread yield for 5000usec, as we were willing to
have the tradeoff of slow printing and user input so we could have optimal camera performance.
CAMERA THREAD:
The bulk of our coding went into the camera thread, where we handle the setup and communication
with the camera, and the processing of data from the camera. This entire part of code took the
most work, as the ArduCAM documentation is not very in depth, or completely missing. It took a
lot of trial and error, digging through forum posts, and reading the sdk's implementation of
functions to get it working.
At the start of this function, we reset the Complex Programmable Logic Device (CPLD) of the
camera, which is done in the example code, presumably to get the camera into a known state on a
new session. Then, we begin to verify the functionality of SPI and I2C. For this camera, I2C is
used for changing camera parameters like brightness and contrast, while SPI is the protocol used
for the data transfer of the photo information from the camera's buffer where it loads the pixel
information. For checking that SPI is functional, we write a number (0x55) to the ArduCAM's test
register (ARDUCHIP_TEST1 or 0x00). We then read this value and make sure that it has been changed
by this writing, meaning that we have successfully completed a SPI transaction. Then, for
checking the I2C communication we read the camera's model number, which is stored in two
registers on the camera module over I2C. Once these two steps are finished, we know that the
camera is communicating correctly.
The next step of startup is one that took us some time to figure out also, the format of the image.
The ArduCAM documentation says that the camera can capture in RGB, RAW, and JPEG. Unfortunately,
it does not seem like RGB is fully implemented in the ArduCAM sdk for the OV5640. Because of this,
we decided to set the camera's format to RAW, which is the RAW8 image format. This image format
has 2 bitx for red, 2 bits for blue, and 4 bits for green. We tried for a while to get RGB working,
but it probably would have needed a significant amount of changing the sdk to get working.
We then enter the capture loop, which continuously happens for the rest of the program. At the start
of each capture, we flush the fifo, meaning the camera clears out the buffer that the previous image
(if there is one) is stored in. We then clear the fifo flag which appears when a capture is complete,
and then command the camera to start taking an image. Next, we wait until the camera's bit that
corres
Project Introduction
The goal of our project was to implement an interface for the Arducam OV5642
with the Raspberry Pi Pico. We want it to be able to store image pixel information
and to be able to display images taken with the camera on a VGA. Our intent for
this project is to get it working and well documented so that it can be used for
future RP2040 projects that may want to integrate a camera. We also wanted to develop
a way to take information from the camera, identify useful information, and save it
on the RP2040's limited memory.
High Level Design
Our initial idea for our project was to implement eye tracking using the
Raspberry Pi Pico. However, as we researched this option further, we realized
that just getting the camera to work would be a massive endeavor on its own.
So, we adjusted our goal to be to implement an interface for a camera for the
RP2040, specifically the ArduCam OV5642. This program must read an image from
the camera, draw its result on a VGA screen, and be able to store some image data,
which could then be hypothetically used for some rudimentary object detection or
similar applications.
High Level Diagram
The OV5642 camera communicates with the RP2040 using 2 different methods: an I2C
interface is used to configure the camera (eg. writing to registers that control
image format, camera settings, number of frames to capture, etc.), and an SPI
interface is used to transfer image data from the camera to the RP2040. For each
capture, the RP2040 then reads the data for each pixel from the SPI FIFO, which
is then compressed to be stored and drawn on the VGA (depending on the mode). If
the program is configured to just draw the image capture on the VGA, the RAW8 8
bit color format must be compressed down to 3 bits, and the image is not stored.
Otherwise, if the image is stored, the image must be compressed to a black and
white image with a minimal number of pixels. The camera settings are also
adjustable via serial terminal.
A major hardware/software tradeoff we had to work around was the RP2040's
extremely limited memory. The microcontroller has only 264 kB of SRAM memory to
work with, which wasn't even enough to store a single black and white image of
640x480 resolution (the resolution of our VGA). Because of this, we had to find
a way to significantly compress image data from the camera. Rather than reduce
the resolution of the image, we opted to capture only the notable features of
the image, such as lines and edges. This way, the image is still decently clear
and recognizable, while also taking up significantly less space in memory.
Additionally, this has the added benefit of capturing the notable features
that may be needed for object detection. Another possible workaround for this
memory issue could be to use some form of external memory such as an SD card or
external SRAM, but we did not have time or resources to implement this.
ArduCAM has some demo code for the camera for the RP2040, which we used as a
starting point [1]. However, there were some major changes we had to make to
this code to make it usable for our purposes. The demo merely takes a capture
with the camera and sends it to a program on an external computer (via USB) to be
displayed. We had to change this so that instead, the image is stored and
processed locally on the RP2040 so that it can then be directly drawn on the VGA.
This entailed not only getting rid of the USB protocols that were implemented,
but also replacing the JPEG format that the demo uses with RAW8. Since JPEG is
already compressed, it will be very hard to parse into pixel data, hence why we
use RAW8 instead. Additionally, we referenced some code written by an MEng
student, Yibo Yang, which implemented a PIO driver for the OV5642 camera to be
used with the RP2040 [2]. While this code was not complete, it was a valuable
resource to us for understanding how the camera interface works.
Program/Hardware Design
We only had 3 main hardware components that were used in our final project: the
Pico, the ArduCAM, and the VGA monitor. We connected the VGA monitor to the Pico
the same way we did in Labs 2 and 3, as is shown in the schematic below. The
ArduCAM has both SPI and I2C connections to the Pico which is also shown below.
Schematic
To get started with communicating with the ArduCAM, we referenced the ArduCAM
example code available on their Git (
github.com/ArduCAM/PICO_SPI_CAM
). This code
is set up for an RP2040 to communicate with the camera, and then forward the
picture information to a computer over UART for the computer to process the image.
The main part that we used this code for was the initialization of the camera,
as we wanted to either send the pixel information to the VGA driver, or find a way
to save important information onto the RP2040 and the rest of this code immediately
forwarded compressed JPEG information to the computer to be uncompressed.
The other code that we used was Professor Adams' VGA graphics driver for the RP2040
and the associated PIO programs. This was used as it was the quickest way for us to
get set up with getting visual feedback from the ArduCAM. We also used Bruce Land's
protothreads implementation to allow us to have one thread for serial communication
to change camera parameters and program functionality and another thread for processing
camera information. Other than those programs, we used the Pico C SDK for other
functionality like SPI and I2C.
From examining the example code, we decided to write our main project code in C++, as
the ArduCAM example code uses a camera object for its functions to control the camera,
and we wanted to keep the camera controls to be similar to the examples for the highest
chance of working. This decision was tricky at first, as we were attempting to add VGA
functionality to the provided C++ code from ArduCAM, but we eventually found out it was
easier to start with a VGA demo and changing the file type to C++ (this didn't break the
functionality) and then adding the Arducam code to it. We did learn that you have to add
an ' extern “C” ' to the includes when the included files are written in C and you are
including it in a C++ file.
As for the code's structure itself, we had one thread that was for serial communication
over PuTTY and another for the actual camera setup and image capturing. As we did not
want our communication over serial to affect the speed of the camera transferring data
to the RP2040, we only had the camera's thread yield for 5000usec, as we were willing to
have the tradeoff of slow printing and user input so we could have optimal camera performance.
CAMERA THREAD:
The bulk of our coding went into the camera thread, where we handle the setup and communication
with the camera, and the processing of data from the camera. This entire part of code took the
most work, as the ArduCAM documentation is not very in depth, or completely missing. It took a
lot of trial and error, digging through forum posts, and reading the sdk's implementation of
functions to get it working.
At the start of this function, we reset the Complex Programmable Logic Device (CPLD) of the
camera, which is done in the example code, presumably to get the camera into a known state on a
new session. Then, we begin to verify the functionality of SPI and I2C. For this camera, I2C is
used for changing camera parameters like brightness and contrast, while SPI is the protocol used
for the data transfer of the photo information from the camera's buffer where it loads the pixel
information. For checking that SPI is functional, we write a number (0x55) to the ArduCAM's test
register (ARDUCHIP_TEST1 or 0x00). We then read this value and make sure that it has been changed
by this writing, meaning that we have successfully completed a SPI transaction. Then, for
checking the I2C communication we read the camera's model number, which is stored in two
registers on the camera module over I2C. Once these two steps are finished, we know that the
camera is communicating correctly.
The next step of startup is one that took us some time to figure out also, the format of the image.
The ArduCAM documentation says that the camera can capture in RGB, RAW, and JPEG. Unfortunately,
it does not seem like RGB is fully implemented in the ArduCAM sdk for the OV5640. Because of this,
we decided to set the camera's format to RAW, which is the RAW8 image format. This image format
has 2 bitx for red, 2 bits for blue, and 4 bits for green. We tried for a while to get RGB working,
but it probably would have needed a significant amount of changing the sdk to get working.
We then enter the capture loop, which continuously happens for the rest of the program. At the start
of each capture, we flush the fifo, meaning the camera clears out the buffer that the previous image
(if there is one) is stored in. We then clear the fifo flag which appears when a capture is complete,
and then command the camera to start taking an image. Next, we wait until the camera's bit that
corres
Technologies used
Hardware components
- RP2040
- Raspberry Pi Pico
- SD card
- camera module
Software & tools
- C
- Arduino IDE
Project demo video
What you get
- Working project / hardware kit, tested before delivery
- Complete source code with explanation
- Project demo and guidance for your viva
- Project report, PPT and IEEE paper support (on request)
Delivery & Payment
Delivery takes a minimum of two weeks from the date your inquiry is confirmed.
Payment is in two parts:
• 50% advance to start the project
• Remaining 50% before delivery
Note:
• Documentation and PPT are not included by default
• If you need documentation/PPT, it can be arranged for extra time and cost
We'll confirm the exact timeline and cost with you after reviewing your requirements.
Related Embedded Systems projects

Embedded Systems
Gas Leakage Detector Using Arduino
A budget-friendly LPG gas leak detector built with an Arduino and MQ-5 gas sensor, triggering a buzzer and LED when unsafe gas levels are de...
View project
Embedded Systems
Simple Alarm System
A beginner-friendly home alarm with PIR motion sensing, keypad PIN entry, and separate entry/exit timing delays, built to be easy to expand.
View project
Embedded Systems
Ultrasonic Sensor Project with Arduino UNO Q
A beginner-friendly first Arduino UNO Q project: a servo-swept ultrasonic sensor that renders a live sweeping radar display in a web browser...
View project
Embedded Systems
3D Audio Localization
[Fall 2025] We designed a real-time embedded system that localizes sound sources in three dimensions and visualizes them live using a four-m...
View project