Piano Tiles 2
[Fall 2023] The project aims to bring the popular mobile game "Piano Tiles 2" to life through a physical hardware version, enhancing the gaming experience and challenging users' hand-eye coordination and reflexes. This interactive adaptation will use a VGA screen to display descending tiles, which players will intercept using flex sensors attached to their fingers. The game's difficulty escalates with the player's score, offering a progressively challenging and engaging experience. This innovati
- Suitable forB.Tech/B.E Embedded Systems students
- Build time4-6 weeks
- LevelAdvanced
- Available atAjvika Labs, Kakinada
About this project
Project Introduction
The project aims to bring the popular mobile game "Piano Tiles 2" to life through a physical hardware version, enhancing the gaming experience and challenging users' hand-eye coordination and reflexes. This interactive adaptation will use a VGA screen to display descending tiles, which players will intercept using flex sensors attached to their fingers. The game's difficulty escalates with the player's score, offering a progressively challenging and engaging experience. This innovative approach not only aims to recreate the digital game in a physical format but also seeks to make it accessible and enjoyable for a broad audience.
High Level Design
"Piano Tiles," a single-player mobile game, was developed by Hu Wen Zeng at Umoni Studio and released on March 28, 2014.
[1]
Our project aims to reimagine this game using flex sensors, enabling users to experience the touchscreen control aspect of the game without an actual touchscreen, thus offering a novel gaming experience.
In the game, tiles cascade down the screen, and players must flex their fingers at precise moments to match the tiles' arrival at the screen's bottom. The game features four tiles, requiring coordination of four fingers. Successful hits are rewarded with distinctive sounds, while misses result in an alternate sound, signaling game over and prompting a restart. Players earn a point for each successful hit, and every ten points, the tile colors shift, adding visual variety to the gameplay.
The sound generation part of the design was accomplished utilizing the implementations of the swooping/chirping birdsong sounds created using DDS (Direct digital synthesis) code from lab 1.
The Direct Digital Synthesis (DDS) algorithm is based on the concept that a variable overflowing is equivalent to one rotation of a phasor. This method involves projecting a rotating phasor onto an axis to generate a sine wave. In DDS, an accumulator represents the phasor's angle, and overflowing this accumulator signifies a full phasor rotation. The algorithm operates by incrementing the accumulator with each audio sample, determining the sine wave's frequency. The frequency output depends linearly on the accumulator's increment value. The precision of this synthesis method can vary based on the accumulator's size, influencing the harmonic distortion in the generated tones. DDS can be utilized in various applications beyond sound synthesis, demonstrating its versatility.
[2]
The mathematical synthesis of birdsong, specifically the swoop and chirp sounds, involves using Direct Digital Synthesis (DDS) to accurately generate audio frequencies. The swoop sound is created using a sine wave formula, where the frequency changes over time according to a sinusoidal pattern. The chirp sound, on the other hand, is modeled using a quadratic equation to represent its rapid frequency shift from low to high.
[3]
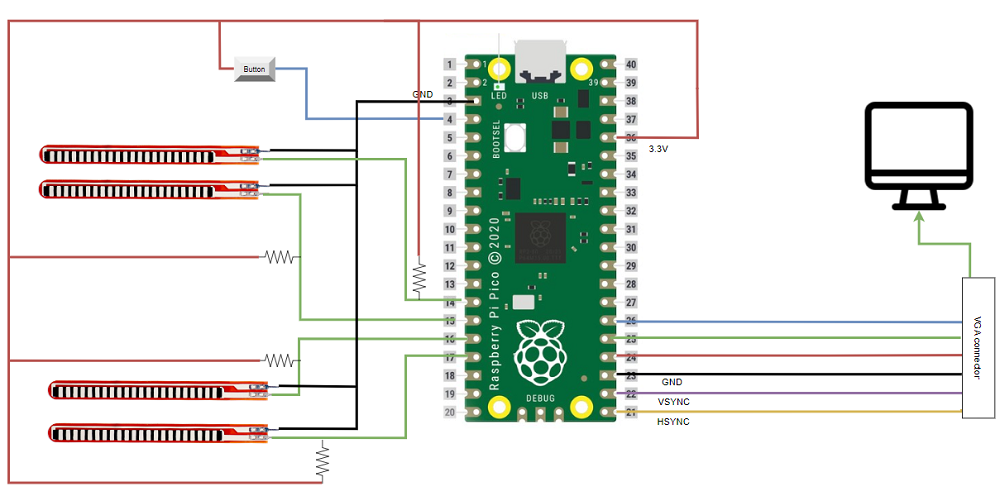
Figure 1. High-level Block Diagram of the design set-up
The comprehensive hardware architecture of the design is illustrated in Figure 1, with detailed coverage of the audio setup (DAC) circuit in subsequent sections. The system configuration comprises four flex sensors linked to a Raspberry Pi through resistors. For game control, a button connected to the RP2040 facilitates game restarts following a game-over scenario. Notably, the flex sensors were meticulously wired with a specific resistor calibration. In our specific design, each sensor necessitated a distinct resistance level, typically falling within the range of 20k ohms to 25k ohms.
Software Design
Given the project's significant reliance on visual elements, the software aspect of the application played a crucial role and encompassed several pivotal blocks. Let's delve into each of these code blocks individually.
main():
The main function launches the animation threads and initializes peripherals like the video graphics adapter and the GPIO pins for sensor inputs. As the program's starting point, it coordinates the initialization almost all the communication channels being used, Interrupt Service routines (ISR) and thread (proto thread).
Controlling the visual elements:
The visualisation part of the software was built around Protothreads, enabling concurrent operations for better
performance. In the process of plotting on the VGA screen, the primary objective of the visual control code is to effectively orchestrate the dynamic movement and interaction of colored tiles within the game environment. Each distinct color, namely cyan, yellow, green, and blue, corresponds to a specific lane, signifying a unique tile type. The variables utilized in this code block are intuitively named, facilitating clarity in their respective roles. The core logic of the code involves assessing the positions of these tiles by considering their indices and incorporating a speed factor denoted as speed_fact.
As the execution progresses, the code continually monitors the indices of the tiles, and upon surpassing a predefined threshold, initiates a sequence of actions. These actions encompass critical game dynamics, including the resetting of indices, score updates, alteration of the color scheme in designated regions of the screen, and the management of game-over scenarios. Crucially, the code's response mechanisms are intricately linked to the state of the flex sensors, introducing a layer of interactivity based on user input.
Producing sound:
This code for producing sound operates within an Interrupt Service Routine (ISR) callback, generating sound through a Digital-to-Analog Converter (DAC). Upon GPIO activation (gpio_put(ISR, 1)), the code calculates the sine wave's frequency based on a dynamic amplitude (current_amplitude_0) and phase increment (phase_incr_main_3). The phase accumulator (phase_accum_main_0) is updated, and the sine wave is sampled to produce the DAC output (DAC_output_0).
The amplitude undergoes dynamic adjustment during the sound generation process. It ramps up during the attack phase (count_0 < ATTACK_TIME) and ramps down during the decay phase (count_0 > BEEP_DURATION - DECAY_TIME). The resulting DAC output is masked with control bits and sent through SPI communication. The counter (count_0) is incremented, and the state transitions when the sound duration (BEEP_DURATION) is reached. Upon completion, the ISR callback is reset (gpio_put(ISR, 0)), signaling the end of the sound generation.
Fixed point Macros:
The code uses fixed-point arithmetic for efficient numerical calculations. The macros provided help in
performing fixed-point operations and for interconversion between fix, float, and integers as per
requirement.
The preceding explanation provides an overview of the intricate logic governing crucial segments of the code, addressing challenging aspects of the implementation. Additionally, the code seamlessly integrates functionalities for buttons and flex sensors by straightforwardly reading GPIO pins. For a detailed reference to the entire project code, including comprehensive comments, please refer to Appendix 4 located at the end of the webpage.
A valuable resource that significantly contributed to our project was a publicly available GitHub repository. We found substantial assistance and incorporated certain code snippets from the repository at Ruturajn/ese5190-falling-tiles
[4]
Hardware Design
Key hardware components of the project are follows
3D printed flex sensor ring:
To ensure the accurate placement of flex sensors on the fingers for optimal performance, we opted to utilize 3D printing technology for crafting a dedicated ring. This 3D printed flex sensor ring serves a dual function by securely enclosing the flex sensors in the precise finger location and providing a comfortable fit for users during gameplay. The design of the ring draws inspiration from an open-source model available on the internet
[5]
, contributing to the project's accessibility and adaptability.
Figure 2. Image of the case for flex-sensor
Integration of Flex Sensors:
Incorporating four flex sensors aligned with each lane on the game's visual side, we encountered the challenge of having more sensors than available ADCs on the RP2040 board, prompting a choice between using a multiplexer (MUX) or reducing lanes to three. Despite an attempt to integrate a MUX for increased input capacity, it fell short of providing the required resolution. Consequently, we opted for a digital pin approach, where a pin would register as HIGH if the voltage exceeded approximately 1.8V (approximate value calculated by experimentation), indicating a bent finger. To ensure the accuracy of this threshold, we designed and calibrated a circuit that included carefully selected resistance values (can be seen in circuit in the high level design section). This circuit guaranteed that the threshold aligned precisely with the desired degree of flex detected by the flex sensor, ensuring reliable and responsive gameplay.
Setup for integration of Audio:
For efficient communication with the digital-to-analog converter (DAC), we opted for SPI communication, establishing a streamlined connection to the Raspberry Pi Pico. The DAC, an external chip to the Pi Pico, facilitated the conversion of voltage signals. The DAC's two audio outputs were then directed to a single audio jack which was connected to a speaker, allowing the production of sound.
Figure 3. Circuit setup for audio output
VGA setup:
The VGA screen connection requires careful attention, as outlined in the provided corresponding table. This detail ensures proper setup and understanding of the full functionality of the VGA interface in the project.
VGA Connector Name
GPIO #
Purpose
HSYNC
HSYNC is one of the two digital synchronization pins required to drive a VGA screen.
Its primary function is to signal the VGA display when to move to a new row of pixels.
The HSYNC signal remains active (logic level high) for 640 pixel clock cy
Technologies used
Hardware components
- RP2040
- Raspberry Pi Pico
- VGA display
- compass
- speaker
- DAC
- ADC
Software & tools
- C
- Arduino IDE
Project demo video
What you get
- Working project / hardware kit, tested before delivery
- Complete source code with explanation
- Project demo and guidance for your viva
- Project report, PPT and IEEE paper support (on request)
Related Embedded Systems projects

Gas Leakage Detector Using Arduino
A budget-friendly LPG gas leak detector built with an Arduino and MQ-5 gas sensor, triggering a buzzer and LED when unsafe gas levels are de...
View project
Simple Alarm System
A beginner-friendly home alarm with PIR motion sensing, keypad PIN entry, and separate entry/exit timing delays, built to be easy to expand.
View project
Ultrasonic Sensor Project with Arduino UNO Q
A beginner-friendly first Arduino UNO Q project: a servo-swept ultrasonic sensor that renders a live sweeping radar display in a web browser...
View project
3D Audio Localization
[Fall 2025] We designed a real-time embedded system that localizes sound sources in three dimensions and visualizes them live using a four-m...
View project