Nuclear fission simulator
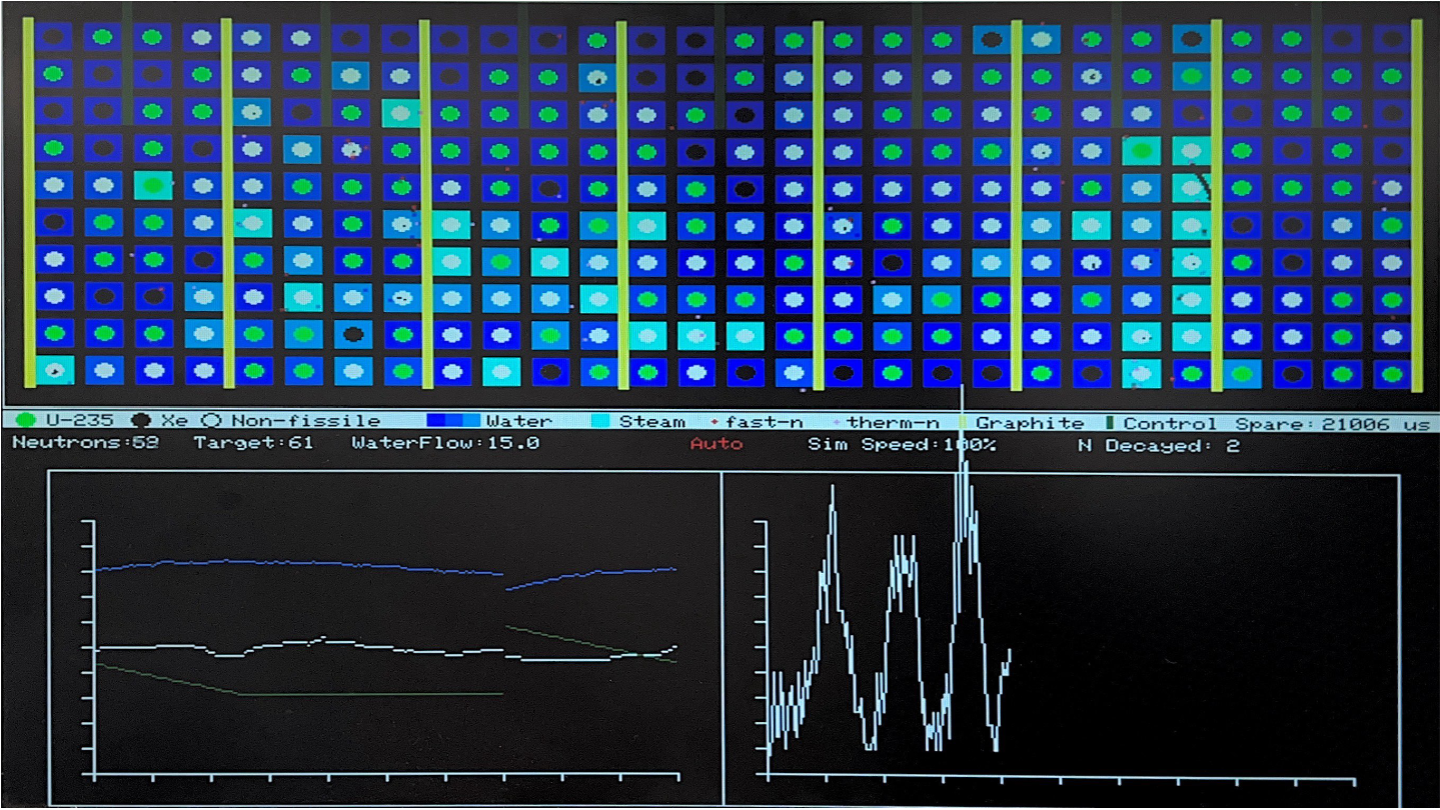
[Spring 2025] Our Project simulates the RBMK Nuclear Fission Reactor, notable for the infamous Chernobyl Disaster. The concept for this project was inspired by theChernobyl Visually ExplainedVideo by Higgsino physics. Our Simulation is running on a Raspberry Pi Pico using the RP2040 Microcontroller, displaying visuals to a VGA display, synthesizing Geiger Counter audio via DMA channels, and enabling user input via buttons and encoders.
- Suitable forB.Tech/B.E Embedded Systems students
- Build time4-6 weeks
- LevelIntermediate
- Available atAjvika Labs, Kakinada
About this project
and another group member
ECE 5730 Digital System Design using Microcontrollers
Cornell University
Nuclear Fission Simulator
using Raspberry Pi Pico
Our Project simulates the RBMK Nuclear Fission Reactor, notable for the infamous Chernobyl Disaster. The concept for this project was inspired by the
Chernobyl Visually Explained
Video by Higgsino physics. Our Simulation is running on a Raspberry Pi Pico using the RP2040 Microcontroller, displaying visuals to a VGA display, synthesizing Geiger Counter audio via DMA channels, and enabling user input via buttons and encoders.
High Level Design
Our project was heavily inspired by the
Chernobyl Visually Explained
video. We aimed to recreate all parts of the simulation on the RP2040 using the 4-bit color VGA library. The simulation models the Soviet-era RBMK nuclear fission reactor. The nuclear fission of Uranium-235 is represented by the following equation:
We simulate a representative section of the fission reactor, including Uranium fuel, neutrons, and various other moderators. All decayed materials are represented as non-fissile nuclei in our simulation.
In addition to the simulation and real time statistics, we designed and implemented a user interface that can adjust various parameters of the simulation, including toggling automatic/manual control, adjusting the reactor cooling, target power, simulation speed, etc. Through this control panel, we are able to simulate both controlled and uncontrolled chain reactions.
Core 0 and Core 1 Threads
Our program is organized as follows: The main simulation and animation takes place on core 0 of the RP2040. In addition, it draws timing sensitive statistics like the frame timing. Core 1 handles the peripheral logic like creating and drawing the graphs in the lower half of the screen. Core 1 also contains additional threads that poll the various hardware inputs. This organizaiton takes advantage of the multi-core architecture of the RP2040.
Detailed Design
Software Design
Understand how we navigated programming the simulation and how the code actually works.
More
Hardware Design
Housing Design and Manufacturing, Component Selection, and System Integration
More
Results and Conclusions
What we achieved, what went well, and what didn't.
More
Appendix
Permisions, Code, Skematics, References, etc.
More
Technologies used
Hardware components
- RP2040
- Raspberry Pi Pico
- VGA display
- IMU
Software & tools
- C
- Arduino IDE
Project demo video
What you get
- Working project / hardware kit, tested before delivery
- Complete source code with explanation
- Project demo and guidance for your viva
- Project report, PPT and IEEE paper support (on request)
Related Embedded Systems projects

Gas Leakage Detector Using Arduino
A budget-friendly LPG gas leak detector built with an Arduino and MQ-5 gas sensor, triggering a buzzer and LED when unsafe gas levels are de...
View project
Simple Alarm System
A beginner-friendly home alarm with PIR motion sensing, keypad PIN entry, and separate entry/exit timing delays, built to be easy to expand.
View project
Ultrasonic Sensor Project with Arduino UNO Q
A beginner-friendly first Arduino UNO Q project: a servo-swept ultrasonic sensor that renders a live sweeping radar display in a web browser...
View project
3D Audio Localization
[Fall 2025] We designed a real-time embedded system that localizes sound sources in three dimensions and visualizes them live using a four-m...
View project