MIDI file generation from microphone input
To accomplish this, we utilized an FFT, designed a note categorization system, and used this system to generate corresponding MIDI messages that can be processed by a digital audio workstation.
- Suitable forB.Tech/B.E Embedded Systems students
- Build time4-6 weeks
- LevelBeginner
- Available atAjvika Labs, Kakinada
About this project
For our project, we designed a system to generate sheet music based upon inputs detected by a microphone and processed by our microcontroller.
To accomplish this, we utilized an FFT, designed a note categorization system, and used this system to generate corresponding MIDI messages that can be processed by a digital audio workstation. We also investigated the prospect of utilizing a
machine-learning model to improve the note categorization process.
High-Level Design
Our project is split into three major parts: frequency identification, note classification, and MIDI conversion. In order to accomplish audio identification, we utilize a microphone and ADC converter to feed audio information into a fixed-point
implementation of an FFT. The fixed point implementation was provided to us by Dr. Adams earlier on in the semester, however, we changed it slightly so that we could detect every peak instead of just one maximum frequency. From the output of the
FFT, we implemented note classification which classifies bins from FFT that met certain conditions into actual music notes. In order for a sound to be classified, its respective bin from the FFT must reach a certain threshold, chosen by us through
observation, so that we do not incorrectly detect and classify noise as a viable note. Additionally, the respective bin must be a peak, meaning it must have the largest magnitude in comparison to its neighbors. This requirement gives us the
functionality to not make the mistake of classifying several notes at once.
Once those requirements are met, we can then actually classify the bins we have detected in our sound as notes. On startup, we populate a table full of notes and their respective frequency. In order to classify notes, we compare the frequency
of the sound heard to those of the frequencies in the note lookup table. We do this by comparing the difference between the bin and each frequency in our lookup table iteratively, and retaining the index of the note which has the least distance
between itself and the bin under examination. That index can then be used to return the actual note played and which octave it is played in.
Our next challenge was the implementation of MIDI. MIDI is a standardized protocol so that music can be played and edited through computers and various instruments. The way MIDI operates is by a series of events, which can range from copyright
information to changes in time signature, but the ones we exclusively care about for the purpose of this project are note events, which play notes in the MIDI protocol. MIDI note events work by activating and deactivating a note, and in general
MIDI events are timed by the change in time between MIDI events rather than the absolute time that has occurred in a song. Thus, in order to effectively turn a note into MIDI, we must be able to signal when a note is turned on or off, and keep
track of the time between events, called delta time. Furthermore, due to the poor quality of our microphone, we wanted to implement a debouncing functionality, which would only allow us to convert notes heard to MIDI if and only if the note was
heard on or off for more than a certain number of cycles. To accomplish this on the microcontroller, we had to implement a data structure that can hold values corresponding to whether the note had just been turned on or off, and how many sequential
cycles the note had been held on or off. If a note passed through our debugging logic and was a rising or falling edge of a note, we would trigger the correct MIDI event.
Additionally, we needed a method to determine the delta time. To do this, we implemented a repeating timer interrupt that would increment a global variable that would correspond to the current time. An unexpected challenge was choosing how fast this
interrupt should run. We needed the time to be accurate enough so that it could differentiate notes heard between subsequent cycles on the microcontroller, but not so fast that it would significantly increase our cycle time. The former issue was a
slightly complicated matter. To determine how fast our cycle time was, we configured a GPIO pin to toggle every cycle. We then connected that GPIO pin to an oscilloscope and read the duty cycle to determine our cycle time. Ultimately we found that a
timer interrupt running at 40kHz was optimal for our purposes. This delta time is important because it tells us the time between each note and how long a note is played. In contrast, resolving the latter issue was simple because we were able to utilize
the Raspberry Pi Pico's second core to handle timing while devoting the first core solely to our music classification.
The last part to implement to get MIDI to work properly was to generate the header and track chunks of the MIDI file, which contains information about the song as a whole and the track that will be played. Unfortunately, it wasn't until deep into the
project that we realized that MIDI track chunks are defined by their size, and thus we cannot easily add events to a track dynamically without a device specifically able to receive this information. Originally, we wanted to generate a MIDI file in real
time but in order for a MIDI file to be successfully parsed with the tools available to us, it had to have more metadata given with the MIDI file than merely a series of note events. Thus, though our project is capable of streaming valid MIDI events
in real-time, perhaps via MIDI packets, it cannot make a valid MIDI file in real-time due to the requirement to define the length. Essentially, to make the file, we would calculate all the MIDI note events in real-time and store them in an array of chars.
Upon completion of the song, which occurs when the 'STOP_TRACK' pushbutton is pressed, we would append the MIDI file header and track chunks with correct information about the song that it just interrupted, as well as append the required end track event.
We thus store MIDI information about the song we just played on the Raspberry Pi Pico that later can be turned into a readable MIDI file.
Hardware Design
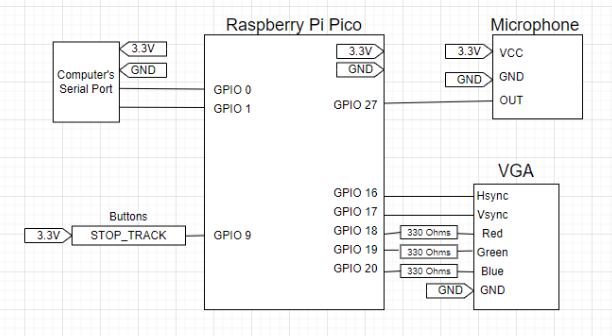
Our final project consisted of very few hardware components because of the nature of the project. The only components required for our project to work are the microphone, the ‘STOP_TRACK’ button, and the serial communication port. The VGA display is used
for debugging and verification purposes.
The microphone is utilized to acquire audio samples so that we can feed them through an FFT to analyze. The microphone we used was a simple and cheap Electret Microphone Amplifier. This device has an embedded amplifier, which is controlled by a potentiometer
so that we tune it to change the sensitivity of the audio that is received. The microphone outputs an analog signal, which we feed to the ADC embedded in the Raspberry Pi Pico. Converting the audio output from analog to digital allows us to perform our
fixed point FFT, which will give us the information to classify the sounds we hear as notes.
The ‘STOP_TRACK’ pushbutton is another very simple component that is used to tell the microcontroller when the audio track has ended and to send the generated MIDI to the computer to be stored in a file. It is tied to a GPIO pin, which we poll to check
whether someone has pressed it. We use the Pico's UART serial's TX and RX GPIO pins to send the generated MIDI through serial UART communication to the computer.
Next, the VGA, although it is not a crucial part to make our final project run, it was very useful through the designing and implementation process to be able to verify our microcontroller is doing as we intended it to do. For example, we displayed
our FFT, note classifications, the time between notes, and more on the screen so we can visualize our code.
Lastly, although they are not shown in the figure above, we added some measures to reduce the noise coming from the microphone to improve our audio detection. First, we made sure our wires connected to the microphone were as short as possible to reduce
the amount of inductive coupled electromagnetic interference. Additionally, we added a small sheet of metal, connected to the board's ground, underneath our project to reduce the noise generated by the microcontroller. Placing the sheet of metal
underneath everything almost completely eliminated the low-frequency noise, generated by the Pi Pico, that was affecting our microphone. This allowed us to classify notes of very low frequency, which we were not able to do before these changes.
Software Design
One of the challenges of our project was to be able to listen to and classify audio in real-time. This means that our cycle time, or the time between each analysis of the recorded audio, must be short enough so that we never have loss in the audio. To
reduce our cycle time, we utilized a fixed-point FFT, which is significantly more efficient than its equivalent floating-point FFT. Additionally, our note classification logic, which would compute the distance between standard note frequencies, was
implemented in fixed-point. The utilization of the fixed-point arithmetic does result in some inaccuracy in calculations, but it ultimately did not have a significant or noticeable effect on the overall outcome. We verified it by playing pure tones
across a wide range of frequencies and verified that we computed the expected frequency and we matched it to the corresponding note.
To classify notes, we utilized a simple loop that would measure the distance between our sample frequency and the frequencies of notes. Because we generated a fixed-point FFT, we are able to perform fixed-point math for this distance cal
Technologies used
Hardware components
- Raspberry Pi Pico
- VGA display
- IMU
- microphone
- amplifier
- ADC
Software & tools
- C
- Arduino IDE
Project demo video
What you get
- Working project / hardware kit, tested before delivery
- Complete source code with explanation
- Project demo and guidance for your viva
- Project report, PPT and IEEE paper support (on request)
Related Embedded Systems projects

Gas Leakage Detector Using Arduino
A budget-friendly LPG gas leak detector built with an Arduino and MQ-5 gas sensor, triggering a buzzer and LED when unsafe gas levels are de...
View project
Simple Alarm System
A beginner-friendly home alarm with PIR motion sensing, keypad PIN entry, and separate entry/exit timing delays, built to be easy to expand.
View project
Ultrasonic Sensor Project with Arduino UNO Q
A beginner-friendly first Arduino UNO Q project: a servo-swept ultrasonic sensor that renders a live sweeping radar display in a web browser...
View project
3D Audio Localization
[Fall 2025] We designed a real-time embedded system that localizes sound sources in three dimensions and visualizes them live using a four-m...
View project