Interactive synth
[Spring 2025] A hands-on teaching synthesizer with real-time visual feedback to help beginners understand sound synthesis.
- Suitable forB.Tech/B.E Embedded Systems students
- Build time4-6 weeks
- LevelBeginner
- Available atAjvika Labs, Kakinada
About this project
Project Introduction
A hands-on teaching synthesizer with real-time visual feedback to help beginners understand sound
synthesis.
Summary
We developed an educational synthesizer device designed to simplify the learning process for new
electronic musicians. The device features six knobs that adjust the sound envelope and frequency, a
switch to toggle between sine and square waveforms, and a live VGA display that visualizes the current
waveform, frequency spectrum, and envelope stage. Our motivation stemmed from the observation that most
synthesizers are challenging for beginners, often requiring trial and error to understand their
controls. By providing immediate audio and visual feedback, our device demystifies core synthesis
concepts such as the ADSR envelope, frequency manipulation, and waveform differences, making sound
design more accessible.
Demonstration video
High Level Design
In our design, we utilize two cores. Core 0 primarily runs a single thread and handles two interrupt
service routines: one for receiving user input-where the user can rotate six potentiometers to adjust
parameters-and another that triggers every 20 microseconds to compute values and send them to the DAC
module via SPI transactions. Core 1 runs a separate thread that is primarily responsible for VGA signal
generation.
Rationale and Sources
Synthesizers are notoriously difficult for beginners due to their abstract controls and lack of
intuitive feedback. While high-end synthesizers may include small displays for envelope
visualization, entry-level and DIY models typically offer only labeled knobs and buttons, which can
be confusing. Our project aims to bridge this gap by combining tactile controls with clear visual
feedback, introducing users to essential synthesis concepts like attack, decay, sustain, and release
(ADSR).
Background Math
There are four stages in generating an ADSR signal: Attack, Decay, Sustain, and Release.
Attack:
In the attack stage, we use an exponential function to shape the amplitude
over time. The mathematical formulation is:
Amplitude
t
= 1 − exp(−t / τ)
The constant τ in the attack stage determines the rate at which the amplitude increases. We will
discuss how this value is chosen in a later section.
Decay:
In the decay stage, we use a linear function to shape the amplitude over
time. The mathematical formulation is:
Amplitude
t
= Amplitude
t-1
− (Max_Attack_Amplitude / Decay_Time)
Amplitude
t
= max(Amplitude
t
, Sustain_Level)
The maximum attack amplitude is determined based on the amplitude reached at the end of the attack
stage. The decay duration is set according to user input. If the computed amplitude falls below the
user-defined sustain level, it is clamped to the sustain level to ensure stability in the envelope.
Sustain:
In the sustain stage, the amplitude is held constant at the user-defined
sustain level. The mathematical formulation is:
Amplitude
t
= Sustain_Level
Both the sustain level and the sustain duration are determined based on user input.
Release:
In the release stage, the amplitude decreases linearly from the sustain
level to zero over a duration defined by the user-specified release time.
Amplitude
t
= Amplitude
t-1
− (Sustain_Level / Release_Time)
Both the sustain level and the release time are determined based on user input.
We applied both sine and square waveforms as the base signals that pass through the ADSR envelope to
demonstrate the system’s versatility in shaping different types of input signals. Only one waveform is
used at a time, and the user can select between sine and square waveforms via a switch input.
Logical Structure & Software Architecture
Thread Responsibilities
User Input Thread:
In this thread, six switches are used to allow the user to
select which parameter to adjust—namely, attack time, decay time, sustain time, sustain level,
release time, and frequency. An additional switch enables the user to choose between a sine wave or
a square wave as the base waveform. Six potentiometers are available to provide analog input, which
are read by the system in real time. The thread continuously monitors the switch states to identify
the active parameter and then reads the corresponding potentiometer value to update that parameter
dynamically.
VGA Thread:
In the VGA thread, an animation is displayed to indicate the current
stage of the ADSR envelope—Attack, Decay, Sustain, or Release. Additionally, the current amplitude
and output frequency are shown on the screen in real time, enhancing user engagement and
interaction. This thread continuously updates the display with the latest information to reflect
system behavior accurately.
Interrupt Service Routine (ISR)
The timer-based interrupt service routine (ISR) on core 0 handles the system’s core audio generation and
operates as a state machine implementing the ADSR (Attack, Decay, Sustain, Release) envelope.
The state machine includes two main stages: STATE_0 = 0, which generates sound, and STATE_0 = 1, which remains
silent. A counter continuously increments within the ISR and triggers a state transition when it reaches
a predefined threshold—resetting the counter and switching to the alternate stage.
In STATE_0 = 0, which is responsible for producing sound, the ISR calculates the amplitude using parameters
obtained from the user input thread. Based on the current counter value, it performs exponential growth
during the Attack phase, linear decay toward the user-defined Sustain level during the Decay phase,
maintains the amplitude in the Sustain phase, and applies a linear decrease during the Release phase.
The amplitude is then used in a Direct Digital Synthesis (DDS) routine to generate the waveform, either
sine or square, according to user selection, and the result is transmitted to the DAC via SPI for audio
output.
Inter-thread Communication
All threads share global variables such as attack time, decay time, sustain time, sustain level, release
time, and frequency, which are safely updated by the input thread and read by the ISR and VGA threads.
Overall Software Architecture
Core 0:
Runs audio ISR and real-time synthesis
Core 1:
Manages user input and VGA display threads
Hardware/Software Tradeoffs
The Raspberry Pi Pico we used provides only three analog inputs, but our design required six
potentiometers. To address this, we implemented a manual multiplexing solution using double-throw
switches: two switches per potentiometer pair-one to send a high/low signal to a GPIO pin and another to
select between potentiometer wipers for the analog input. Although unconventional and somewhat
confusing, this approach allowed us to meet our design goals within our time constraints.
We initially planned to use an MCP3008 ADC to expand our analog inputs, but we encountered difficulties
finding reliable libraries and did not have time to write our own driver. Given our concurrent
commitments to other projects, we opted for the manual multiplexing approach, which, while unorthodox,
proved effective and even enjoyable from a hardware-hacking perspective.
Program/Hardware Details
In this figure, "A" stands for attack time, "D" for decay time, "ST" for sustain time, "R" for release time, "SL" for sustain level, and "F" for frequency.
For example, to adjust the sustain level (labeled in blue), the user should rotate the potentiometer and set both switches to the correct position.
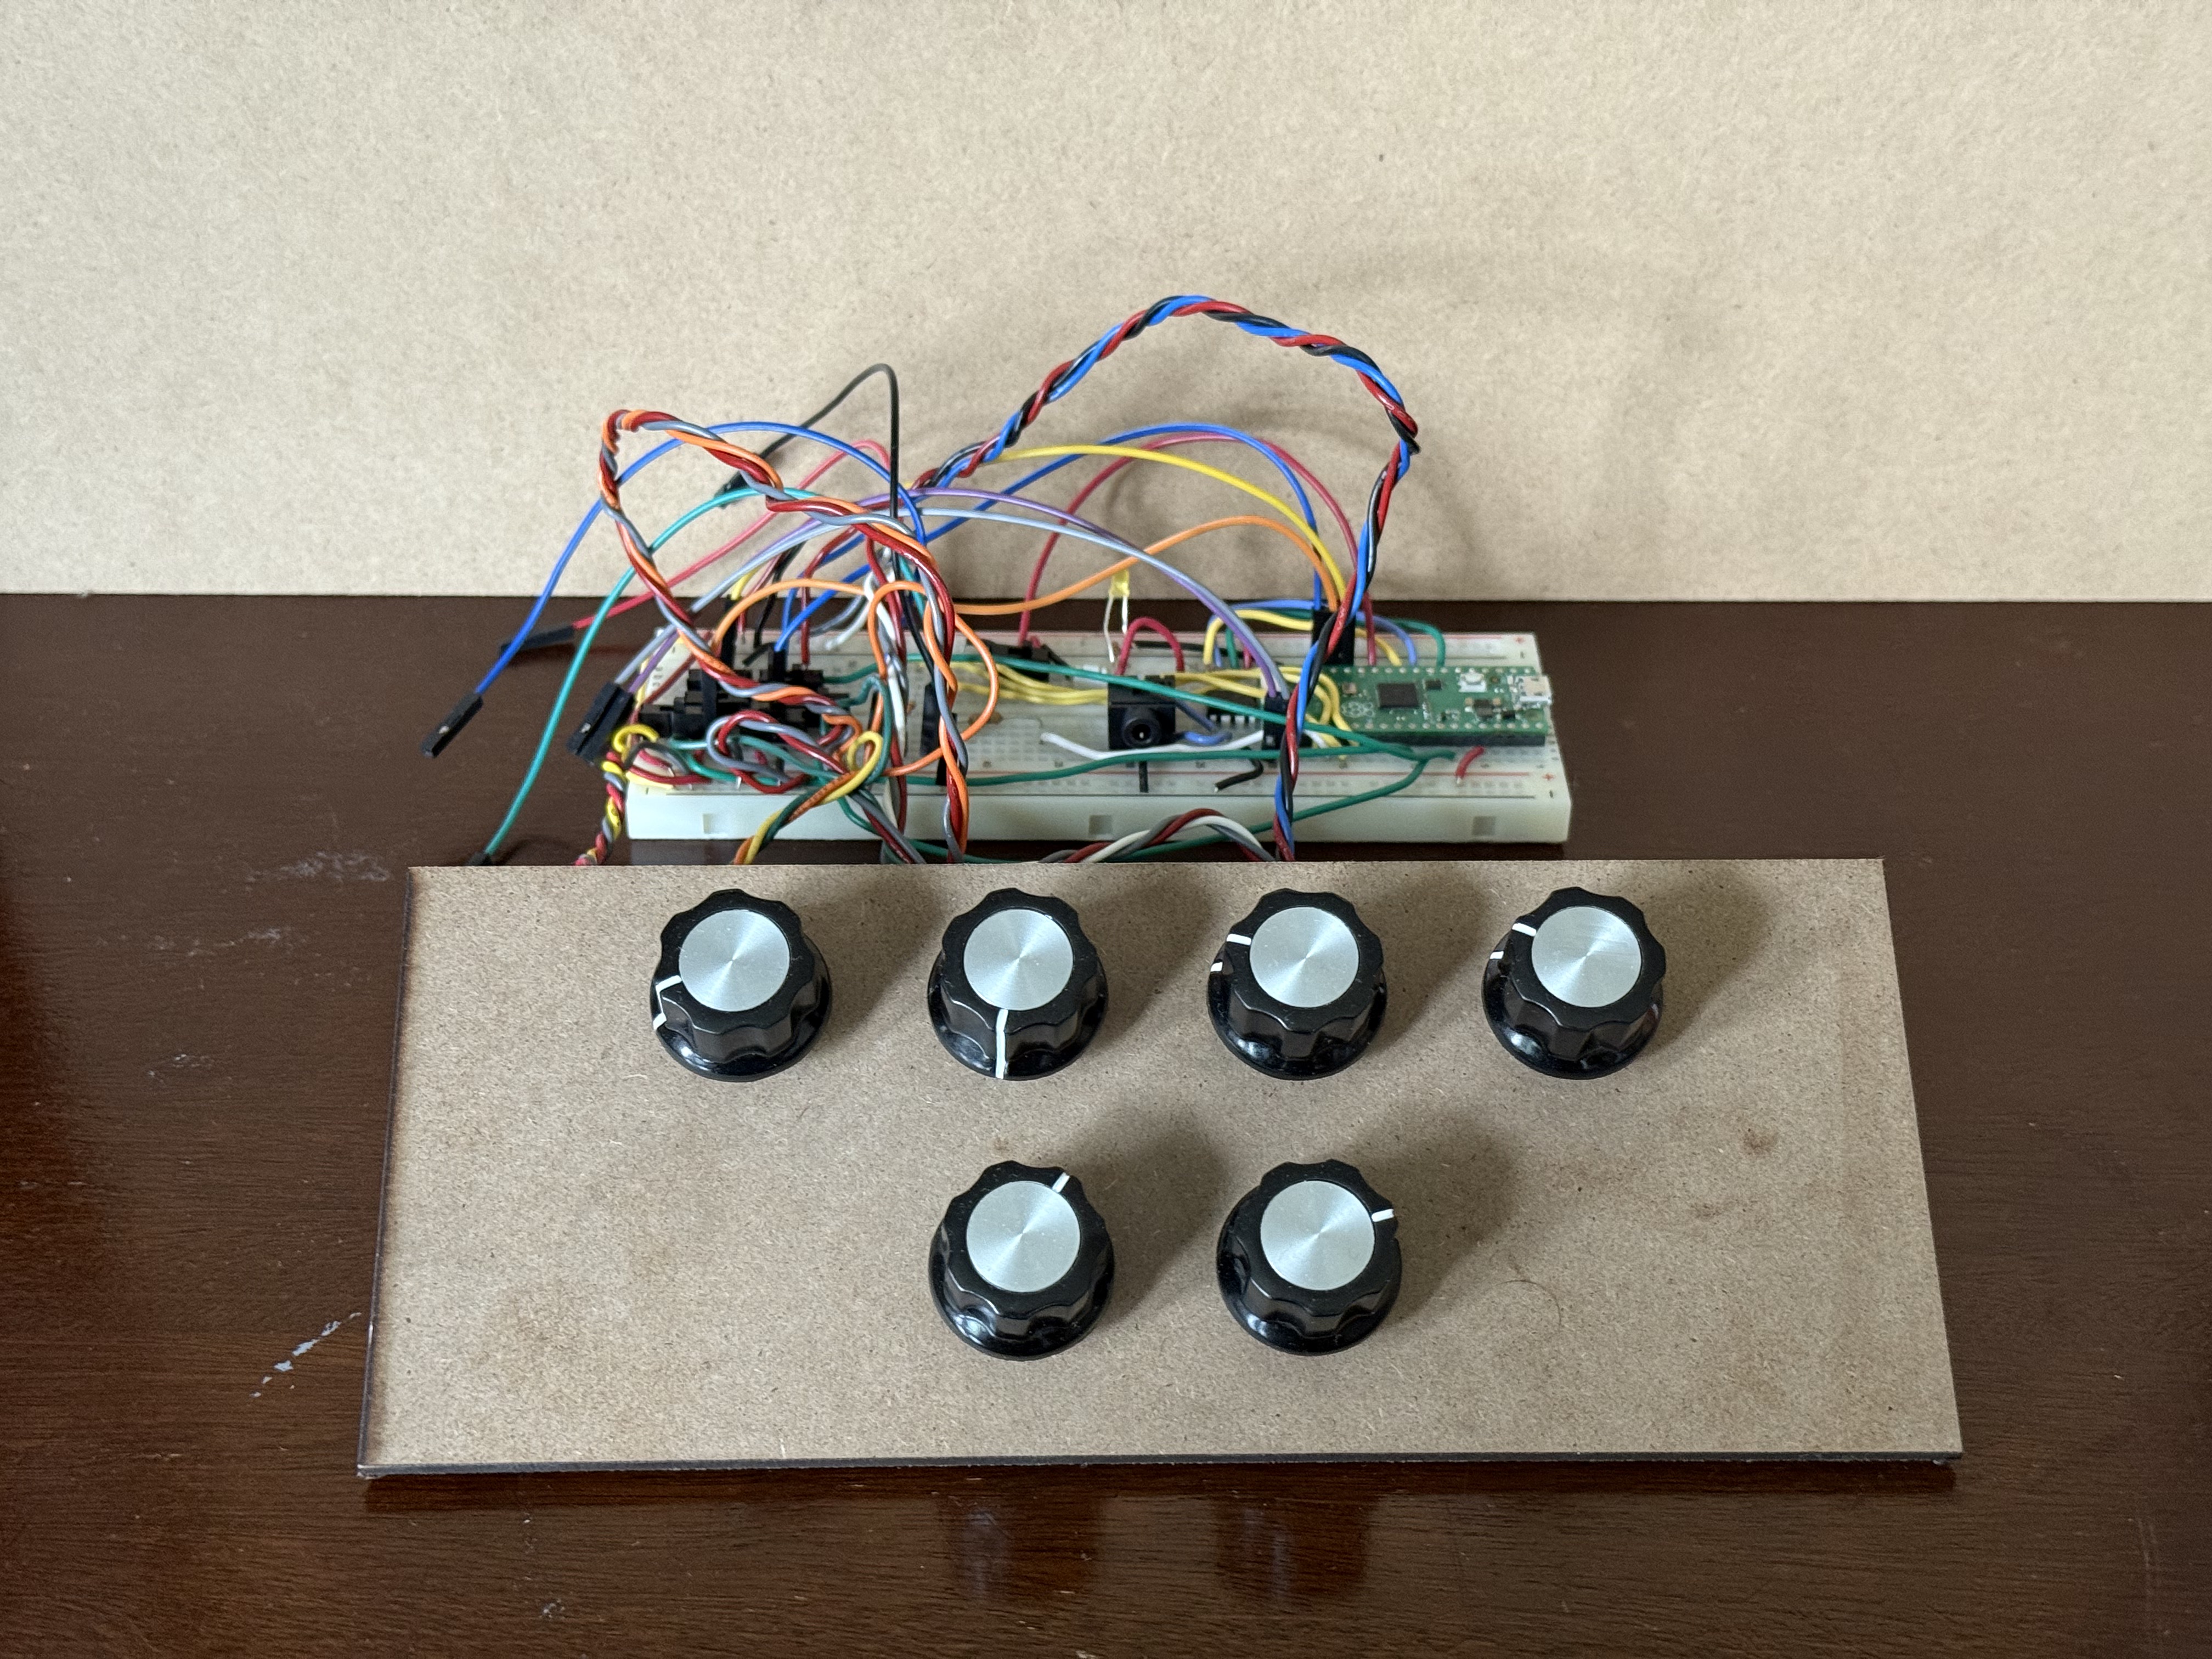
Our device uses six 10kΩ potentiometers with infinite rotation for a smooth tactile experience. The
enclosure is
a custom laser-cut structure made from medium-density fiberboard (MDF). Each potentiometer's diameter
was
measured and slightly enlarged in CAD to ensure a proper fit, along with a hole for the small protrusion
on the
potentiometer which later will provide rigidity. The layout places four knobs on the top panel and two
on the
bottom, all evenly spaced. The side panels are triangular, forming a wedge-shaped housing, while the
back panel
features a large notch for cable management. The enclosure is spacious enough to accommodate the
breadboard and
Raspberry Pi Pico, though for ease of debugging, the electronics were kept external during development.
The
panels were assembled using wood glue. The potentiometers were inserted to the holes and the notches
aligned,
then the nuts that came with the potentiometers were secured on top of the panel such that the
potentiometer
shafts could spin without the body spinning. Knob caps were pushed onto each potentiometer shaft for
ease of
use. The knobs also allow for finer adjustment of each potentiometer because of their larger diameter.
Program Details
The software component was responsible for generating the sound, handling user input from the
potent
A hands-on teaching synthesizer with real-time visual feedback to help beginners understand sound
synthesis.
Summary
We developed an educational synthesizer device designed to simplify the learning process for new
electronic musicians. The device features six knobs that adjust the sound envelope and frequency, a
switch to toggle between sine and square waveforms, and a live VGA display that visualizes the current
waveform, frequency spectrum, and envelope stage. Our motivation stemmed from the observation that most
synthesizers are challenging for beginners, often requiring trial and error to understand their
controls. By providing immediate audio and visual feedback, our device demystifies core synthesis
concepts such as the ADSR envelope, frequency manipulation, and waveform differences, making sound
design more accessible.
Demonstration video
High Level Design
In our design, we utilize two cores. Core 0 primarily runs a single thread and handles two interrupt
service routines: one for receiving user input-where the user can rotate six potentiometers to adjust
parameters-and another that triggers every 20 microseconds to compute values and send them to the DAC
module via SPI transactions. Core 1 runs a separate thread that is primarily responsible for VGA signal
generation.
Rationale and Sources
Synthesizers are notoriously difficult for beginners due to their abstract controls and lack of
intuitive feedback. While high-end synthesizers may include small displays for envelope
visualization, entry-level and DIY models typically offer only labeled knobs and buttons, which can
be confusing. Our project aims to bridge this gap by combining tactile controls with clear visual
feedback, introducing users to essential synthesis concepts like attack, decay, sustain, and release
(ADSR).
Background Math
There are four stages in generating an ADSR signal: Attack, Decay, Sustain, and Release.
Attack:
In the attack stage, we use an exponential function to shape the amplitude
over time. The mathematical formulation is:
Amplitude
t
= 1 − exp(−t / τ)
The constant τ in the attack stage determines the rate at which the amplitude increases. We will
discuss how this value is chosen in a later section.
Decay:
In the decay stage, we use a linear function to shape the amplitude over
time. The mathematical formulation is:
Amplitude
t
= Amplitude
t-1
− (Max_Attack_Amplitude / Decay_Time)
Amplitude
t
= max(Amplitude
t
, Sustain_Level)
The maximum attack amplitude is determined based on the amplitude reached at the end of the attack
stage. The decay duration is set according to user input. If the computed amplitude falls below the
user-defined sustain level, it is clamped to the sustain level to ensure stability in the envelope.
Sustain:
In the sustain stage, the amplitude is held constant at the user-defined
sustain level. The mathematical formulation is:
Amplitude
t
= Sustain_Level
Both the sustain level and the sustain duration are determined based on user input.
Release:
In the release stage, the amplitude decreases linearly from the sustain
level to zero over a duration defined by the user-specified release time.
Amplitude
t
= Amplitude
t-1
− (Sustain_Level / Release_Time)
Both the sustain level and the release time are determined based on user input.
We applied both sine and square waveforms as the base signals that pass through the ADSR envelope to
demonstrate the system’s versatility in shaping different types of input signals. Only one waveform is
used at a time, and the user can select between sine and square waveforms via a switch input.
Logical Structure & Software Architecture
Thread Responsibilities
User Input Thread:
In this thread, six switches are used to allow the user to
select which parameter to adjust—namely, attack time, decay time, sustain time, sustain level,
release time, and frequency. An additional switch enables the user to choose between a sine wave or
a square wave as the base waveform. Six potentiometers are available to provide analog input, which
are read by the system in real time. The thread continuously monitors the switch states to identify
the active parameter and then reads the corresponding potentiometer value to update that parameter
dynamically.
VGA Thread:
In the VGA thread, an animation is displayed to indicate the current
stage of the ADSR envelope—Attack, Decay, Sustain, or Release. Additionally, the current amplitude
and output frequency are shown on the screen in real time, enhancing user engagement and
interaction. This thread continuously updates the display with the latest information to reflect
system behavior accurately.
Interrupt Service Routine (ISR)
The timer-based interrupt service routine (ISR) on core 0 handles the system’s core audio generation and
operates as a state machine implementing the ADSR (Attack, Decay, Sustain, Release) envelope.
The state machine includes two main stages: STATE_0 = 0, which generates sound, and STATE_0 = 1, which remains
silent. A counter continuously increments within the ISR and triggers a state transition when it reaches
a predefined threshold—resetting the counter and switching to the alternate stage.
In STATE_0 = 0, which is responsible for producing sound, the ISR calculates the amplitude using parameters
obtained from the user input thread. Based on the current counter value, it performs exponential growth
during the Attack phase, linear decay toward the user-defined Sustain level during the Decay phase,
maintains the amplitude in the Sustain phase, and applies a linear decrease during the Release phase.
The amplitude is then used in a Direct Digital Synthesis (DDS) routine to generate the waveform, either
sine or square, according to user selection, and the result is transmitted to the DAC via SPI for audio
output.
Inter-thread Communication
All threads share global variables such as attack time, decay time, sustain time, sustain level, release
time, and frequency, which are safely updated by the input thread and read by the ISR and VGA threads.
Overall Software Architecture
Core 0:
Runs audio ISR and real-time synthesis
Core 1:
Manages user input and VGA display threads
Hardware/Software Tradeoffs
The Raspberry Pi Pico we used provides only three analog inputs, but our design required six
potentiometers. To address this, we implemented a manual multiplexing solution using double-throw
switches: two switches per potentiometer pair-one to send a high/low signal to a GPIO pin and another to
select between potentiometer wipers for the analog input. Although unconventional and somewhat
confusing, this approach allowed us to meet our design goals within our time constraints.
We initially planned to use an MCP3008 ADC to expand our analog inputs, but we encountered difficulties
finding reliable libraries and did not have time to write our own driver. Given our concurrent
commitments to other projects, we opted for the manual multiplexing approach, which, while unorthodox,
proved effective and even enjoyable from a hardware-hacking perspective.
Program/Hardware Details
In this figure, "A" stands for attack time, "D" for decay time, "ST" for sustain time, "R" for release time, "SL" for sustain level, and "F" for frequency.
For example, to adjust the sustain level (labeled in blue), the user should rotate the potentiometer and set both switches to the correct position.
Our device uses six 10kΩ potentiometers with infinite rotation for a smooth tactile experience. The
enclosure is
a custom laser-cut structure made from medium-density fiberboard (MDF). Each potentiometer's diameter
was
measured and slightly enlarged in CAD to ensure a proper fit, along with a hole for the small protrusion
on the
potentiometer which later will provide rigidity. The layout places four knobs on the top panel and two
on the
bottom, all evenly spaced. The side panels are triangular, forming a wedge-shaped housing, while the
back panel
features a large notch for cable management. The enclosure is spacious enough to accommodate the
breadboard and
Raspberry Pi Pico, though for ease of debugging, the electronics were kept external during development.
The
panels were assembled using wood glue. The potentiometers were inserted to the holes and the notches
aligned,
then the nuts that came with the potentiometers were secured on top of the panel such that the
potentiometer
shafts could spin without the body spinning. Knob caps were pushed onto each potentiometer shaft for
ease of
use. The knobs also allow for finer adjustment of each potentiometer because of their larger diameter.
Program Details
The software component was responsible for generating the sound, handling user input from the
potent
Technologies used
Hardware components
- Raspberry Pi Pico
- VGA display
- IMU
- DAC
- ADC
Software & tools
- C
- Arduino IDE
Project demo video
What you get
- Working project / hardware kit, tested before delivery
- Complete source code with explanation
- Project demo and guidance for your viva
- Project report, PPT and IEEE paper support (on request)
Delivery & Payment
Delivery takes a minimum of two weeks from the date your inquiry is confirmed.
Payment is in two parts:
• 50% advance to start the project
• Remaining 50% before delivery
Note:
• Documentation and PPT are not included by default
• If you need documentation/PPT, it can be arranged for extra time and cost
We'll confirm the exact timeline and cost with you after reviewing your requirements.
Related Embedded Systems projects

Embedded Systems
Gas Leakage Detector Using Arduino
A budget-friendly LPG gas leak detector built with an Arduino and MQ-5 gas sensor, triggering a buzzer and LED when unsafe gas levels are de...
View project
Embedded Systems
Simple Alarm System
A beginner-friendly home alarm with PIR motion sensing, keypad PIN entry, and separate entry/exit timing delays, built to be easy to expand.
View project
Embedded Systems
Ultrasonic Sensor Project with Arduino UNO Q
A beginner-friendly first Arduino UNO Q project: a servo-swept ultrasonic sensor that renders a live sweeping radar display in a web browser...
View project
Embedded Systems
3D Audio Localization
[Fall 2025] We designed a real-time embedded system that localizes sound sources in three dimensions and visualizes them live using a four-m...
View project