Electromagnet robot
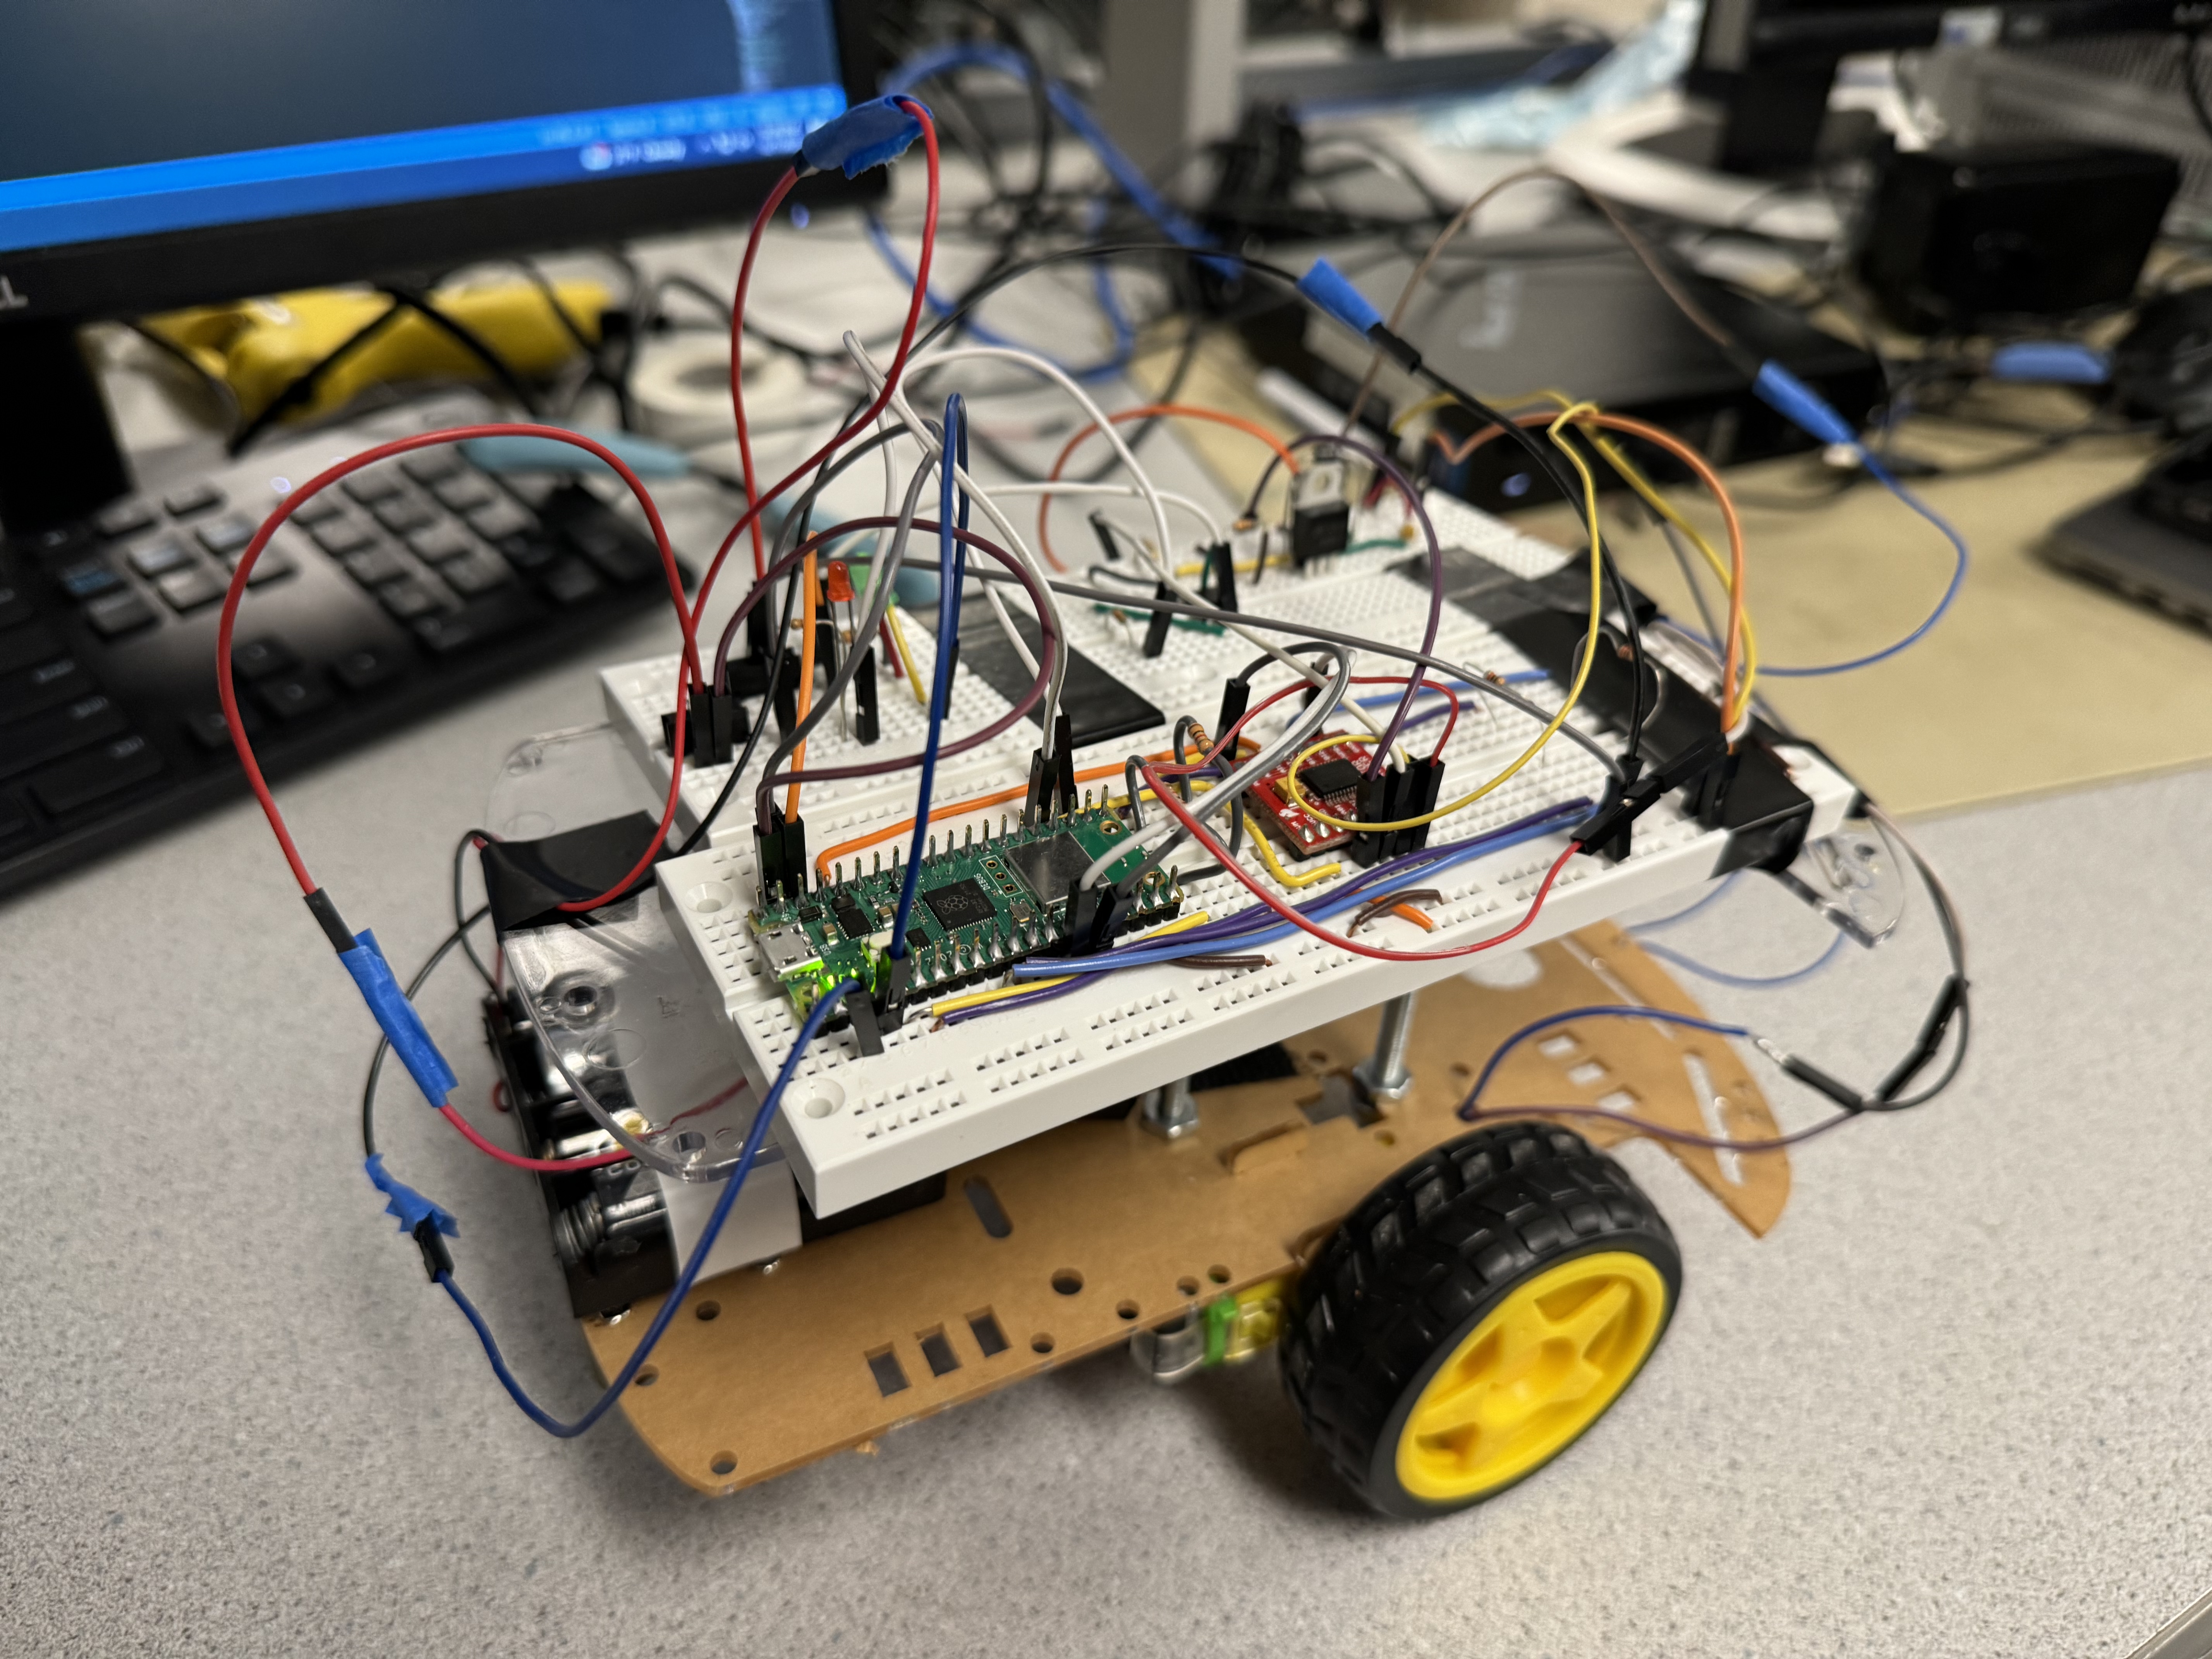
[Fall 2023] Our project innovates an interactive electromagnet car that can be wirelessly directed via a laptop to control, collect magnetic objects, and deliver them to designated locations as commanded by the users.
- Suitable forB.Tech/B.E Embedded Systems students
- Build time4-6 weeks
- LevelBeginner
- Available atAjvika Labs, Kakinada
About this project
Project name
Introduction
High Level Design
Design
Results and Analysis
Conclusions
Team Members
References
Appendix
ECE5730 Remote-controlled Robot with Electromagnet
Dec 12, 2023
Remote-controlled Robot with Electromagnet
Demonstration Video
Introduction
Our project innovates an interactive electromagnet car that can be wirelessly directed via a laptop to control, collect magnetic objects, and deliver them to designated locations as commanded by the users.
We engineered an electromagnet car with the capability to be remotely controlled using Wi-Fi, aiming to streamline the process of magnetic object retrieval and placement. The motivation behind this project was to enhance efficiency in scenarios where precise and controlled movement of magnetic items is required. By leveraging wireless technology, the car can be maneuvered with precision to designated spots, thereby automating the collection and transportation of magnetic materials. This innovation not only serves to reduce manual labor but also introduces a level of precision and control that manual handling cannot achieve, making it a valuable asset in various practical applications.
High Level Design
The concept for our project stemmed from the need to automate and simplify the process of transporting magnetic objects in various settings, such as manufacturing floors, educational labs, or clean-up sites. The idea was inspired by the increasing demand for remote-controlled and automated systems in industry and education for tasks that require precision and can be tedious or hazardous for humans. Furthermore,with more research on this project, remote operations can be conducted in a variety of implementation environments, such as nuclear reactor, space robots collecting metals.
The project idea was basically influenced by advancements in the Internet of Things and robotics. Existing ubiquity of Wi-Fi technology, and the combination of using RP2040 and motor driver. They all provided a solid foundation for the project's inception.
Background math
Calculations were made to determine the necessary current turns for the electromagnet, ensuring it operates within safe power limits while maintaining functionality. Besides, we also calculate the PWM power sent to the motor control so that our motor can drive the wheels at our desired speed. Furthermore, with resistors and capacitors carefully chosen in the electromagnet control circuit, we can realize the switching status of the magnet by proper forward bias of the MOSFET.
Logical structure
The project's logical structure is designed to ensure the efficient and responsive operation of the interactive electromagnet car. It comprises several key components:
Directional controls
Forward Movement
: Allows the user to move the car forward. This basic command is crucial for navigating the car toward magnetic objects or designated locations.
Left and Right Turn (Forward)
: Enables precise steering while the car is moving forward. Users can navigate the car around obstacles or through complex paths.
Backward Movement
: Facilitates the reverse motion of the car. This control is essential for repositioning or maneuvering in tight spaces.
Left and Right Turns (Backward)
: Similar to forward turns, these controls allow for precise steering when the car is moving backward.
Electromagnet activation
On/Off Toggle
: A simple control to activate or deactivate the electromagnet. When activated, the car can pick up magnetic objects; deactivation allows for the release of these objects at desired locations.
Design
Hardware Design
i. Overview
Figure 1
shows the connection implemented on the plastic sheet, where there are DC motors, electromagnet, motor controller, Pico W, etc. In the figure on the right, it can be seen that the two breadboards containing motor and electromagnet control circuits are installed on the top layer of the plastic board. Additionally, in the middle of the figure, we can observe that the electromagnet is installed in front of the robot, which enhances the convenience to grab the metal on the ground, and in the right, it can be observed that the two DC motors are assembled on the bottom of the car, driving those two wheels.
Figure 1. Mechanical Connection of the Robot
Figure 2
displays the overall hardware connection of our final project, Remote-controlled robot with electromagnet implemented on RP2040. The microcontroller used is the Pico W, as it has the Wi-Fi connection module, which is required in the remote control part of our project. And we use two sets of batteries to power the device, one is 4.5V to power the Pico W by connecting to VSYS and GND pins, and the other is 6V to power the motor and the electromagnet. In the following sections, detailed hardware design will be fully illustrated, including motor and electromagnet control circuits.
Figure 2. Hardware Connection of the Robot
ii. Motor Control Circuit
We applied the motor control chip as the H bridget to control the wheel to move forward and backward. In this project, Sparkfun TB6612FNG dual-channel motor controller is chosen as the motor control module, and the pinout diagram is listed in
Figure 3
. According to the hookup guide
[1]
, the motor controller can be connected to the Pico W to realize certain functions, which is shown in
Figure 2
. VM is connected to the 6V power supply, used for powering the motors; VCC is connected to the 3.3 Volts output from the Pico W for powering the controller. STNDBY basically acted as a chip select pin, so it was also connected to the 3.3 Volts output from the Pico W to maintain the control of the motors. In addition, for the motor A, we select available pins, GPIO 3 and GPIO 4 for INA1 and INA2 respectively, and then GPIO 10 for PWMA, continuing the previous LED setting. The Aout1 and Aout2 outputs are connected from the motor controller to the DC motor. As for the motor B, we select GPIO 7 and GPIO 8 for INB1 and INB2 respectively, and GPIO 11 for PWMB. The mechanical design of the motor ciucuit in shown in
Figure 4
on the bottom breadboard.
Figure 3. TB6612FNG Motor Controller Pinout Diagram
Figure 4. Circuits Construction
iii. Electromagnet control circuit
Since the circuit shown in
Figure 5
could drive the motor in Lab 3, it might be able to drive electromagnet as well, so we tried this circuit and it performed perfectly. Consequently, the circuit was implemented by only changing the motor into an electromagnet. When the input signal on the left is set to high, indicating 3.3V from the microcontroller, the transistor inside
4N35
module the MOSFET
IRF640
can be forward biased, and then the electromagnet can be turned on.
Figure 5. Electromagnet Drive Circuit
Program Design
i. Program Overview
Motor control
Several motor control functions were defined, including
Stop(), Forward(), Reverse(), TurnLeft(), TurnRight(), ReverseTurnleft(), and ReverseTurnRight(),
which can be applied in the PWM interrupt service routine to control the moving direction of the remote-control robot. On the basis of Lab 3 assignment, there was only one PWM GPIO set, so in this project, we needed to initialize another PWM GPIO, according to the Pico W datasheet. Additionally, in the PWM ISR, we defined 7 states to correspond to each moving direction, where the state would be switched based on the UDP packets received from the Wi-Fi wireless connection channel. In this case, GPIO 10 and 11 were set as the PWM channel of the motors according to
Figure 6
, and GPIO 3, 4, 7, 8 were chosen to move the motors forward or backward.
Figure 6. Mapping of PWM channels to GPIO pins on RP2040
[2]
Electromagnet control
Since the motor control circuit from Lab 3 has been applied in this module, we only need to set the input signal high, coming from GPIO 17, to turn on the MOSFET
IRF640
, and later turn on the Electromagnet. Furthermore, we implemented a red LED to indicate the status of the magnet, controlled by programming GPIO 18.
Wi-Fi module
Concerning Wi-Fi connection, we consulted with the
UDP packet sending program
from Prof. Land. Later, we combined the code with the
official Wi-Fi connection code
shown in the Pico W datasheet. Since it was hard to register the device on the RedRover, we tried to open a hotspot on our mobile phones as the Wi-Fi connection station. However, at first, the Pico W could not be connected to the hotspot, so we applied the Wi-Fi scan program from the Raspberry Pi Company to check the Wi-Fi around us until the name we wanted appeared. Therefore, we could successfully connect to our mobile phone.
Initially, we sent the characters through the software, UDP Sender/Receiver, to control the internal LED of the microcontroller to see whether it was successful. Furthermore, with the successful implementation of toggling the LED, the Python program would be run on the laptop to establish a UDP socket to send data, and we modified the code to send characters without pressing the
ENTER
key on the laptop keyboard.
ii. Program Organization
Program on Pico W
Thread 1: protothread_udp_recv
Thread 1 is used to receive UDP packets containing the wheels and electromagnet control instructions, which is set as
'w'
(forward),
'a'
(left),
'd'
(right),
's'
(backward),
'c'
(stop),
'k'
(electromagnet on),
'l'
(electromagnet off). The parameter of
LAST_STATE
will record previous state, and when the previous state is
Forward
or
TurnLeft
and receiving
'd'
, the motor will be set to
STATE = 4
, representing
TurnRight()
, while when the previous state is
Reverse
or
ReverseTurnLeft
and receiving
'd'
, the motor will be set to
STATE = 6
, representing
ReverseTureRight()
, and under other similar condition, it will be programed to similar actions, since it ensure that the robot can turn left or right backward when it is generally moving backward. Furthermore, the current state parameter is controlled by
STATE
and set under all the conditions mentioned above. As for electromag
Technologies used
Hardware components
- RP2040
- DC motor
- MOSFET
- motor driver
Software & tools
- Python
Project demo video
What you get
- Working project / hardware kit, tested before delivery
- Complete source code with explanation
- Project demo and guidance for your viva
- Project report, PPT and IEEE paper support (on request)
Related Embedded Systems projects

Gas Leakage Detector Using Arduino
A budget-friendly LPG gas leak detector built with an Arduino and MQ-5 gas sensor, triggering a buzzer and LED when unsafe gas levels are de...
View project
Simple Alarm System
A beginner-friendly home alarm with PIR motion sensing, keypad PIN entry, and separate entry/exit timing delays, built to be easy to expand.
View project
Ultrasonic Sensor Project with Arduino UNO Q
A beginner-friendly first Arduino UNO Q project: a servo-swept ultrasonic sensor that renders a live sweeping radar display in a web browser...
View project
3D Audio Localization
[Fall 2025] We designed a real-time embedded system that localizes sound sources in three dimensions and visualizes them live using a four-m...
View project