Driving simulator game
[Fall 2023] Our project was the development of a driving game where the user is given a course to drive over and has to try to complete the course in as quick a time as possible while avoiding the obstacles on the road.
- Suitable forB.Tech/B.E Embedded Systems students
- Build time4-6 weeks
- LevelIntermediate
- Available atAjvika Labs, Kakinada
About this project
Daniela Makowka, Sherri Qazi, Yunnie Kim
Welcome to our ECE 4760 Final Project GitHub Page!
Introduction
Our project was the development of a driving game where the user is given a course to drive over and has to try to complete the course in as quick a time as possible while avoiding the obstacles on the road.
There exists today many versions of racing games such as Mario Kart, Burnout, Gran Turismo, and many more. These games mimic what it's like to drive a car over a course. There are many variations of these driving games. However, every driving game has a wheel or some way of steering the car. Some additional features are pedals for acceleration and brake, a stick to change the gears, a device that causes vibrations for simulating rough terrain, and many other features. We were inspired by these games to create our own version of a racing game using the RP2040.
For our racing game, we used a steering wheel to control the direction the car moves and acceleration and brake pedals to control the speed of the car. The user is able to move the car right or left by using the steering wheel. The brake pedal slows the car and eventually stops the car so that the car is no longer moving and all visuals are paused until the pedal is released. The acceleration pedal makes the car move faster along the road the harder the pedal is pressed down. This also causes obstacles to move faster towards the driver. If the user hits an obstacle, the car is regenerated towards the left side of the screen and 5 seconds are added to the time. Depending on how fast the user finished the course, the user can either earn a bronze, silver, or gold ranking with bronze being the slowest time ranking and gold being the fastest time ranking.
We wanted to create a driving game that could be used for entertainment and to simulate driving a car. With the 3D aspects of the game like the dashed lines and objects on the roads getting bigger as they get closer, it really feels like the user is driving a car. The additions of rankings and times make the game a competition for the user to compete against friends, other players, and themselves.
High Level Design
Design Components
When we were first determining how to approach this project, we looked for interactive physical features that would make our game interesting.
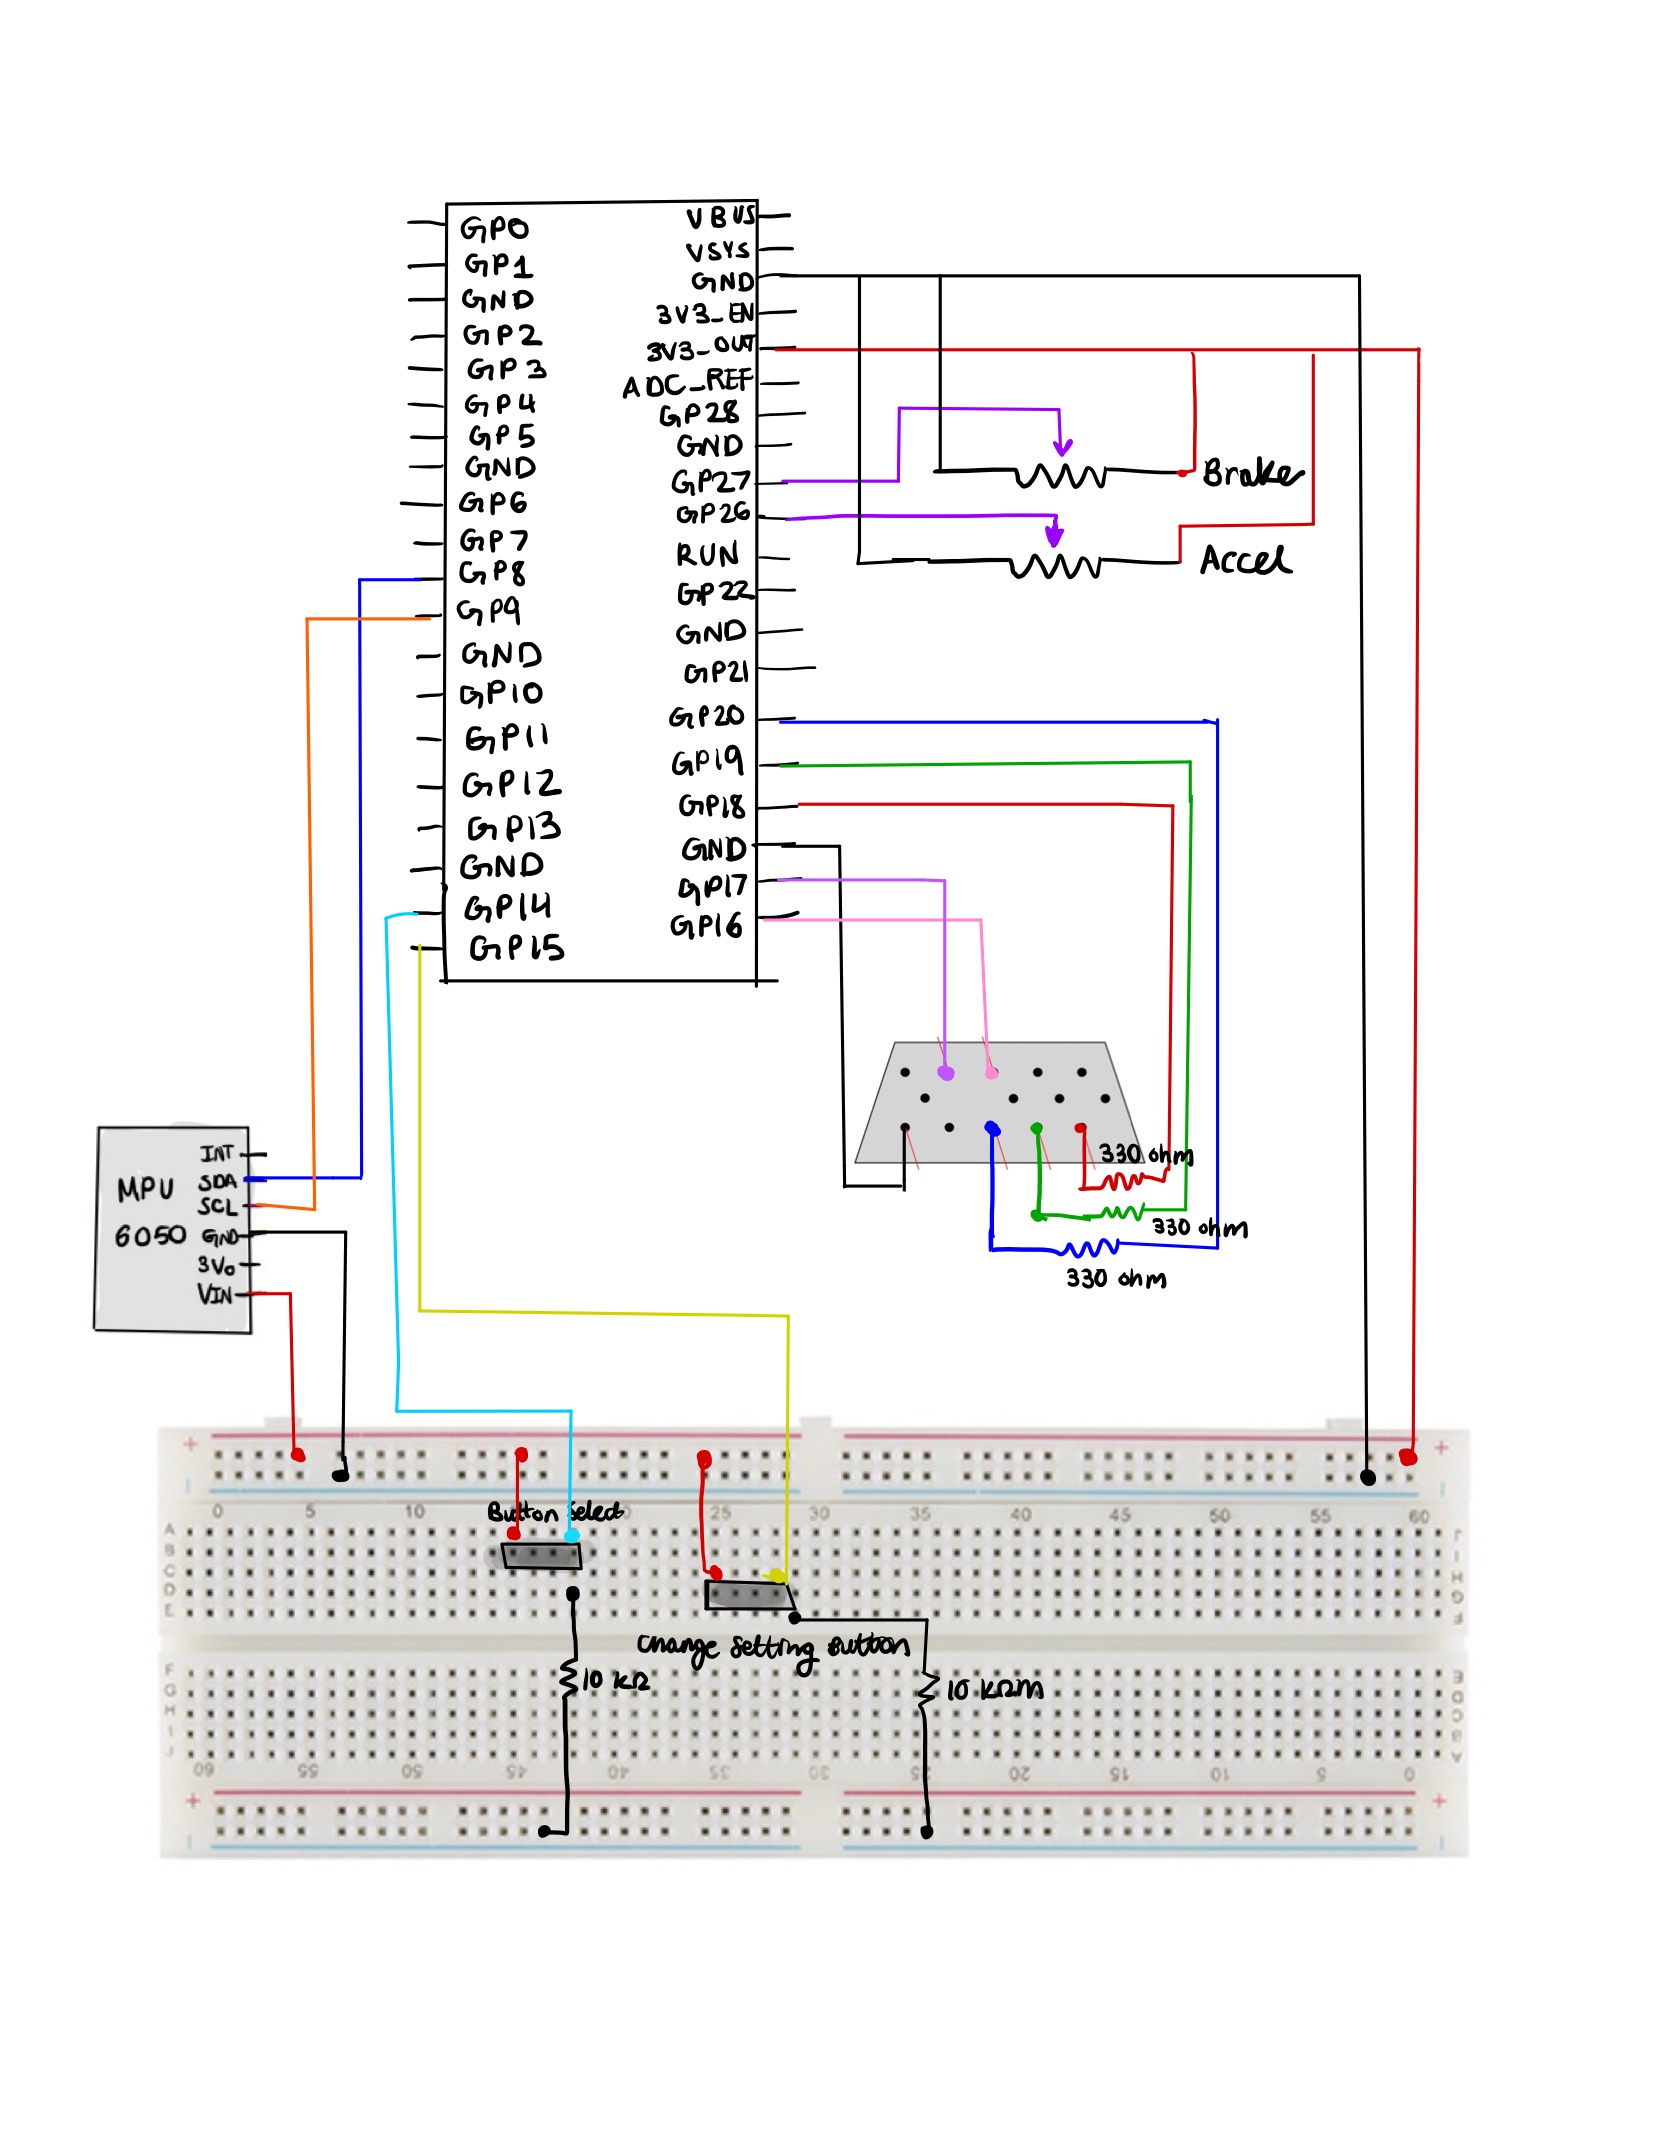
Wheel: We wanted to use an actual wheel instead of a remote to control the steering, so we used an old racing car wheel, which was a good size for our needs. We attached the IMU in order to measure the angle of the wheel.
Pedals: We knew that we wanted to include pedals to simulate a real driving experience, so we used two potentiometer pedals for our brake and accelerator pedals.
Buttons: We used two buttons, one to start the game and one to toggle between backgrounds. We wanted our game to feel like a game, so we attached these two buttons on a separate breadboard to feel like a game remote in a way, where there was a main button and a button to customize the aesthetic experience.
Logical Structure
The beginning screen allows the player to get adjusted and change the background aesthetic to their liking. When they are ready, the player presses the start button to begin the game.
When the game starts, the timer starts counting and the animation begins. The road lines start moving down and the obstacles spawn on the screen randomly one at a time. The car moves left and right on the bottom of the screen, controlled by the player’s steering. The objective of the game is to gain the fastest time, so part of that comes from avoiding obstacles and using the pedals strategically. Hitting an obstacle adds extra time, and the pedals control how fast the car moves, or rather the speed of the lines and obstacles. On the top of the screen is the time elapsed and the progress of the player, which is determined by the distance covered.
The game ends when the player has fully completed the distance, and the player’s time and ranking is displayed.
Software Design
Animation
Within our game, there were three moving parts that were being animated: the car, road lines, and obstacles.
Our car animation was handled by the drawCar() function, which had an input parameter that determined the amount of pixels the car should move in a certain direction. This input variable was added to a position variable, which was then used to determine where the car was being driven at. The coordinates of the car were limited to the edges of the road. As the car moves to the left or right, the right or left edge of the car is first erased and the entire car is redrawn at the current position of the car. Since the drawCar() function controlled the car’s position, it also checked if the car had bumped into an obstacle. In that case, the car would be redrawn to the left of the road. This drawCar() function was called in the animation protothread, where we were reading the angle of the wheel from the IMU and calling drawCar with various input values. Larger deviances from the neutral state resulted in stronger turns and therefore higher values, and if the wheel was turned to the left, the value was negative.
For the road lines, we had a line struct with a ready variable and various position and accumulator variables and an updateLine() function that animated each line. The line was drawn using a for loop that drew multiple lines increasing in width, which we accomplished by shifting the left and right coordinates by a small amount in the loop. After the for loop has finished running, the topmost line is erased. After the function has been called a certain number of times, which is tracked by the variable accum, the for loop condition is incremented, meaning that the height of the line increases. After the y position of the line passed the bottom edge of the screen, the position variables were reset and the ready variable was set to 0. By increasing the width and height of the line as the line moves down, we create the illusion of the line getting closer, which helps to achieve a 3D effect. We used two line struct instances in order to have two lines visible on the road, rather than only one line that was visible at a time. The updateLine() function was called in the VGA protothread, which animated the game states. Here we tracked each line’s ready variable and also set them. When a line was considered ready, the updateLine() function was called for that line struct instance, and when the current line’s y coordinate reached the middle of the road, the other line’s ready variable was set to 1, so that the lines were continuously animating.
Animating the obstacles was very similar to animating the lines, as it followed much of the same logic. For our obstacles, we also created an obstacle struct with additional variables for the color, height, and width. We created three instances of this obst struct, a small red one, a medium green one, and a large magenta one. With our obstacles, however, we wanted them to be able to slide to the sides of the road, since we noticed that animating them straight down didn’t cover the edges of the road. So, depending on whether the obstacle started on the left or right, the lines that were drawn by the for loop were shifted to the left or right, which resulted in obstacles being able to slide down in a diagonal direction. Similar to the line animation, the top line of the obstacle was erased, the height of the obstacle was incremented after the function has been called a certain number of times, and after the y position of the line passed the bottom edge of the screen, the position variables were reset and the ready variable was set to 0. The updateObst() was called in the VGA protothread, where we only animated the obstacles if they were ready, and the obstacle that was determined ready was randomized. The updateObst() function was also called in the drawCar() function, which tracked if the car’s coordinates were overlapping with any of the obstacles. If so, the obstacle was erased.
Game Modes
The beginning, playing, and ending screens were controlled by a finite state machine. A variable called “mode” was made to decide which state the game was currently in. There were three states “beginning_screen” which had a value of 0, “playing_state” which had a value of 1, and “ending_screen” which had a value of 2.
When the program is first run, the beginning screen appears. It consists of the sky, grass, and road being drawn. At the top of the screen, text is printed to tell the user to press the “Select” button to start the game. Once a button press is detected, the “game_state” variable switches from “beginning_screen” to the “playing_state”. A button press is detected by seeing if the value outputted by the button had toggled meaning that the current value outputted by the button does not equal to previous value outputted by the button.
Once the mode is set to the “playing_state”, all the animation would start. In order to get the animation to move at the proper times, all animation was put under an if statement stating that the animation would only run if “mode” was equal to “playing_state”. The animation would keep playing until 30 dashed lines in the road had gone off screen. This is the distance that we set for the length of the course the user would drive.
Once the user had traveled this distance, the game was over and the “mode” variable was set to the “ending_screen” variable. When the “mode” was equal to “ending_screen”, all animation stopped, the user’s rank was displayed on the top of the screen, and text at the top of the screen prompts the user to press the button again to play again. When a button press was detected again, “mode” was set to the “playing_state” variable and the animation started all over again.
Buttons
Two buttons were used for this project: one button to start the game called “Select” and the other button to change the setting called “Change Setting”. These buttons we
Technologies used
Hardware components
- RP2040
- IMU
Software & tools
- C
- Arduino IDE
Project demo video
What you get
- Working project / hardware kit, tested before delivery
- Complete source code with explanation
- Project demo and guidance for your viva
- Project report, PPT and IEEE paper support (on request)
Related Embedded Systems projects

Gas Leakage Detector Using Arduino
A budget-friendly LPG gas leak detector built with an Arduino and MQ-5 gas sensor, triggering a buzzer and LED when unsafe gas levels are de...
View project
Simple Alarm System
A beginner-friendly home alarm with PIR motion sensing, keypad PIN entry, and separate entry/exit timing delays, built to be easy to expand.
View project
Ultrasonic Sensor Project with Arduino UNO Q
A beginner-friendly first Arduino UNO Q project: a servo-swept ultrasonic sensor that renders a live sweeping radar display in a web browser...
View project
3D Audio Localization
[Fall 2025] We designed a real-time embedded system that localizes sound sources in three dimensions and visualizes them live using a four-m...
View project