Batting simulator
[Spring 2025] A fully functional batting simulator featuring 3D vector graphics, realistic pitching trajectories, and challenging batting mechanics. Use a joystick to position your bat and a button to time your swing! Perfect timing is rewarded with increased bat power.
- Suitable forB.Tech/B.E Embedded Systems students
- Build time4-6 weeks
- LevelAdvanced
- Available atAjvika Labs, Kakinada
About this project
Batting Simulator
Intro
High Level Design
Hardware Design
Program Design
Results
Conclusion
Work Distribution
Permissions
References
Code
Batting Simulator
ECE4760 Spring 2025
Natalia Pope, Nathan Rahklin, Daria Kot
Demonstration Video
Introduction
A fully functional batting simulator featuring 3D vector
graphics, realistic pitching trajectories,
and challenging batting mechanics. Use a joystick to position your bat and a button to time your swing!
Perfect timing is rewarded with increased bat power.
High Level Design
Our project idea was inspired by our team's love for baseball
and for
video games. This project requires physics for the bat collision with the ball but uses an algorithm to
model the
pitch. This design uses hardware for the inputs of the game: the joystick and button. It also uses PWM
combined with
an analog filter rather than using the DAC output for ease of completion. All of the VGA graphics were
completed in the
software. We organized our code into 5 parts: Batting, Pitching, VGA Graphics, Game Logic, and Audio.
Hardware Design
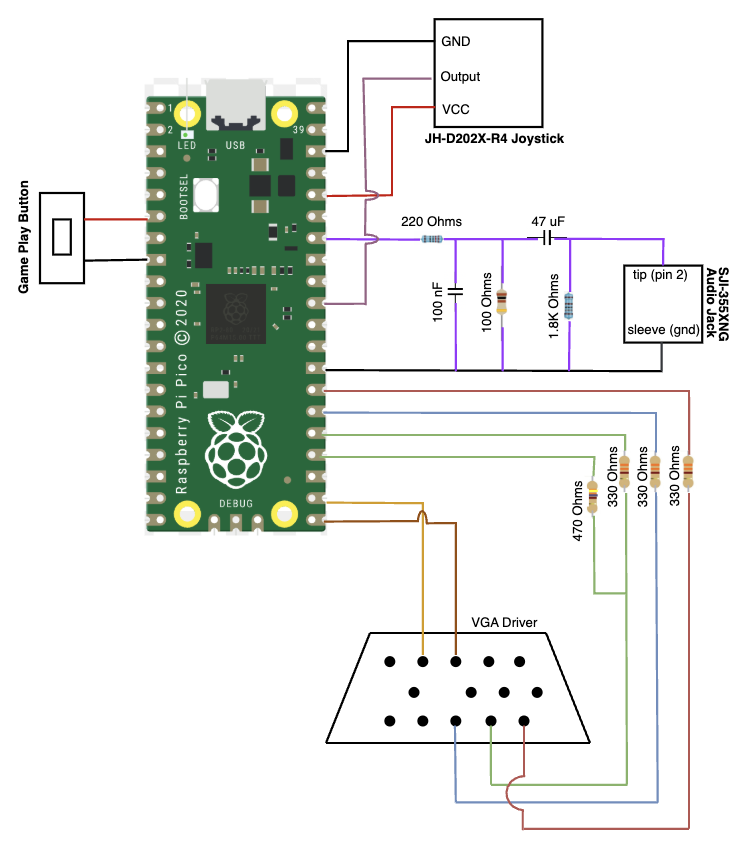
The hardware required to run the Batting Simulator includes a
VGA Driver, a DAC,
a joystick, and a button. The electrical schematic can be found below.
Electrical Design
Joystick
The joystick is used to control the bats height, it has 2 10K
Ohm potentiometers: one for the
x axis and 1 for the y axis. Because the timing of the swing is dependent on the release of the button,
only the y axis of the joystick needed
to be wired to the RP2040 to control the vertical position. To limit noise, we kept the wires as short
as possible.
Button
The button is used to control the timing and power of the
swing. The button was wired from the
RP2040 ground directly to a GPIO pin, making our button pull down. When pressed, the input to the PWM is
low. Again, to limit noise, we kept the
wires as short as possible.
Audio
To control the audio, we elected to use the built in PWM Audio. The PWM signal gets fed
through an analog filter, which turns the digital signal into an AC-coupled analog signal in the audio
frequency range. Once the signal is in
the audio frequency range, it can be connected to the SJI355XNG Audio Jack to be played out of the
speaker. Additionally, pwm was chosen over DMA
audio due to the complexity our chosen song requires. "Take me out to the ballgame" is significantly
more complex than the birdsongs implemented in class.
The audio jack is comprised of 3 different parts, which the SJI355XNG breaks out on to the breadboard.
The 3 parts are comprised of: the sleeve, the tip, and the ring.
The tip is the part at the very end of the jack, and is where the device gets the audio for the left
microphone. The ring can be found in the middle of the sleeve and
the tip, and is where the device gets the audio for the right microphone. The sleeve grounds the audio
jack. In our design, we used the ground of the
RP2040 to ground the audio jack, and arbitrarily elected to connect the tip to provide audio to the left
microphone, but the right would have worked just as well.
Controller
Gaming Controller
To make the hardware of the game feel more like a commercial grade video game, we used a box to
encapsulate all internal wires. This made it easier for the user to
utilize the joystick and the button at the same time as they can use just one hand to do both. To place
the joystick both the Joystick and button, we first measured the
hardware, traced a hole, and used a drill to create a hole in a plastic box to ensure that the devices
would fit snug in the holes to make it easier. When designing the
controller, we chose to make it right hand dominant. We elected that the joystick would be controlled by
the player's right hand and the button by the players left.
A hole was strategicically cut in the plastic to allow the VGA driver wires to come out as well as the
power cord for the RP2040.
Program Design
Our Program design is composed of 5 parts: Pitching, Batting,
3D Graphics, Game Play Logic, and Audio.
Pitching
Pitching Algorithm
Pitchers are famous for their ability to throw balls fast
with wild curves.
In real life, pitchers create these curves by spinning the ball with high RPM. The physics of baseball
pitches are extremely
complex. In the interest of programmability, it was determined that pitches would be modeled using a
function. Thus, a function
that takes in a timestamp and returns a position in real world space was created in collaboration with
the TA Mahmoud Elsharawy
(Pitching Algorithm figure). A desmos animation of this function can be found in the appendix [3] and
below. Taking inspiration from mechanics classes,
a unique version of this function is used for the ball’s x and y velocities. In the interest of
simplicity, the ball’s z velocity
is made constant. This picewise function used a number of parameters to tune various aspects of the
pitch’s curve:
Sorry, your browser doesn’t support HTML5 video.
Changing Paramater Values: a, h, n, g
a
= Maximum pitch amplitude
d
= Pitch end position (z-direction)
h
= Pitch x or y position at position z = d
n
= Z position of maximum amplitude
g
= Initial pitch release height
A pitch is initialized with the init_pitch() function. This
function sets random a, h, n,
and g parameters for the balls x and y directions as well as a random z velocity. The d parameter is a
constant equal to the mound_to_plate
constant (19.395 meters). To randomize these parameters, the stlib.h function rand() is used. The rand()
output is divided by the macro RAND_MAX
to normalize it and is then scaled by macros for the maximum and minimum values of each paremeter.
Finally, these parameters are saved in the x_parameter or
y_parameter global variables respectively and the ball’s x, y, and z positions are saved in the
ball_position global variables.
An interesting bug was found during the update_pitch()
implementation. Originally, the time since pitch
release was used as the model_pitch() time argument. This lead to the ball not following its full
trajectory as prescribed by the desmos function.
Some reflection lead to the realization that the units used in the demsos function actually corresponded
with the ball’s z position. One final
debugging session revealed that the desmos function takes in z positions from 0 to d while the game
functions from d to 0 (home plate is position z = 0).
Thus, inputting ball_vz * time into the model_pitcrh() function and then updating ball_z position with
mound_to_plate - ball_vz * time correctly modeled pitches.
All pitching variables are floats as it was not found that
computation optimization was necessary.
Batting
Early Swing
Late Swing
Bat Position Registering and Animation
Both in real life and in our video game, three key metrics
drive a successful bat: positioning, timing, and power. On a high level, batting works as follows:
From our original goals, we were able to accomplish the
following:
1. A player uses the joystick to move the bat up and down.
2. Pressing and holding the button results in increasing, then decreasing power. This can be thought
of as winding up the bat.
3. Releasing the button locks in the power value, and the swing is initialized.
The bat position (determined by joystick position) is
animated at all times. To do so, the drawBat()
function is called, which animates both the bat and the batter's box. This function calls the
get_bat_position() function which pulls the joysticks
gpio value using the adc. This value is shifted (to high pass), normalized, and scaled by the height
of the batters box. This ensures that the maximum
joystick position corresponds to the top of the batter's box and that the minimum joystick position
corresponds with the bottom of the box. This bat
position (in world coordinates) is stored in the bat_position global float. The draw_bat() function
is called once per animation frame.
Button Press Registering
Once the player presses the batting button to wind up
their swing and generate power, an interrupt associated with the button’s falling edge state is
called. This interrupt sets a holding_power_button boolean true, stores the time the button was
pressed in the start_button_press variable, and sets an already_hit boolean true. The already_hit
boolean prevents the player from being able to swing the bat multiple times for one pitch. The
holding_power_button boolean guards the portion of code responsible for animating the power bar
Technologies used
Hardware components
- RP2040
- IMU
- microphone
- speaker
- DAC
- ADC
Software & tools
- C
- Arduino IDE
Project demo video
What you get
- Working project / hardware kit, tested before delivery
- Complete source code with explanation
- Project demo and guidance for your viva
- Project report, PPT and IEEE paper support (on request)
Related Embedded Systems projects

Gas Leakage Detector Using Arduino
A budget-friendly LPG gas leak detector built with an Arduino and MQ-5 gas sensor, triggering a buzzer and LED when unsafe gas levels are de...
View project
Simple Alarm System
A beginner-friendly home alarm with PIR motion sensing, keypad PIN entry, and separate entry/exit timing delays, built to be easy to expand.
View project
Ultrasonic Sensor Project with Arduino UNO Q
A beginner-friendly first Arduino UNO Q project: a servo-swept ultrasonic sensor that renders a live sweeping radar display in a web browser...
View project
3D Audio Localization
[Fall 2025] We designed a real-time embedded system that localizes sound sources in three dimensions and visualizes them live using a four-m...
View project