Automated hydroponics system
[Fall 2023] Our project is a countertop sized, controlled environmental hydroponic system for fresh produce integral to our daily diets year around! We spent the past few weeks building a 12 inch by 12 inch by 16 inch in-home garden with climate control surrounding water temperature, water level, and light resources. Our first week was spent designing and laser printing an acrylic box with space to insert two fans, a water pump, and wires. Then we began the process of soldering three motor contr
- Suitable forB.Tech/B.E Embedded Systems students
- Build time4-6 weeks
- LevelBeginner
- Available atAjvika Labs, Kakinada
About this project
By: Jessica Henson &
Leo Davies
Introduction:
Our project is a countertop sized, controlled environmental hydroponic system for fresh produce integral to our daily diets year around! We spent the past few weeks building a 12 inch by 12 inch by 16 inch in-home garden with climate control surrounding water temperature, water level, and light resources. Our first week was spent designing and laser printing an acrylic box with space to insert two fans, a water pump, and wires. Then we began the process of soldering three motor control circuits, as seen in lab 3 of ECE4760. For our second week, we finalized the motor control circuits and tested them with fans, heating pads, and the water pump. We also decided on RPi Pico GPIO pins to connect each motor control circuit two, along with researching and determining the necessary pins for temperature sensor and ultrasonic sensor. Our final week and a half was spent debugging the circuitry and programming the raspberry pi to receive a desired temperature input, change the water temperature with the heating pads and fans accordingly, and control the water level inside the grow tray with the water pump and reservoir.
High-Level Design:
The idea for our project came from a culmination of mutual interest and history working with hydroponics and indoor growing systems. We had researched previous projects and had seen successful builds, so that gave us hope when designing our system. The first step we took to plan our project was figuring out what sensors and devices we needed to monitor and manipulate our environment.
We did some research online and found the most important conditions to maintain in a hydroponic system were constant water level and temperature. So we looked into a temperature sensor and water level sensor. We found this
temperature sensor
, which operates off the 1-wire signaling scheme. As for water level, we found that
ultrasonic sensors
could accurately measure distances off water surfaces.
Next, we had to find devices that could change both temperature and water level that the Pico could control. To regulate temperature, we bought both
heating pads
and
cooling fans
. For the water level, we bought a
submersible pump
to refill the container as water is consumed by the plants. All of these could be controlled by a motor circuit we had implemented in an earlier lab.
We had to consider the quantity of sensors and devices we were ordering to ensure we had enough space on the Pico. The Pico has plenty of GPIOs, some of which have different communication capabilities. We had to ensure that as we added devices, we had enough room on the Pico to properly communicate with the device. Another consideration we had was the complexity added to both the hardware and software with each device added. Each device added to the system would take up breadboard space and require more software configuration and balance within the code. For the scope of this project, we decided to implement the devices from above, and depending on the complexity of both the hardware and software, continue to add sensors and devices beyond that.
Another consideration we had was the safety of the electronics. We knew we were controlling and regulating a system with water, and we had to think thoroughly about how to protect the electronics from getting wet. We designed a box to try and isolate the two as much as possible. Using CAD software (Fusion 360), we designed the edges of a cube to contain our environment with the water tank and regulators, with small holes cut out. One hole on the side was for tubing for access to an external reservoir of water with our pump. We cut out holes on opposite sides of the walls for the fans to sit in, and then a hole in the top to run all of our wires from the environment to the hardware on top. By maintaining the electronics on top, we were able to keep it safe from the water.
Program/Hardware Design:
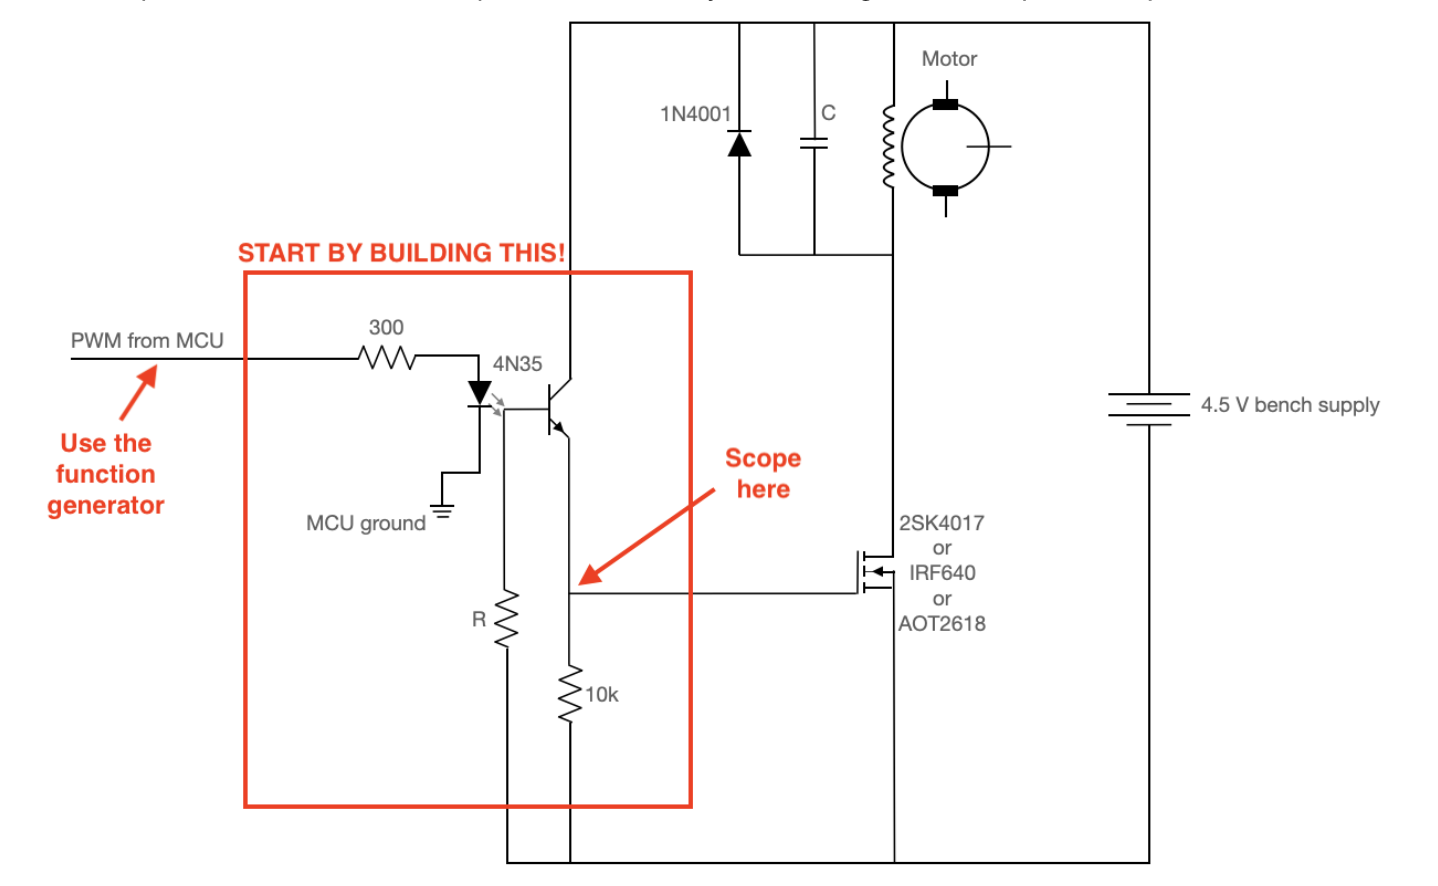
Once we had the physical build of our box, we began piecing together each sensor/device one by one, starting with hardware then working the software in. First, we started with the fans since we had worked with them before in lab 3. To use the fans, we needed to build a motor control circuit isolated from the microcontroller. This is due to the large voltage spikes that come off a DC motor when running, some of which can fry the microcontroller.
Figure 1:
Motor control circuit
Above is an image of the motor control circuit we built. Starting with the components in the red rectangle (plus the bench power supply), we built it up component by component, checking each time that we were reading the correct signal on the motor side of the circuit. The two resistor values we used were 1MOhm and 10kOhm. The 4N35 component is an optoisolator, to separate the two circuits electrically. This allows us to send a PWM (pulse-width modulation) signal from our microcontroller to the other circuit through the electrical “translation” of the optoisolator. We were able to test this by sending a square wave with a specific duty cycle from the function generator, then read that same duty cycle, but with the 4.5 V amplitude on the other side using the oscilloscope. This ensured that we had the circuit built correctly thusfar.
We then built the rest of the circuit up around that. The two components in parallel with the motors help provide paths to ground for reverse polarity spikes and high-frequency noise. The capacitor started at 0.1uF, but could be increased depending on the noise. We hooked both fan motors up in parallel with those components, so we could control both fans with one circuit. This way, you could consider the two fans as one unit. We then soldered the components into a solder board so no wires would come loose. Once we had completed the circuit and tested it with the function generator, we began controlling the circuit with the microcontroller. We configured one of the GPIOs to send a PWM signal to the circuit. We then controlled it through a serial monitor input, asking for a duty cycle between 0 and 5000. From then on we could change the duty cycle and watch the fans speed up and slow down.
Next, we wanted to add in the heating pads. We built the same motor control circuit, with both heating pads in parallel, similar to the fans, to act as one unit. Both the fans and heating pads operated off 5V of power, so we used the same bench supply for both circuits. Again, we tested and debugged the circuit in the same way to confirm it was correct, then soldered it in. Similar to the fans, we integrated the software allow for open-loop control of the heating pads with the serial monitor. We configured a new GPIO to send out a PWM signal, and allowed user input to change either the fan or heating pad signals. This allowed us to turn on or off either the heating pads or the fans, similar to how we would eventually want the closed-loop system to operate.
Once we had the two devices to manipulate the temperature inside our environment, it made sense to get the temperature sensor working and adjusting the fans and heating pads based on it’s readings. The temperature sensor we used was from the 1-wire family of devices. This communication system allows multiple devices to communicate and be powered by one wire or bus. This system works by allowing the devices charge up a capacitor when the line is high, then use that charge for device operation and communication while the line is low. For us, we only had one device to operate on with this system, which made it easier to use. We found
this example
code
online from Raspberry Pi, which happened to be interfacing with the exact device we had. We then used this to setup our temperature sensor and get readings off of it live. We then switched our open-loop control system to become closed-loop. We now had users input desired temperatures into the serial monitor, then based on the temperature sensor reading, turn on either the fans or the heating pads to adjust. We could then test our software implementation by inputting different desired temperatures and watching the fans or heating pads turn on and off respectively.
One issue we continued to encounter was how our code would get blocked waiting on a user to input their desired temperature. This meant that if the heating pads were turned on, for example, they would never turn off unless the user imputed a new number that was lower than what the current temperature was reading. We had two pieces of code, the serial monitor and the temperature control loop, operating as one. To account for this, we extrapolated the two into separate threads, one which could loop, and the other could stall waiting for an input. This way, we could constantly check the current temperature readings against the desired temperature and adjust the devices while simultaneously waiting for a new input from the user. From our example, the heating pads would turn off once the desired temperature was reached, and if the current temperature continued to rise due to momentum, the fans would turn on to cool it down.
Next, we went to implement the other closed loop control system we had, which was the pump/ultrasonic sensor loop. Again, to control the pump, we built and debugged the same circuit for the fans and heating pads. The only difference was that the pump required significantly more power, at 12V. As for the ultrasonic sensor, it operated off a trigger pin and an echo pin. We set each one up with a GPIO, and configured the trigger pin as a GPIO output, and the echo pin as a GPIO input. The ultrasonic sensor operated off a simple principle: send an ultrasonic signal out off the trigger pin, wait for a response from the echo pin, and measure the time it took for the signal to travel. Using that time and the speed of sound, you can calculate the distance from the surface the ultrasonic sensor is facing.
We initially implemented this software separately from the temperature loo
Technologies used
Hardware components
- DC motor
- IMU
- ultrasonic sensor
Software & tools
- C
- Arduino IDE
What you get
- Working project / hardware kit, tested before delivery
- Complete source code with explanation
- Project demo and guidance for your viva
- Project report, PPT and IEEE paper support (on request)
Related Embedded Systems projects

Gas Leakage Detector Using Arduino
A budget-friendly LPG gas leak detector built with an Arduino and MQ-5 gas sensor, triggering a buzzer and LED when unsafe gas levels are de...
View project
Simple Alarm System
A beginner-friendly home alarm with PIR motion sensing, keypad PIN entry, and separate entry/exit timing delays, built to be easy to expand.
View project
Ultrasonic Sensor Project with Arduino UNO Q
A beginner-friendly first Arduino UNO Q project: a servo-swept ultrasonic sensor that renders a live sweeping radar display in a web browser...
View project
3D Audio Localization
[Fall 2025] We designed a real-time embedded system that localizes sound sources in three dimensions and visualizes them live using a four-m...
View project