3D rendered maze game
[Fall 2023] Our final project is a 3D-rendered video game in which the player navigates a procedurally generated maze using a USB mouse and keypad, running entirely on the Raspberry Pi Pico.
- Suitable forB.Tech/B.E Embedded Systems students
- Build time4-6 weeks
- LevelBeginner
- Available atAjvika Labs, Kakinada
About this project
Our final project is a 3D-rendered video game in which the player navigates a
procedurally generated maze using a USB mouse and keypad, running entirely on
the Raspberry Pi Pico.
We implemented a full 3D graphics pipeline, which reads 3D models from input OBJ
files and renders onto a VGA screen. We created a script to procedurally
generate a 3D maze model, and implemented a user interface using USB, to allow
the player to move around inside a 3D maze in a first-person view.
High level design
We chose to do this project because we thought it would pose an interesting
challenge, and give us the opportunity to learn more about 3D rendering. No
previous project for this class used a true 3D rendering engine to create an
interactive experience. The closest was “Maze in a Box”
[1]
, which used a
Doom-style pseudo-3D system. We thought we could improve upon this, since the
Pico has much more RAM and computational power than the ATMega32.
Background math
1. 3D models
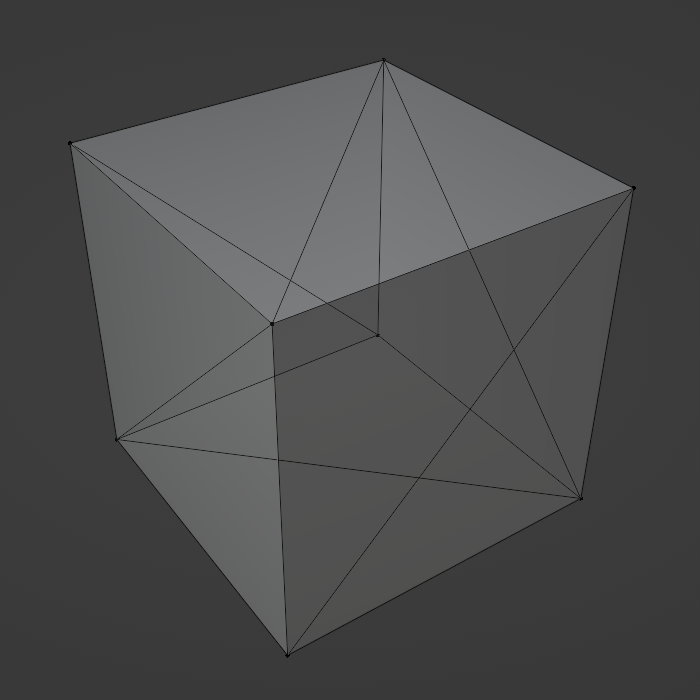
A 3D shape is represented as a set of triangles which collectively
form the surface of that shape. For example, a cube is made of 12
triangles, since each of its 6 square faces can be broken down into 2
triangles. A sphere or other curved shape can be approximated by many
small triangles.
Because triangles in a model usually share vertices with other
triangles, models in the OBJ format are represented using a list of
vertices and a list of triangles. The vertex list stores the 3D
coordinates of each vertex, and the triangle list defines the set of
vertices in each triangle as a set of indices in the vertex list. This
means every vertex only has to be defined once, which saves us time when
we have to transform every vertex in a model.
2. Linear algebra
To move a model by 1 unit in the
direction, we can add 1 to the
coordinate of each of its vertices. To rotate a model, we can rotate
each of its vertices the same amount. In general, any combination of
translation, rotation, and scaling is called an “affine transformation”,
and to
apply any affine transformation to a model, we just apply it to every
vertex.
This is done by augmenting each 3D vertex into a 4D vector (x, y, z, 1),
and multiplying it by a 4x4 matrix.
Most of the steps in the
3D graphics pipeline
are affine transformations from one coordinate space to another. For
example, to transform an object from the “world coordinate space” to the
“camera coordinate space”, we rotate and translate every vertex by the
camera angle and position. This moves the origin of the coordinate
system from the lower-left corner of the maze to the center of the
camera.
(Public domain diagram courtesy of Wikipedia)
3. Fixed-point math
We used fixed-point math instead of floating-point math for most of
the project, which was described in lecture and used in previous labs.
This was necessary as a performance optimization to make the game
playable.
Software architecture
The animation thread, which executes the entire graphics pipeline,
runs on core 1, while the TinyUSB host task runs on core 0. All of our
linear algebra is implemented in “threeD.h” and “threeD.c”, and our
fixed-point macros are in “fix15.h”. These functions are used in the
main file, “maze.c”, to implement the graphics pipeline. At the end of
the pipeline we use the 2D graphics primitives implemented in
“vga_graphics.c” to rasterize the geometry and display it on the screen.
This file is based on the VGA graphics library provided by Hunter
Adams, with heavy modifications to allow double-buffering, reduce the
resolution, increase the color depth, enable z-buffering, and improve
performance.
Hardware diagram
Hardware/software tradeoffs
A handful of design decisions had to be made during the process of
proposing and developing this project. For example, in deciding the user
interface, we could have used a simpler communication protocol, but
choosing USB allowed us to use a mouse and keypad, which already feels
natural to most users. However, because the TinyUSB implementation for
the Pico is very
resource-intensive, we were unable to run a serial thread on the same
core as
the USB task. Doing this would cause the serial monitor to print very
slowly,
and to not register most user inputs. Due to this, we decided to remove
the serial
thread after adding USB support, since it was only used for debugging.
Additionally, using USB required us to purchase two USB-A breakout boards so they could interface with the Pico.
Other decisions, such as the resolution of the VGA display, were
limited by the constraint that our system has only 264 kB of memory
available. The original 640x480 resolution required 153.6 kB of memory
to store a single frame, which was too large to allow for
double-buffering, since two frames would exceed the Pico’s memory
capacity. Reducing the resolution to 320x240 allowed us to use
double-buffering and improve the quality of the displayed image, but
also cost us a lot of development time.
Another trade-off was color depth. Modern displays use 24 bits per pixel, but we
could only use 4 bits per pixel to fit within the Pico’s memory constraints.
This was slightly more complicated than our original 3-bit RGB implementation,
but we decided the additional complexity was worth it in exchange for more
colors available. We wanted the maze to have an illusion of depth, and 3 bit RGB
color would not provide enough color resolution to create a convincing effect.
One option would be to use grayscale, which would give us 8 shades of gray using
3-bit color, or 16 shades if we upgraded to 4-bit color. Because 4 bit color
would use the same amount of memory as 3-bit (2 pixels per byte either way), we
chose 4-bit color. We chose to add a second green bit, to give us nice-looking
color pallete with enough resolution for convincing shading
[2]
(Image courtesy of Hunter Adams’ and Bruce Land’s
16-color VGA demo page
)
Program and Hardware Design
Maze generation
Prim’s algorithm is an algorithm that can generate a random maze of any size
[3]
This algorithm is specific in that the entrance and exit of the maze
are opposite of each other, and that there are only two continuous walls
in the maze with no closed off loops. We implemented Prim’s algorithm
in Python, and produced two outputs. First, we output an OBJ file so
that our 3D renderer could display the maze in 3D space. Second, we
output an array of binary values representing which grid cells contained
walls, for later use in calculating player collisions with walls.
3D pipeline
Our graphics pipeline is based on vector math we implemented in
“threeD.h” and “threeD.c”. We defined 2D, 3D, and 4D vectors, as well as
3x3 and 4x4 matrices, as custom struct data types. We then defined
functions to add vectors, multiply matrices, and multiply a matrix and a
vector using these structs. We also create a helper function to
initialize a rotation matrix based on the Euler angles of the rotation,
and a helper function to initialize a 4D affine transformation matrix to
represent both a rotation and a translation.
Because the Pico doesn’t have a file system, the 3D models rendered
by our graphics pipeline are defined inside of C header files and are
baked into the program at compile time, instead of being loaded at
runtime. To make sure our pipeline worked for a variety of input models,
we wrote a Python script to convert any OBJ file into a header file.
This lets us create an arbitrary model in Blender, export it as an OBJ
file, convert it into a header file automatically, and render it on the
Pico after compiling the code.
To render a model, we transform its vertices from “model space” into “world
space” based on that object’s position, rotation, and scale. The vertices are
then transformed into the “camera space” based on the camera’s position and
rotation, which represents the player’s point of view. Then, the vertices are
projected into a 4D “clip space” using another transformation, after which we
clip away any geometry that is off-screen and invisible to the player. This
clipped geometry is then transformed back to 3D space, and projected onto a 2D
plane (“screen space”) to be drawn onto the 2D screen.
Here is an example of a stock Blender model (“Suzanne”) rendered by our system
as a wireframe:
Initially, we rendered models as wireframes, to make sure that the
corners and edges of each face were transformed into screen coordinates
correctly. This just used drawLine() to connect the three corners of
each triangle using the coordinates we got at the end of the pipeline.
Eventually, we replaced this with filled-in triangles, so that the
player couldn’t see through the walls of the maze, and to enhance the
illusion of depth.
The final stages in the pipeline are clipping and rasterization. Clipping
removes any parts of the world geometry which are outside the camera’s field of
view so that they aren’t displayed on the screen. Rasterization converts the
transformed vertex and triangle data into pixels on the screen. This is done
using a z-buffer, which stores the distance from the camera to the nearest
object at every screen pixel, so that nearer triangles are drawn in front of
more distant triangles.
To improve the illusion of depth, we also use the z-buffer to determine the
color of each pixel, so that the walls of the maze become darker the further
away they are.
After rendering all of the 3D elements of the game, we draw the remaining UI
elements, including the FPS (frames per second) in the upper-left corner.
VGA display driver
In the original single-buffer VGA implementation, the DMA channels read pixel
data from the same array that drawPixel() writes data to. This means that if
a draw function is called while a frame is being displayed on the VGA screen,
the screen can display an i
Technologies used
Hardware components
- Raspberry Pi Pico
- ATmega
- VGA display
Software & tools
- Python
Project demo video
What you get
- Working project / hardware kit, tested before delivery
- Complete source code with explanation
- Project demo and guidance for your viva
- Project report, PPT and IEEE paper support (on request)
Related Embedded Systems projects

Gas Leakage Detector Using Arduino
A budget-friendly LPG gas leak detector built with an Arduino and MQ-5 gas sensor, triggering a buzzer and LED when unsafe gas levels are de...
View project
Simple Alarm System
A beginner-friendly home alarm with PIR motion sensing, keypad PIN entry, and separate entry/exit timing delays, built to be easy to expand.
View project
Ultrasonic Sensor Project with Arduino UNO Q
A beginner-friendly first Arduino UNO Q project: a servo-swept ultrasonic sensor that renders a live sweeping radar display in a web browser...
View project
3D Audio Localization
[Fall 2025] We designed a real-time embedded system that localizes sound sources in three dimensions and visualizes them live using a four-m...
View project