
DIY Smart Vacuum Cleaning Robot using Arduino
This arduino based robot is simple four wheeled Vacuum Cleaner which could smartly avoid obstacles and vacuum the floor at the same time.
- Suitable forB.Tech ECE students
- Build time5-7 weeks
- LevelAdvanced
- Available atAjvika Labs, Kakinada
About this project
Hi guys, are you a newbie to the world of Robotics or Electronic? OR Are you looking for a simple yet powerful project to make your friends and teachers impressed? Then this is the place.
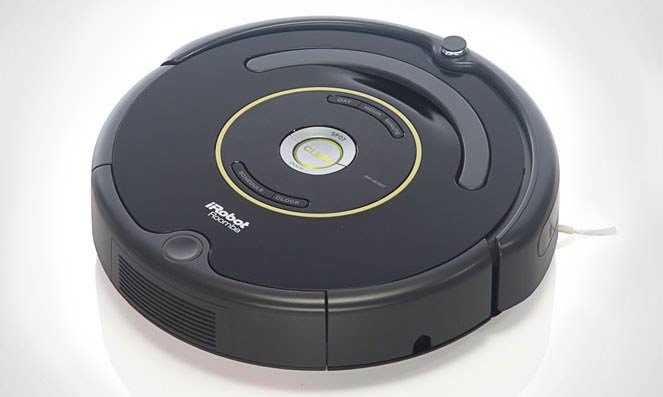
In this project we will use the power of Embedded Systems and Electronics to make our own robot which could help us in keeping our home or work place neat and tidy. This robot is simple four wheeled Vacuum Cleaner which could smartly avoid obstacles and vacuum the floor at the same time. The idea is inspired by the famous vacuum cleaner Robot Roomba which is shown in the image below.
Our Idea is to make a simple robot right from the scratch which can automatically avoid the obstacles while cleaning the floor. Trust me people it's fun!!
Required Material and Components:
Okay so now we have the Idea of our Automatic Floor Cleaner Robot in mind and we know what we are up to. So let's look where we should start our execution. In order to build a robot of our idea we would first need to decide on the following:
Microcontroller type
Robot chassis material
Now, lets us decide on each of the above mentioned points. This way it will be helpful for you to not only build this home cleaning robot but also any other robots which strikes your imagination.
Microcontroller Type:
Selecting the Microcontroller is a very important task, as this controller will act as the brain of your robot. Most of the DIY projects are made around Arduino and Raspberry Pi, but doesn't have to be the same. There is no specific Microcontroller that you can work on. It all depends upon the requirement and cost. Like a Tablet cannot be designed on 8 bit Microcontroller and there is no worth of using ARM cortex m4 to design an electronic calculator.
Microcontroller selection totally depends upon the requirements of the product:
1. Firstly technical requirements are identified like number of I/O pins required, flash size, number/type of communication protocols, any special features etc.
2. Then list of controllers are selected as per the technical requirements. This list contains controllers from different manufacturers. Many application specific controllers are available.
3. Then a controller is finalized based upon cost, availability and support from manufacturer.
If you don't want to do lot of heavy lifting and just want to learn the basics of microcontrollers and then later get deep into it, then you can choose Arduino. In this project we will be using an Arduino. We have previously created many types of Robots using Arduino :
DTMF Controlled Robot using Arduino
Line Follower Robot using Arduino
Computer Controlled Robot using Arduino
WiFi Controlled Robot using Arduino
Accelerometer Based Hand Gesture Controlled Robot using Arduino
Bluetooth Controlled Toy Car using Arduino
There are a lot of sensors available in the market each having its own usage. Every robot gets input via a sensor, they act as the sensory organs for the Robot. In our case our robot should be able to detect obstacles and avoid them.
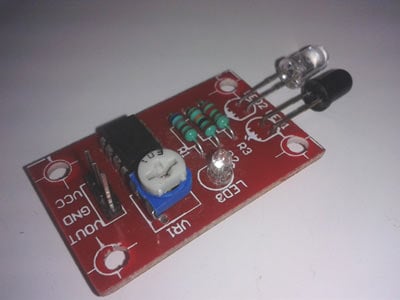
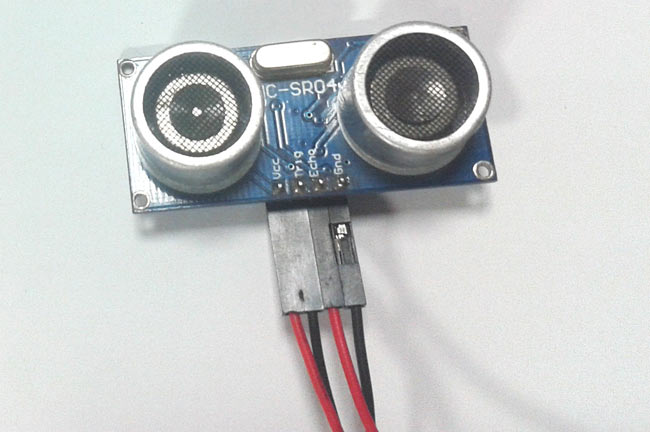
There a lot of other cool sensor which we will be using in our future projects, but now let us stay focused on IR sensor and US (Ultrasonic sensor) as these two guys will be providing the vision for our robo-car. Check out the working of IR sensor here. Below showing pictures of IR sensor Module and Ultrasonic Sensor :
Ultrasonic Sensor consists of two circular eyes out of which one is used to transmit the US signal and the other to receive the US rays. The time taken by the rays to get transmitted and received back is calculated by the microcontroller. Now, since the time and speed of sound is known we can calculate the distance by the following formulae.
Distance = Time x Speed of Sound divided by 2
The value is divided by two since the ray travels forward and backward covering the same distance. Detailed explanation of using Ultrasonic sensor is given here.
There are quite a lot a motors used in the field of robotics the most used ones are the Stepper and Servo motor. Since this project does not have any complicated actuators or rotary encoder we will be using a normal PMDC Motor. But our battery is a bit bulky and heavy hence we use four motors to drive our robot all four being the same PMDC motors. But it is advisable to set into stepper and servo motors once you get comfortable with PMDC motors.
Robot chassis material:
As a student or hobbyist the most difficult part while making a robot is to prepare the chassis of our robot. The problem is with the availability of tools and material. The most ideal material for this project will be Acrylic, but it requires drillers and other tools to work with it. Hence wood is chosen that everyone can work on it with ease.
This problem has totally vanished from the field after the introduction of the 3D printers. I am planning to 3D print parts someday and update you people with the same. So for now let’s use wooden sheets to build our robot.
Selecting the battery capacity should be our last part of work because it purely depends on your chassis and motors. Here our battery should drive a vacuum cleaner which draws about 3-5A and four PMDC motors. Hence we will require a heavy battery. I have chosen 12V 20Ah SLAB (Sealed lead acid battery) and its pretty bulky making our robot get four PMDC motors to pull this bulky guy.
Now that we have selected all our Required Components lets list them down
Wooden sheets for chassis
Vacuum cleaner which runs on DC current
Motor driver IC (L293D)
Enthusiastic energy to learn and work.
Most of our components are covered in the description above, I will explain the left outs below.
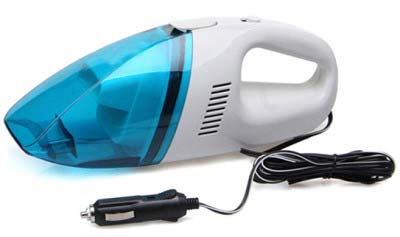
Since our robot runs on a 12V 20Ah DC system. Our vacuum should also be a 12V DC vacuum cleaner. If you are confused on where to get one then you can visit eBay or Amazon for car cleaning vacuum cleaners.
We will be using the same as shown in above picture.
Motor driver (L293D):
A motor driver is a intermediate module between Arduino and the Motor. This is because Arduino microcontroller will not be able to supply the current required for the motor to work it and can just supply 40mA, hence drawing more current will damage the controller permanently. So we trigger the motor driver which in turn controls the motor.
We will be using L293D Motor Driver IC which will be able to supply up to 1A, hence this driver will get the information from Arduino and make the motor work as desired.
Thats it!! I have given most of the crucial information but before we start building the robot it is recommended to go through the datasheet of L293D and Arduino. If you have any doubts or problems you can contact us through the comment section.
Building and Testing the Robot:
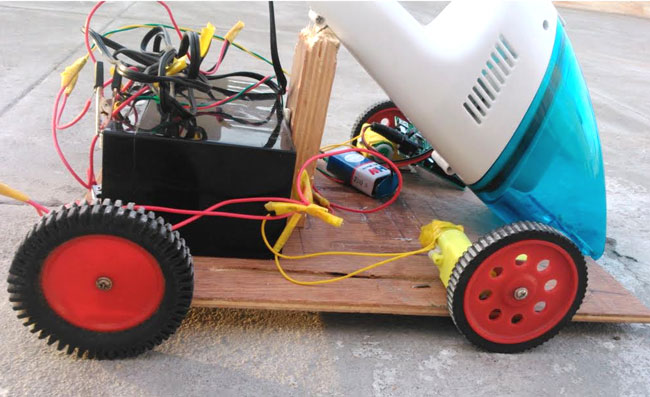
The Vacuum Cleaner is the most crucial part in placement of Robot. It has to be placed at tilted angle as shown in the picture, so that it can provide proper vacuum action. The vacuum cleaner is not controlled by the Arduino. Once you power on the robot the vacuum is also turned on.
One tiring process of building our Robot is the wooden works. We have to carve our wood and drill some holes to place the sensors and vacuum cleaner.
It is recommended to Test Ride your Robot with the following code once you arrange the Motor and Motor driver, before connecting the Sensors.
If everything works fine then you can connect the sensors with Arduino as shown in Circuit Diagram and use the Full Code given at the end. As you can see I have mounted an Ultrasonic sensor to the front and two IR sensors on both the side of the robot. The heat sink is fitted on to the L293D just in case the IC heats up fast.
You can also add few extra parts like this one
This is a Sweeping Arrangement can be placed on both ends of the front part that will push the dust along the sides into the suction area.
Further, you also have an option of making a Smaller Version of this Vacuum Cleaning Robot like this
This smaller Robot is made on cardboard and runs on ATMega16 development board. The vacuum cleaner part was done by using a BLDC fan and enclosed in a box. You can adopt this if you want to keep your budget low. This idea also works but it's not efficient.
Further, I am also planning to completely 3D Printed the parts in its next version. I am also going to be adding few cool features and complex algorithms so that it covers the whole carpet area and easy to handle and compact in size. So stay tuned for future updates.
Complete Project Code
why ur car is very slow sir
In reply to sir why ur car is very slow by harish kumar
I have slowed down the speed of the car by using delay functions. This is done so that the vacuum action takes place. If the car moves fast the vacuum cleaner on it might not be able to suck all the dust on ground. You can experiment yourself by reducing the delay and find out how your bot responds.
Let us know if you need any other guidance
In reply to Hi Harish, by ASWINTHRAJ Bh
I need this project. How much will it cost for a fully designed project along with CAD models and the Codes.
In this project we will use the power of Embedded Systems and Electronics to make our own robot which could help us in keeping our home or work place neat and tidy. This robot is simple four wheeled Vacuum Cleaner which could smartly avoid obstacles and vacuum the floor at the same time. The idea is inspired by the famous vacuum cleaner Robot Roomba which is shown in the image below.
Our Idea is to make a simple robot right from the scratch which can automatically avoid the obstacles while cleaning the floor. Trust me people it's fun!!
Required Material and Components:
Okay so now we have the Idea of our Automatic Floor Cleaner Robot in mind and we know what we are up to. So let's look where we should start our execution. In order to build a robot of our idea we would first need to decide on the following:
Microcontroller type
Robot chassis material
Now, lets us decide on each of the above mentioned points. This way it will be helpful for you to not only build this home cleaning robot but also any other robots which strikes your imagination.
Microcontroller Type:
Selecting the Microcontroller is a very important task, as this controller will act as the brain of your robot. Most of the DIY projects are made around Arduino and Raspberry Pi, but doesn't have to be the same. There is no specific Microcontroller that you can work on. It all depends upon the requirement and cost. Like a Tablet cannot be designed on 8 bit Microcontroller and there is no worth of using ARM cortex m4 to design an electronic calculator.
Microcontroller selection totally depends upon the requirements of the product:
1. Firstly technical requirements are identified like number of I/O pins required, flash size, number/type of communication protocols, any special features etc.
2. Then list of controllers are selected as per the technical requirements. This list contains controllers from different manufacturers. Many application specific controllers are available.
3. Then a controller is finalized based upon cost, availability and support from manufacturer.
If you don't want to do lot of heavy lifting and just want to learn the basics of microcontrollers and then later get deep into it, then you can choose Arduino. In this project we will be using an Arduino. We have previously created many types of Robots using Arduino :
DTMF Controlled Robot using Arduino
Line Follower Robot using Arduino
Computer Controlled Robot using Arduino
WiFi Controlled Robot using Arduino
Accelerometer Based Hand Gesture Controlled Robot using Arduino
Bluetooth Controlled Toy Car using Arduino
There are a lot of sensors available in the market each having its own usage. Every robot gets input via a sensor, they act as the sensory organs for the Robot. In our case our robot should be able to detect obstacles and avoid them.
There a lot of other cool sensor which we will be using in our future projects, but now let us stay focused on IR sensor and US (Ultrasonic sensor) as these two guys will be providing the vision for our robo-car. Check out the working of IR sensor here. Below showing pictures of IR sensor Module and Ultrasonic Sensor :
Ultrasonic Sensor consists of two circular eyes out of which one is used to transmit the US signal and the other to receive the US rays. The time taken by the rays to get transmitted and received back is calculated by the microcontroller. Now, since the time and speed of sound is known we can calculate the distance by the following formulae.
Distance = Time x Speed of Sound divided by 2
The value is divided by two since the ray travels forward and backward covering the same distance. Detailed explanation of using Ultrasonic sensor is given here.
There are quite a lot a motors used in the field of robotics the most used ones are the Stepper and Servo motor. Since this project does not have any complicated actuators or rotary encoder we will be using a normal PMDC Motor. But our battery is a bit bulky and heavy hence we use four motors to drive our robot all four being the same PMDC motors. But it is advisable to set into stepper and servo motors once you get comfortable with PMDC motors.
Robot chassis material:
As a student or hobbyist the most difficult part while making a robot is to prepare the chassis of our robot. The problem is with the availability of tools and material. The most ideal material for this project will be Acrylic, but it requires drillers and other tools to work with it. Hence wood is chosen that everyone can work on it with ease.
This problem has totally vanished from the field after the introduction of the 3D printers. I am planning to 3D print parts someday and update you people with the same. So for now let’s use wooden sheets to build our robot.
Selecting the battery capacity should be our last part of work because it purely depends on your chassis and motors. Here our battery should drive a vacuum cleaner which draws about 3-5A and four PMDC motors. Hence we will require a heavy battery. I have chosen 12V 20Ah SLAB (Sealed lead acid battery) and its pretty bulky making our robot get four PMDC motors to pull this bulky guy.
Now that we have selected all our Required Components lets list them down
Wooden sheets for chassis
Vacuum cleaner which runs on DC current
Motor driver IC (L293D)
Enthusiastic energy to learn and work.
Most of our components are covered in the description above, I will explain the left outs below.
Since our robot runs on a 12V 20Ah DC system. Our vacuum should also be a 12V DC vacuum cleaner. If you are confused on where to get one then you can visit eBay or Amazon for car cleaning vacuum cleaners.
We will be using the same as shown in above picture.
Motor driver (L293D):
A motor driver is a intermediate module between Arduino and the Motor. This is because Arduino microcontroller will not be able to supply the current required for the motor to work it and can just supply 40mA, hence drawing more current will damage the controller permanently. So we trigger the motor driver which in turn controls the motor.
We will be using L293D Motor Driver IC which will be able to supply up to 1A, hence this driver will get the information from Arduino and make the motor work as desired.
Thats it!! I have given most of the crucial information but before we start building the robot it is recommended to go through the datasheet of L293D and Arduino. If you have any doubts or problems you can contact us through the comment section.
Building and Testing the Robot:
The Vacuum Cleaner is the most crucial part in placement of Robot. It has to be placed at tilted angle as shown in the picture, so that it can provide proper vacuum action. The vacuum cleaner is not controlled by the Arduino. Once you power on the robot the vacuum is also turned on.
One tiring process of building our Robot is the wooden works. We have to carve our wood and drill some holes to place the sensors and vacuum cleaner.
It is recommended to Test Ride your Robot with the following code once you arrange the Motor and Motor driver, before connecting the Sensors.
If everything works fine then you can connect the sensors with Arduino as shown in Circuit Diagram and use the Full Code given at the end. As you can see I have mounted an Ultrasonic sensor to the front and two IR sensors on both the side of the robot. The heat sink is fitted on to the L293D just in case the IC heats up fast.
You can also add few extra parts like this one
This is a Sweeping Arrangement can be placed on both ends of the front part that will push the dust along the sides into the suction area.
Further, you also have an option of making a Smaller Version of this Vacuum Cleaning Robot like this
This smaller Robot is made on cardboard and runs on ATMega16 development board. The vacuum cleaner part was done by using a BLDC fan and enclosed in a box. You can adopt this if you want to keep your budget low. This idea also works but it's not efficient.
Further, I am also planning to completely 3D Printed the parts in its next version. I am also going to be adding few cool features and complex algorithms so that it covers the whole carpet area and easy to handle and compact in size. So stay tuned for future updates.
Complete Project Code
why ur car is very slow sir
In reply to sir why ur car is very slow by harish kumar
I have slowed down the speed of the car by using delay functions. This is done so that the vacuum action takes place. If the car moves fast the vacuum cleaner on it might not be able to suck all the dust on ground. You can experiment yourself by reducing the delay and find out how your bot responds.
Let us know if you need any other guidance
In reply to Hi Harish, by ASWINTHRAJ Bh
I need this project. How much will it cost for a fully designed project along with CAD models and the Codes.
Technologies used
Hardware components
- Arduino
- Servo Motor
- DC Motor
- L298N
- Ultrasonic Sensor
- ESP32
Software & tools
- Arduino IDE
- ROS
- Python
- OpenCV
- VS Code
Project demo video
What you get
- Working project / hardware kit, tested before delivery
- Complete source code with explanation
- Project demo and guidance for your viva
- Project report, PPT and IEEE paper support (on request)
Delivery & Payment
Delivery takes a minimum of two weeks from the date your inquiry is confirmed.
Payment is in two parts:
• 50% advance to start the project
• Remaining 50% before delivery
Note:
• Documentation and PPT are not included by default
• If you need documentation/PPT, it can be arranged for extra time and cost
We'll confirm the exact timeline and cost with you after reviewing your requirements.
Related ECE projects
ECE
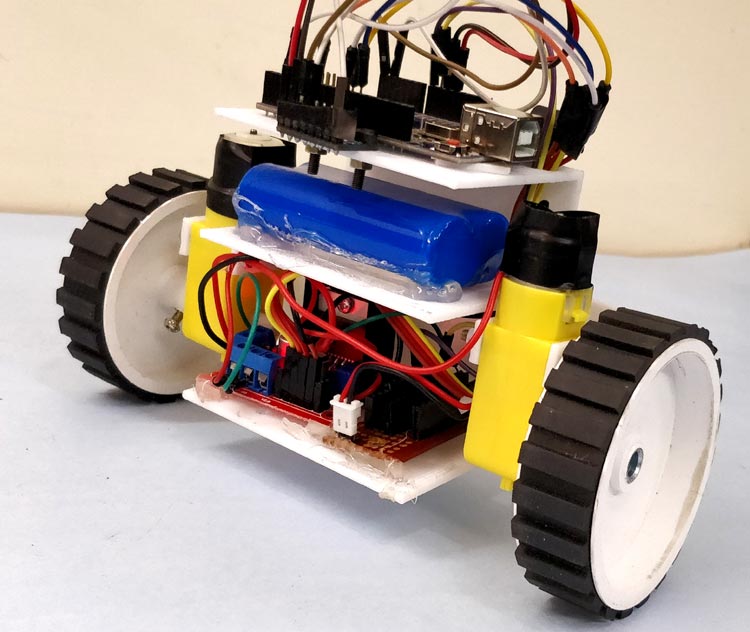
DIY Self Balancing Robot using Arduino
In this tutorial I will document my experience in building the self balancing robot. You might be an absolute beginner who is just getting s...
View project
ECE
Sustainable Battery Material For Electric Cars
Researchers have created eco-friendly batteries for EVs, matching cobalt-based batteries in cost-effectiveness with potential for lithium re...
View project
ECE
BorgWarner To Integrate STMicroelectronics SiC Technology In Viper Power Module For Volvo Cars Next-Generation EVs
STMicroelectronics will supply BorgWarner Inc. with the latest third generation 750V silicon carbide SiC power MOSFETs dice for their propri...
View project
ECE
Longer-Lasting Chips For Smartphones
New chips help users run apps faster, keep devices working longer, and handle more tasks on smartphones, computers, and cars.
View project