Bluetooth Controlled Pick and Place Robotic Arm Car using Arduino
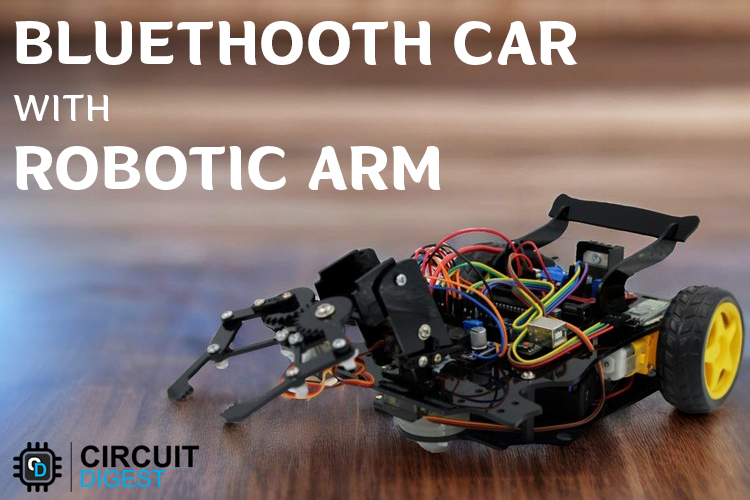
Android phone controllable robotic arm using an Arduino board, servo motors, Bluetooth module and a motor driver.
- Suitable forB.Tech ECE students
- Build time5-7 weeks
- LevelAdvanced
- Available atAjvika Labs, Kakinada
About this project
In the domain of robotics and automation, precision-controlled mechanical movements have ushered in a revolutionary wave across diverse industries, spanning from manufacturing to healthcare. Thanks to the advent of cost-effective microcontrollers ( Arduino ) and easily accessible programming tools, enthusiasts and hobbyists now have the means to create their own Bluetooth-controllable robotic arm using an Arduino board, servo motors, and a motor driver.
Robotic arms have found their way into an extensive array of applications, from industrial automation to even Pick and Place assembly lines. The ARA ( Arduino Robotic Arm ), now, from the comfort of your own home, you can construct a Robot Arm mounted on a 2WD Arduino car kit.
This tutorial will serve as an illuminating guide on how to create an Arduino-powered Robotic Arm, replete with wireless control and programmability facilitated through a custom-build Android application. Within the application's interface, individual servos or axes of the robot arm can be manually maneuvered using dedicated buttons. Notably, this robot car encompasses two primary functions: a 2WD car mode and the control of a robotic arm. This integration is achieved through the utilization of two DC motors and a robotic arm. The robotic arm itself is presented through both a 3D-designed model (designed from scratch) and a physically assembled iteration.
Also, check our previously built Robotic Arm projects using different microcontrollers:
DIY Pick and Place Robotic Arm using ARM7-LPC2148 ARM Microcontroller
Hand Gesture Controlled Robotic Arm using Arduino Nano
Arduino Based Robotic Arm
Record and Play 3D Printed Robotic Arm using Arduino
Robotic Arm Control using PIC Microcontroller
Kinematics of Arm Robot Manipulator
At first, the thought of building a robotic arm might sound complex and gruesome. But after learning the physics and kinematics behind it, and going more in-depth into the topic. You will understand that it is not that hard.
This robotic arm consists of 3 servo motors, 1 for the gripper and 2 for the arm joints movement. This means that the DOF (degree of freedom) for this robot is 2. The angle and position of the Arm depends on the kinematics.
Kinematics is the science that considers the motion of an object (robot) without cares for the cause of that motion. Kinematics studies the position, velocity, acceleration, and other higher derivatives of position with respect to time. Therefore, the study of kinematics refers to all geometrical and time-based properties of motion.
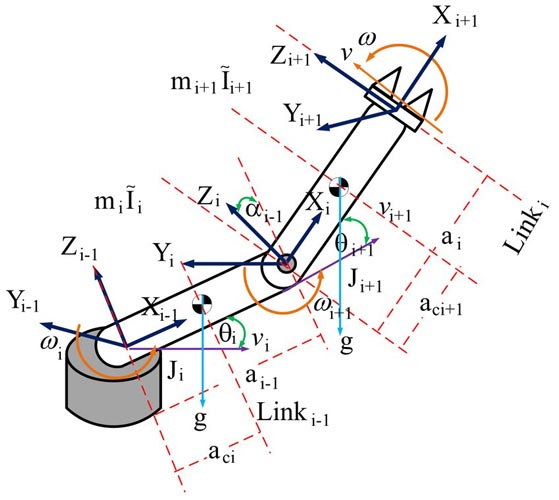
An arm robot manipulator is a set of links connected by joints, the lowest part is called the based, and the end part is called end-effector. The number of joints and how it moves define the degree of freedom (DOF). The joints are characterised as revolute or prismatic joints. Below fig shows a 2 DOF robot that consists of all revolute joints. A typical industrial robot has 5 or 6 joints. In this project, the kinematics and dynamics are derived from a 2-DOF system for the sake of simplicity.
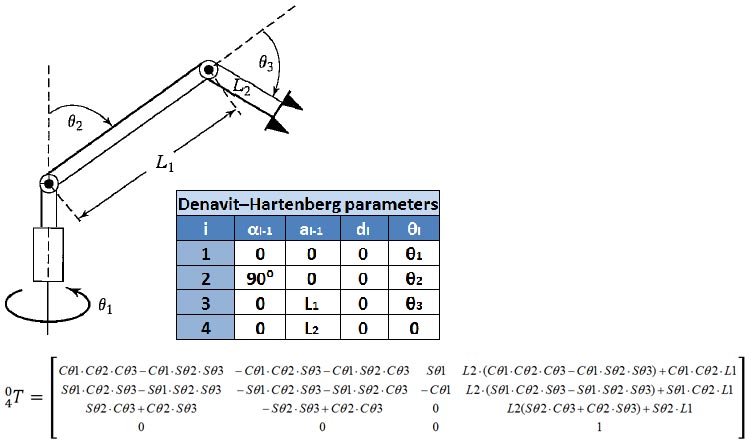
Forward kinematics involves utilizing a robot's kinematic equations to calculate the position of the end-effector based on given joint parameter values, which in this context are the positions of the servo motors. In the sketch of the robotic arm below, you can visualize the Denavit-Hartenberg parameters, an essential component in this process. Additionally, the derived forward kinematic equations for the robotic arm are presented.
While an alternative approach was ultimately pursued, one not reliant on matrices, the derived equations remain valuable for those interested in exploring different methodologies. It's important to note that 'C' represents cosine and 'S' represents sine.
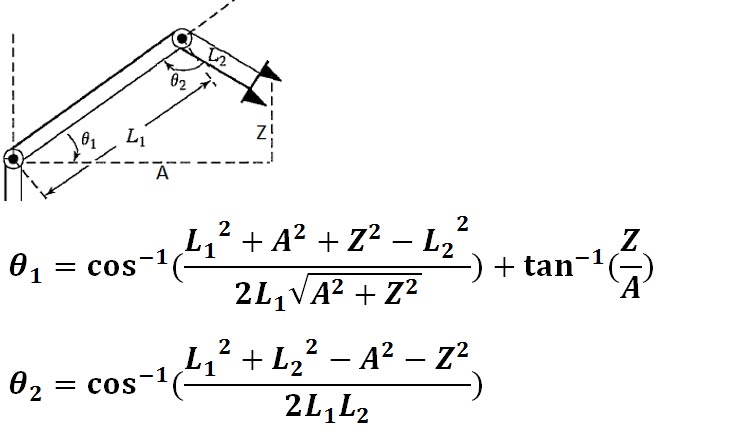
By solving the Inverse Kinematics equations, we can precisely control the movement and orientation of the robotic arm's end-effector. These equations provide us with the necessary angles for each joint to achieve a desired position in space. The figure below visually breaks down the variables that play a crucial role in these equations, allowing us to translate mathematical concepts into practical arm movements.
Design and Build of Robotic Arm
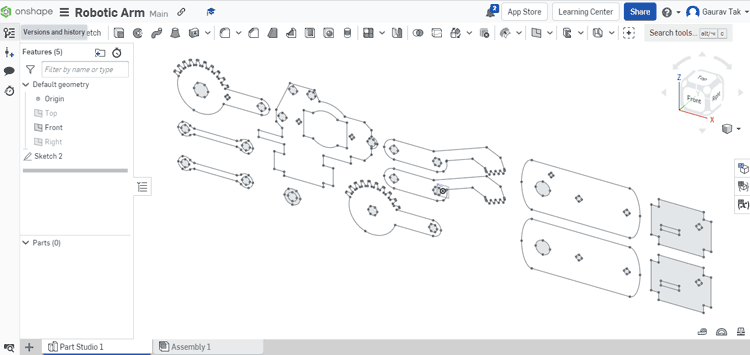
I created the custom robotic arm specifically for this project, and you can see screenshots of the CAD design I made using Onshape, as well as the actual mechanical arm I built, in the images below. If you're interested in recreating this project or incorporating my design into your own work, I've included the CAD .dxf files, which you can download from here.
For constructing the arm, I used laser-cut acrylic parts. However, if you have access to a 3D printer, you can also use that. If you opt for the 3D printing route, you'll need to open the files in SolidWorks, convert them to STL format, and save them. To do this, open any part, click 'Save As,' and choose STL as the file format.
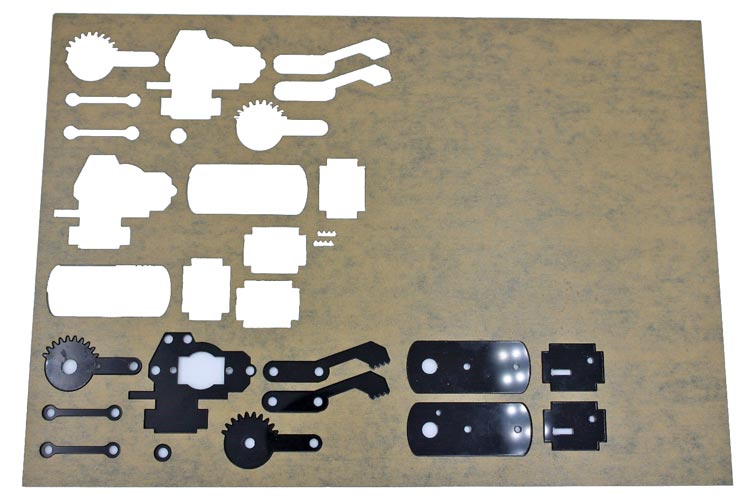
Here's a visual representation of what the laser-cut acrylic sheet will look like.
Arduino robot arms, much like other robot arms, are commonly evaluated based on their degrees of freedom (DOF). This term refers to the count of rotational joints integrated into the robot's design. The concept of DOF is interchangeable with the term \" axes,\" a familiar term in this context. For instance, a 2DOF (2 Axis) robot arm is equipped with two distinct axes enabling specific motion.
This robotic arm arrives in a flat-pack state, requiring minimal soldering for assembly and activation. It incorporates two MG90 servos, enabling two degrees of movement. Notably, it can adeptly grip lightweight objects using the gripper.
The \"Base,\" also known as the \"Waist,\" often facilitates a 180° or 360° rotation of the arm, contingent on the servo type employed (in this project, a 180° Servo was utilized).
The \"Base,\" also known as the \"Waist,\" often facilitates a 180° or 360° rotation of the arm, contingent on the servo type employed (in this project, a 180° Servo was utilized).
The \"Shoulder\" maneuver is responsible for vertically raising or lowering the arm.
The \"Shoulder\" maneuver is responsible for vertically raising or lowering the arm.
The \"Gripper\" engages by either opening or closing to \"grab things.\"
The \"Gripper\" engages by either opening or closing to \"grab things.\"
Components Required for Robotic Arm Car
Arduino board (e.g., Arduino Uno)
Arduino board (e.g., Arduino Uno)
MG 90 metal gear Servo motors (3x)
MG 90 metal gear Servo motors (3x)
HC-05 Bluetooth module
HC-05 Bluetooth module
Laser cut Chassis and Robotic arm mechanical components
Laser cut Chassis and Robotic arm mechanical components
LM2596 DC-DC Buck Converter
LM2596 DC-DC Buck Converter
Breadboard or PCB (Printed Circuit Board)
Breadboard or PCB (Printed Circuit Board)
Screws, nuts, spacers
Screws, nuts, spacers
Assembly of Robotic Arm
We have utilized an acrylic sheet cut with a laser to create a Robotic Arm for our project. The sheet has been precisely cut to accommodate all the necessary fittings and components, allowing for easy assembly using screwdrivers.
Before starting the assembly, we need to adjust the angle adjustment of the servo motors. Otherwise, your robotic Arm will not work properly.
To begin, attach the Servo Arm to the servo by carefully aligning and securing it in place. We can manually calibrate and adjust the servo motor angle but some time manually calibration is not accurate or may not be possible. so you can calibrate your servo motors using the provided code #1. Refer to the circuit diagram mentioned below and connect your servo motors to Arduino pins 5, 6, and 3 accordingly. Upload the provided code #1 to your Arduino board, which will facilitate the calibration process. Failing to execute this step may result in unstable performance of your robot.
By ensuring proper alignment and calibration of the servos, you lay the foundation for a stable and well-functioning robot.
Angle values for robotic arm movements
Angle of rotation on servo(in°)
This angle value maybe changed cording to your servo adjustment. After done with servo adjustments, you can pass Assembly stages.
Step 1 : Here is an image showcasing all the essential components necessary for assembling the robotic arm.
Step 2 : Secure the servo motor to the gripper base plate using M2.5 10mm nuts and bolts.
Step 3 : Attach the pair of gripper gears to the servo and base plate using M4 10mm nuts and bolts.
Step 4 : Secure the gripper hand to both gears at their designated positions using M3 30mm nuts and bolts.
Step 5 : Join the hand support link to both the gripper hand and servo base plate using M3 and M4 10mm nuts and bolts.
Step 6 : Finally, attach the side stopper and shoulder movement legs to their respective positions using M3 nuts and bolts.
Circuit Diagram for Bluetooth-Controlled Robotic Arm Car with Arduino (3 Servo Motors)
In this setup, the DC motors work like the robot's wheels, helping it to move in different directions. Meanwhile, the three servo motors act like the robot arm's joints, allowing it to twist and turn at the waist, lift or lower its shoulder, and open or close its gripper.
Robotic arms have found their way into an extensive array of applications, from industrial automation to even Pick and Place assembly lines. The ARA ( Arduino Robotic Arm ), now, from the comfort of your own home, you can construct a Robot Arm mounted on a 2WD Arduino car kit.
This tutorial will serve as an illuminating guide on how to create an Arduino-powered Robotic Arm, replete with wireless control and programmability facilitated through a custom-build Android application. Within the application's interface, individual servos or axes of the robot arm can be manually maneuvered using dedicated buttons. Notably, this robot car encompasses two primary functions: a 2WD car mode and the control of a robotic arm. This integration is achieved through the utilization of two DC motors and a robotic arm. The robotic arm itself is presented through both a 3D-designed model (designed from scratch) and a physically assembled iteration.
Also, check our previously built Robotic Arm projects using different microcontrollers:
DIY Pick and Place Robotic Arm using ARM7-LPC2148 ARM Microcontroller
Hand Gesture Controlled Robotic Arm using Arduino Nano
Arduino Based Robotic Arm
Record and Play 3D Printed Robotic Arm using Arduino
Robotic Arm Control using PIC Microcontroller
Kinematics of Arm Robot Manipulator
At first, the thought of building a robotic arm might sound complex and gruesome. But after learning the physics and kinematics behind it, and going more in-depth into the topic. You will understand that it is not that hard.
This robotic arm consists of 3 servo motors, 1 for the gripper and 2 for the arm joints movement. This means that the DOF (degree of freedom) for this robot is 2. The angle and position of the Arm depends on the kinematics.
Kinematics is the science that considers the motion of an object (robot) without cares for the cause of that motion. Kinematics studies the position, velocity, acceleration, and other higher derivatives of position with respect to time. Therefore, the study of kinematics refers to all geometrical and time-based properties of motion.
An arm robot manipulator is a set of links connected by joints, the lowest part is called the based, and the end part is called end-effector. The number of joints and how it moves define the degree of freedom (DOF). The joints are characterised as revolute or prismatic joints. Below fig shows a 2 DOF robot that consists of all revolute joints. A typical industrial robot has 5 or 6 joints. In this project, the kinematics and dynamics are derived from a 2-DOF system for the sake of simplicity.
Forward kinematics involves utilizing a robot's kinematic equations to calculate the position of the end-effector based on given joint parameter values, which in this context are the positions of the servo motors. In the sketch of the robotic arm below, you can visualize the Denavit-Hartenberg parameters, an essential component in this process. Additionally, the derived forward kinematic equations for the robotic arm are presented.
While an alternative approach was ultimately pursued, one not reliant on matrices, the derived equations remain valuable for those interested in exploring different methodologies. It's important to note that 'C' represents cosine and 'S' represents sine.
By solving the Inverse Kinematics equations, we can precisely control the movement and orientation of the robotic arm's end-effector. These equations provide us with the necessary angles for each joint to achieve a desired position in space. The figure below visually breaks down the variables that play a crucial role in these equations, allowing us to translate mathematical concepts into practical arm movements.
Design and Build of Robotic Arm
I created the custom robotic arm specifically for this project, and you can see screenshots of the CAD design I made using Onshape, as well as the actual mechanical arm I built, in the images below. If you're interested in recreating this project or incorporating my design into your own work, I've included the CAD .dxf files, which you can download from here.
For constructing the arm, I used laser-cut acrylic parts. However, if you have access to a 3D printer, you can also use that. If you opt for the 3D printing route, you'll need to open the files in SolidWorks, convert them to STL format, and save them. To do this, open any part, click 'Save As,' and choose STL as the file format.
Here's a visual representation of what the laser-cut acrylic sheet will look like.
Arduino robot arms, much like other robot arms, are commonly evaluated based on their degrees of freedom (DOF). This term refers to the count of rotational joints integrated into the robot's design. The concept of DOF is interchangeable with the term \" axes,\" a familiar term in this context. For instance, a 2DOF (2 Axis) robot arm is equipped with two distinct axes enabling specific motion.
This robotic arm arrives in a flat-pack state, requiring minimal soldering for assembly and activation. It incorporates two MG90 servos, enabling two degrees of movement. Notably, it can adeptly grip lightweight objects using the gripper.
The \"Base,\" also known as the \"Waist,\" often facilitates a 180° or 360° rotation of the arm, contingent on the servo type employed (in this project, a 180° Servo was utilized).
The \"Base,\" also known as the \"Waist,\" often facilitates a 180° or 360° rotation of the arm, contingent on the servo type employed (in this project, a 180° Servo was utilized).
The \"Shoulder\" maneuver is responsible for vertically raising or lowering the arm.
The \"Shoulder\" maneuver is responsible for vertically raising or lowering the arm.
The \"Gripper\" engages by either opening or closing to \"grab things.\"
The \"Gripper\" engages by either opening or closing to \"grab things.\"
Components Required for Robotic Arm Car
Arduino board (e.g., Arduino Uno)
Arduino board (e.g., Arduino Uno)
MG 90 metal gear Servo motors (3x)
MG 90 metal gear Servo motors (3x)
HC-05 Bluetooth module
HC-05 Bluetooth module
Laser cut Chassis and Robotic arm mechanical components
Laser cut Chassis and Robotic arm mechanical components
LM2596 DC-DC Buck Converter
LM2596 DC-DC Buck Converter
Breadboard or PCB (Printed Circuit Board)
Breadboard or PCB (Printed Circuit Board)
Screws, nuts, spacers
Screws, nuts, spacers
Assembly of Robotic Arm
We have utilized an acrylic sheet cut with a laser to create a Robotic Arm for our project. The sheet has been precisely cut to accommodate all the necessary fittings and components, allowing for easy assembly using screwdrivers.
Before starting the assembly, we need to adjust the angle adjustment of the servo motors. Otherwise, your robotic Arm will not work properly.
To begin, attach the Servo Arm to the servo by carefully aligning and securing it in place. We can manually calibrate and adjust the servo motor angle but some time manually calibration is not accurate or may not be possible. so you can calibrate your servo motors using the provided code #1. Refer to the circuit diagram mentioned below and connect your servo motors to Arduino pins 5, 6, and 3 accordingly. Upload the provided code #1 to your Arduino board, which will facilitate the calibration process. Failing to execute this step may result in unstable performance of your robot.
By ensuring proper alignment and calibration of the servos, you lay the foundation for a stable and well-functioning robot.
Angle values for robotic arm movements
Angle of rotation on servo(in°)
This angle value maybe changed cording to your servo adjustment. After done with servo adjustments, you can pass Assembly stages.
Step 1 : Here is an image showcasing all the essential components necessary for assembling the robotic arm.
Step 2 : Secure the servo motor to the gripper base plate using M2.5 10mm nuts and bolts.
Step 3 : Attach the pair of gripper gears to the servo and base plate using M4 10mm nuts and bolts.
Step 4 : Secure the gripper hand to both gears at their designated positions using M3 30mm nuts and bolts.
Step 5 : Join the hand support link to both the gripper hand and servo base plate using M3 and M4 10mm nuts and bolts.
Step 6 : Finally, attach the side stopper and shoulder movement legs to their respective positions using M3 nuts and bolts.
Circuit Diagram for Bluetooth-Controlled Robotic Arm Car with Arduino (3 Servo Motors)
In this setup, the DC motors work like the robot's wheels, helping it to move in different directions. Meanwhile, the three servo motors act like the robot arm's joints, allowing it to twist and turn at the waist, lift or lower its shoulder, and open or close its gripper.
Technologies used
Hardware components
- Arduino
- Servo Motor
- DC Motor
- L298N
- Ultrasonic Sensor
- ESP32
Software & tools
- Arduino IDE
- ROS
- Python
- OpenCV
- VS Code
Project demo video
What you get
- Working project / hardware kit, tested before delivery
- Complete source code with explanation
- Project demo and guidance for your viva
- Project report, PPT and IEEE paper support (on request)
Delivery & Payment
Delivery takes a minimum of two weeks from the date your inquiry is confirmed.
Payment is in two parts:
• 50% advance to start the project
• Remaining 50% before delivery
Note:
• Documentation and PPT are not included by default
• If you need documentation/PPT, it can be arranged for extra time and cost
We'll confirm the exact timeline and cost with you after reviewing your requirements.
Related ECE projects
ECE
DIY Self Balancing Robot using Arduino
In this tutorial I will document my experience in building the self balancing robot. You might be an absolute beginner who is just getting s...
View project
ECE
Sustainable Battery Material For Electric Cars
Researchers have created eco-friendly batteries for EVs, matching cobalt-based batteries in cost-effectiveness with potential for lithium re...
View project
ECE
BorgWarner To Integrate STMicroelectronics SiC Technology In Viper Power Module For Volvo Cars Next-Generation EVs
STMicroelectronics will supply BorgWarner Inc. with the latest third generation 750V silicon carbide SiC power MOSFETs dice for their propri...
View project
ECE
Longer-Lasting Chips For Smartphones
New chips help users run apps faster, keep devices working longer, and handle more tasks on smartphones, computers, and cars.
View project