

Smart Car Washing System Using Edge Impulse for Object Detection
Revolutionize car washing with Arduino UNO, AI-driven automation along with ESP32 CAM that automates wash cycles, enhances safety via human detection, optimizes water use, and ensures eco-friendly, efficient, and safe operations of car wash.
- Suitable forB.Tech AI students
- Build time4-6 weeks
- LevelAdvanced
- Available atAjvika Labs, Kakinada
About this project
AI-powered smart car wash improves safety, efficiency, and reduces waste with automation.
1. ESP32 CAM (As Object Detection Module) x1 2. Arduino UNO R4 Wifi (Main Head Controller) x1 3. NEMA17 Stepper Motor x1 4. A4988 Stepper Motor Driver x1 5. Micro Limit Switch x2 6. 12V DC Water Pump x1 7. 5V Relay Module x1 8. SMPS x1 9. 10mm Fiber Glass x1sq.ft 10. 8mm Lead Screw & Nut x1 11. 8mm Stainless Steel Rod x2 12. Adjustable Spray Nozzle x3 13. 6mm pipe x3mtr 14. Buzzer x1 15. PC817 Optocoupler x2 16. 5mm LED Lights x2 17. 220E 1/4W Resistors x10 18. 6mm x 6mm Push Button x1 19. Multistrand Wire x6mtr 20. Toy Car (For Demonstration Purpose)
To see the full demonstration video, click on the YouTube Video below.
AI-based Object Detection : Uses Edge Impulse for human detection, enhancing safety.
AI-based Object Detection : Uses Edge Impulse for human detection, enhancing safety.
Automated Washing Cycles : Automates the washing process with precise control over water usage.
Automated Washing Cycles : Automates the washing process with precise control over water usage.
Efficient Water Management : Optimizes resource consumption, reducing waste.
Efficient Water Management : Optimizes resource consumption, reducing waste.
Safety Measures : Human detection minimizes risks of accidents during operation.
Safety Measures : Human detection minimizes risks of accidents during operation.
Reduced Human Intervention : Fully automated, requiring minimal manual input.
Reduced Human Intervention : Fully automated, requiring minimal manual input.
Sustainability Focus : Environmentally friendly, conserving water and energy.
Sustainability Focus : Environmentally friendly, conserving water and energy.
Scalable Design : Adaptable for various car wash facilities, from small to large operations.
Scalable Design : Adaptable for various car wash facilities, from small to large operations.
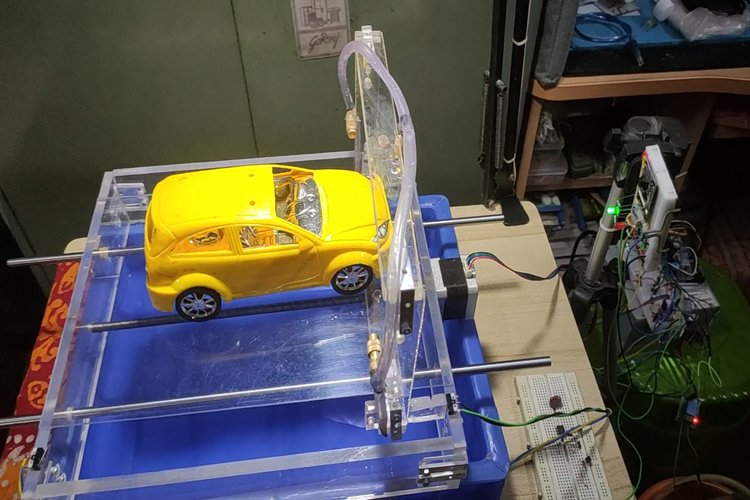
When a car arrives at the washing area, the ESP32 CAM running Edge Impulse object detection identifies whether the object is a car or a human. If a car is detected, the system indicates that it's ready to begin. The driver must lower the window and press a push button located near the driver's window. After a brief delay, the system activates.
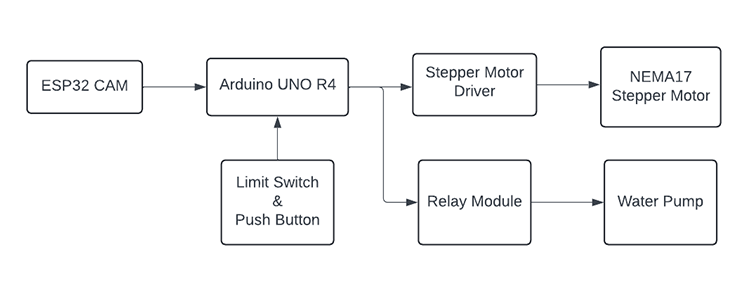
Once initiated, the system turns on a relay that powers the water pump, which sprays high-pressure water through nozzles placed around the car to remove dirt and debris. The Arduino UNO R4, acting as the main controller, also provides a PWM signal to the motor driver to control the forward and reverse movement of the stepper motor, allowing the washing frame to move smoothly over the car.
To ensure safety, limit switches are installed to restrict the movement of the washing frame within the designated washing area. During the washing process, if the ESP32 CAM detects any human presence—either the driver or someone entering the area—the system sends an emergency stop command to the Arduino, halting the entire operation. The system will return to its initial position, and a loud buzzer will sound to notify nearby individuals of the stoppage. This ensures that the system operates safely and prevents accidents during the washing process.
Training an Object Detection Model with Edge Impulse:
Step 2: Data Acquisition
In the project interface, select Data Acquisition from the left-side menu.
In the project interface, select Data Acquisition from the left-side menu.
Click on Connect a Device to link a data-capturing device. Edge Impulse provides three connection options for this: USB connection Edge Impulse CLI QR code method
Click on Connect a Device to link a data-capturing device. Edge Impulse provides three connection options for this:
Note: For this guide, we’ll connect a smartphone using the QR code method.
Use your smartphone to capture the required images for training.
Use your smartphone to capture the required images for training.
Step 3: Labeling Data
Once your data is collected, click on Labeling Queue at the top of the page.
Once your data is collected, click on Labeling Queue at the top of the page.
For each image, draw a bounding box around your object and assign a label. Repeat this for each image to complete the dataset labeling.
For each image, draw a bounding box around your object and assign a label. Repeat this for each image to complete the dataset labeling.
Step 4: Impulse Design
From the Impulse Design dropdown on the left side of the screen, select Create Impulse.
From the Impulse Design dropdown on the left side of the screen, select Create Impulse.
Set the Image Height and Width to 48x48 (suitable for ESP32-CAM).
Set the Image Height and Width to 48x48 (suitable for ESP32-CAM).
Click Add a processing block and select Image Processing.
Click Add a processing block and select Image Processing.
Similarly, click Add a learning block and select Object Detection (Image).
Similarly, click Add a learning block and select Object Detection (Image).
Save the impulse configuration and proceed.
Save the impulse configuration and proceed.
Step 5: Configure Image Processing
In Impulse Design, select Image.
In Impulse Design, select Image.
Change Colour Depth to Greyscale to simplify processing, then click Save Parameters.
Change Colour Depth to Greyscale to simplify processing, then click Save Parameters.
Step 6: Feature Generation
After saving, you’ll be redirected to the feature generation screen.
After saving, you’ll be redirected to the feature generation screen.
Click Generate Features to visualize the differentiation between objects in your dataset.
Click Generate Features to visualize the differentiation between objects in your dataset.
Step 7: Model Training
Go back to Impulse Design and select Object Detection.
Technologies used
Hardware components
- Raspberry Pi
- USB Camera
- Pi Camera
- Jetson Nano
Software & tools
- Python
- TensorFlow
- OpenCV
- Jupyter Notebook
- Google Colab
Project demo video
What you get
- Working project / hardware kit, tested before delivery
- Complete source code with explanation
- Project demo and guidance for your viva
- Project report, PPT and IEEE paper support (on request)
Related AI projects

ESP32 CAM Object Detection using Edge Impulse TinyML
Deploy a custom TinyML object detection model trained on Edge Impulse on ESP32-CAM to identify objects like vegetables, gestures or products...
View project
ESP32 Real-Time Face Recognition Attendance System
Build a face recognition attendance system using ESP32-CAM that automatically logs attendance with timestamp to Firebase when a registered f...
View project
C++ Programming Language
C++ Programming Language — a beginner AI project built with HTML5, CSS3, JavaScript, complete with design details, implementation steps and...
View project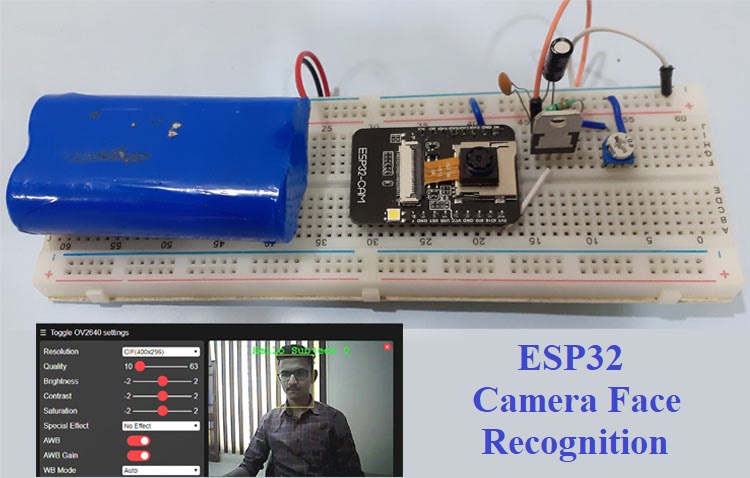
How to use ESP32 Camera Module for Video Streaming and Face Recognition
In this project, we are going to build a Face Recognition System using ESP32-CAM which will also work as an ESP32-CAM Security system by rec...
View project