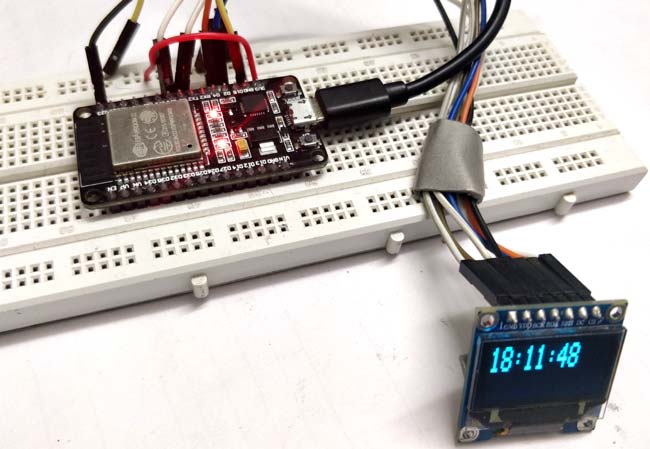

Internet Clock using ESP32 and OLED Display
ESP32 is a Wi-Fi module and can be easily connected to the internet so we will use NTP (Network Time Protocol) and UDP (User Datagram Protocol) to fetch Time from the internet using Wi-Fi.
- Suitable forB.Tech IoT students
- Build time3-4 weeks
- LevelIntermediate
- Available atAjvika Labs, Kakinada
About this project
Network Time Protocol ( NTP ) is a networking protocol used for synchronization of time between systems a0nd Data networks. The NTP framework depends on Internet Time servers. NTP has algorithms to precisely adjust the time of day. NTP servers have software which send the clock's time of day to client computers using UDP port 123. So here in this project, we are getting time from NTP server using ESP32 and showing it on OLED display.
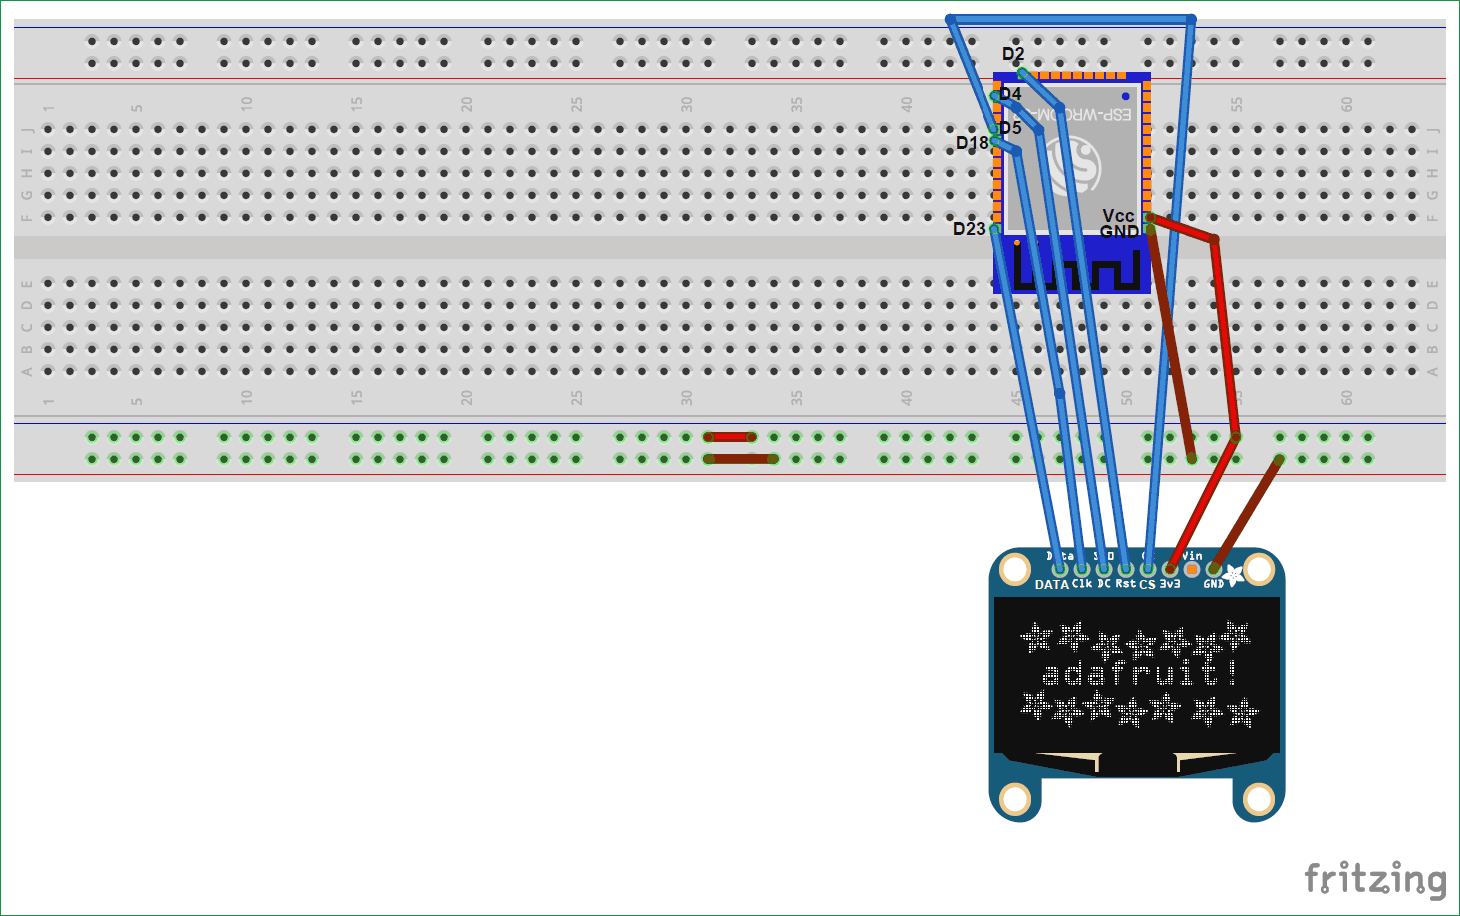
Here, we are using SPI mode to connect our 128×64 OLED display Module (SSD1306) to ESP32. So, it will use 7 pins. Connections with ESP32 are given as:
CS(Chip select) pin of OLED -> PIN D5 of ESP32
DC pin of OLED -> PIN D4 of ESP32
RES pin of OLED -> PIN D2 of ESP32
SDA pin of OLED -> PIN D23 i.e. MOSI of ESP32
SCK pin of OLED -> PIN D18 i.e. SCK of ESP32
Vdd of OLED -> Vcc of ESP32
GND of OLED -> GND of ESP32
You need board files for your ESP32. Check-in board manager drop down menu of Arduino IDE for ESP32 dev kit. If it is not there follow the steps given in the link below:
You can also use ESP12 for this project, learn here to use ESP12.
We will use Arduino IDE to write our program as explained in above article.
The complete code for ESP32 Internet Clock is given at the end of the article. Here we are explaining few important parts of code.
We need several libraries to use in our code which can be downloaded from the below links:
1. Adafruit_SSD1306: https://github.com/adafruit/Adafruit_SSD1306
2. SPI: https://github.com/PaulStoffregen/SPI
3. Adafruit_GFX: https://github.com/adafruit/Adafruit-GFX-Library
4. NTPClient: https://github.com/arduino-libraries/NTPClient
5. WiFiUdp: https://github.com/esp8266/Arduino/tree/master/libraries/ESP8266WiFi
So we have included all the libraries and defined variable for entering Wi-Fi name and password.
Here NTPClient.h library is used to connect with the time server. It takes time from a NTP server and keep it in sync. And Hhre WiFiUdp.h library is used to send and receive UDP messages. UDP is a protocol which sends and receive short messages from our system to NTP server.
So to get the time from Internet, we have to define three variables in our program for NTP.
NTP_OFFSET which is the time zone of your country i.e. for India it is +5:30 hour. So it is 19800 in seconds.
NTP_INTERVAL which is time interval taken by NTP to update time. It is 60-64 seconds.
NTP_ADDRESS is the NTP server of your country. For India you can use “ in.pool.ntp.org ”.
In setup Function, initialise Wi-Fi settings to connect with internet.
Then initialize display functions to show time on OLED.
In loop function, we have used timeClient.update(), this function take updated time from NTP in form of string and stores it in formattedTime variable. Then display it on OLED using display.println() function.
Full program is given below. Now finally program ESP32 with Arduino IDE and your Internet Clock is ready to show time.
Complete Project Code
Technologies used
Hardware components
- ESP32
- ESP8266
- Arduino
- DHT22
- Relay
- OLED
- NodeMCU
Software & tools
- Arduino IDE
- Blynk
- Firebase Console
- Node-RED
- MQTT Broker
Project demo video
What you get
- Working project / hardware kit, tested before delivery
- Complete source code with explanation
- Project demo and guidance for your viva
- Project report, PPT and IEEE paper support (on request)
Related IoT projects

DIY IoT Plant Watering System using Arduino
A remote plant-watering system that monitors soil moisture and lets you trigger a water pump from anywhere through the Blynk app, with LED-m...
View project
Build a smart mirror with an Arduino UNO Q
A wall-mounted smart mirror that shows the time, calendar, to-do list, room temperature/humidity and weather forecast behind a two-way glass...
View project
ESP32 Patient Health Monitor ECG SpO2 BPM Live Dashboard
Build a complete patient health monitoring system using ESP32 with AD8232 ECG sensor, MAX30102 pulse oximeter, BME280 and live web dashboard...
View project
IoT AC Energy Meter with PZEM-004T and ESP32 WebServer
Build an IoT-based AC energy meter using ESP32 and PZEM-004T to measure voltage, current, power, frequency and energy with live web dashboar...
View project