


How to Build an UWB Indoor Positioning System using ESP32 and Qorvo DWM3000
Build a DIY UWB indoor positioning system using ESP32 with the Qorvo DWM3000. This tutorial walks you through hardware, firmware, and Python visualization to create accurate tracking for robotics and IoT projects.
- Suitable forB.Tech IoT students
- Build time3-4 weeks
- LevelIntermediate
- Available atAjvika Labs, Kakinada
About this project
If you've ever tried tracking a device indoors with GPS, you know the limitations. GPS satellites 20,000 km away can't penetrate concrete, steel, and glass effectively. Even in semi-indoor spaces like warehouses or stadiums, GPS accuracy degrades to several meters. That's fine for identifying buildings, but inadequate for precise indoor navigation or asset tracking. If you are not looking for precise indoor tracking and would like to use GPS, then do check out our GeoLinker GPS Tracking Platform, which is a free, open-source tool from CircuitDigest for you to build, test, and deploy GPS projects seamlessly.
More recent applications, such as warehouse robotics, robotics in factories, UWB RTLS (real-time location systems) applications, airport navigation/tracking, and AR/VR, require indoor positioning systems that are fast and precise. Traditional technologies, such as Bluetooth and Wi-Fi, cannot deliver sub-meter accuracy with consistency; that's why this UWB positioning systems using ESP32 project focuses on the DWM3000 UWB positioning module and proven methodology. In this DIY UWB project we’ll show you how to set up an ESP32 indoor positioning system using the DWM3000 module and real-time visualization.
That's where Ultra-Wideband (UWB) comes in. Unlike GPS, UWB doesn't rely on satellites. Instead, it measures the time it takes radio pulses to travel between devices, achieving indoor positioning accuracy of down to 10 cm, allowing you to know exactly which chair you're sitting on, not just which room.
UWB vs Traditional Indoor Positioning Technologies
How Does a UWB Indoor Positioning System Work?
DWM3000 Capabilities
Why UWB Technology Excels
└ Other Qorvo UWB Modules
Hardware Setup and Pin Connections
From JSON Data to Real-Time Position
ESP32 Tag Firmware Setup
Real-Time Indoor Tracking Visualisation with Python
Testing UWB Accuracy
Comparison: UWB vs Traditional Indoor Positioning Technologies
Qorvo DWM3000: The Core of Your UWB Indoor Positioning System Using ESP32
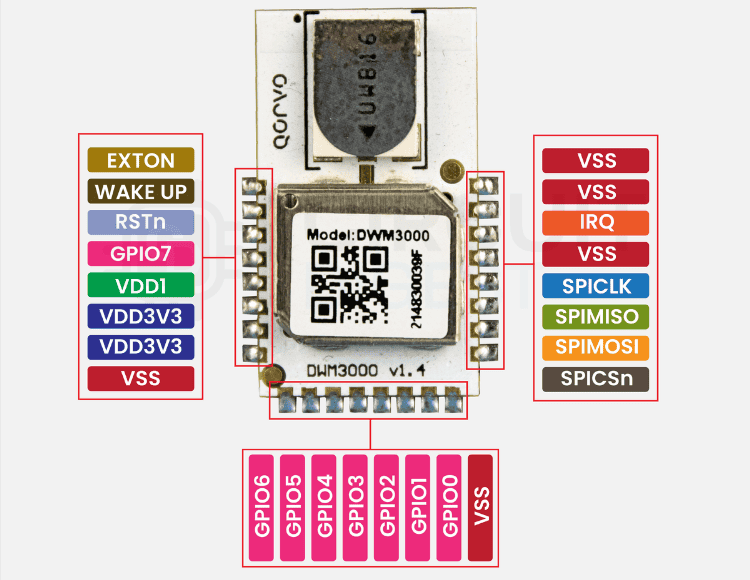
The Qorvo DWM3000 is a compact, fully integrated Ultra-Wideband (UWB) transceiver module designed for high-accuracy location and ranging applications in a UWB positioning system. Built around Qorvo’s DW3110 IC, it complies with the IEEE 802.15.4z standard and is fully interoperable with the FiRa Consortium PHY/MAC specifications, meaning it can work with other UWB devices in the ecosystem. The Qorvo DWM3000 is a compact, fully integrated Ultra-Wideband (UWB) transceiver module designed for high-accuracy location and ranging applications in a UWB positioning system.
Unlike bare ICs, the DWM3000 comes as a ready-to-use RF module, which means you don’t have to be an RF engineer to get it working in your UWB positioning system. It already includes a high-performance ceramic UWB antenna with omnidirectional characteristics. It has all RF passives, a 38.4 MHz crystal oscillator, and a complete power management system onboard.
This “plug-and-play” design is particularly appealing for developers who want cutting-edge location technology without spending months on RF design.
How Does a UWB Indoor Positioning System Using ESP32 Work? (Step-by-Step)
Building an indoor positioning system using UWB technology involves these key steps:
1. Anchor placement: Place 3 or more UWB anchors at known locations (coordinates) in your environment for best coverage in a UWB Real-Time Location System (RTLS). The anchor placement, tag firmware, and trilateration logic all aim to deliver reliable ESP32 indoor positioning, down to centimetre-level accuracy inside complex indoor spaces. 2. Tag initiation: The mobile UWB positioning device (tag) initiates the anchors to range. 3. Two-Way Ranging: Tags and anchors use time-of-flight with one-nanosecond precision, sending and receiving precise UWB pulses. 4. Distance calculations: Using Double-Sided TWR on the tags calculates the distance between the tag and the anchors for UWB location tracking 5. Trilateration: A Python script collects the distances from 3 or more anchors and computes the exact (x, y) coordinates 6. Real-time visualisation: The positional data from the tag is streamed over Wi-Fi to present the tracking live on the floor plan for UWB asset tracking.
DWM3000 Capabilities for Indoor Positioning Systems Using ESP32
Two-Way Ranging ( TWR ) for point-to-point measurements.
Time Difference of Arrival ( TDoA ) for multi-device tracking without direct communication.
Primary: SPI (up to 38 MHz clock speed).
Interrupt pin for fast event handling.
Why UWB Technology Excels in Indoor Positioning System Applications
UWB’s key advantage is its ability to measure time-of-flight with extreme precision. Since the DWM3000 is built for 802.15.4z, it transmits very short pulses (on the order of nanoseconds) across a wide frequency range. This makes the UWB positioning system resistant to multipath interference, a common problem indoors where walls, ceilings, and metal surfaces cause reflections.
For indoor positioning, multipath can make Wi-Fi or Bluetooth wildly inaccurate, but UWB, especially the DWM3000, can filter out those reflections and focus on the direct path signal, giving you centimetre-level accuracy even in cluttered rooms.
The UWB positioning system is therefore resilient to multipath interference that is often encountered indoors from reflection off walls, ceilings, and metal surfaces.
In an indoor UWB localisation system, a signal that takes a longer path via multipath can cause Wi-Fi or Bluetooth to be extremely inaccurate, while UWB will be able to discard unwanted reflections and focus solely on a direct path signal, particularly the DWM3000 UWB positioning module. UWB location tracking systems are great for enclosed spaces where reflection from metal shelving is common, and tracking assets is important in an industrial setting is essential. Because traditional Bluetooth or WiFi systems struggle with reflections and multipath indoors, this approach uses UWB for precision — enabling a complete ESP32 indoor positioning solution rather than just coarse zone tracking.
Qorvo offers several UWB modules with similar form factors but different chipsets, frequency capabilities, and standards compliance, suitable for various UWB positioning system implementations. Here’s a quick comparison:
What We Used for This UWB Indoor Positioning System Using ESP32 Project
In my Indoor UWB location tracking system, I didn’t use every feature the DWM3000 offers; I focused on the capabilities that were essential for a real-time 2D indoor tracking system, to make the UWB indoor positioning system using ESP32:
Double-Sided Two-Way Ranging (DS-TWR) Mode to accurately measure tag to anchor distances
Channel 5 (6.5 GHz) operation, providing consistent performance for my UWB indoor positioning system using ESP32. Supports UWB Channel 5 (6.5 GHz) and Channel 9 (8 GHz), both suitable for global use in UWB RTLS applications
SPI communications to the ESP32 host microcontroller
Standard antenna delay calibration, to further optimise accuracy for UWB indoor localisation
High data rate (6.8 Mbps) to measure and complete faster measurement cycles for real-time UWB location tracking
In addition, beyond UWB asset tracking, the DWM3000 also supports options such as TDoA, low-power tag modes, and multi-channel operation, should I wish to later scale the system for multi-tag tracking, or operate in larger open spaces as a comprehensive UWB RTLS deployment.
Along with UWB asset tracking, features like TDoA, low-power tag modes, and multi-channel operation are also available if I want to scale the system later for multi-tag tracking or larger spaces.
Components Required for Building Your UWB Indoor Positioning System Using ESP32
To build this UWB indoor positioning system using ESP32, you’ll need the following hardware:
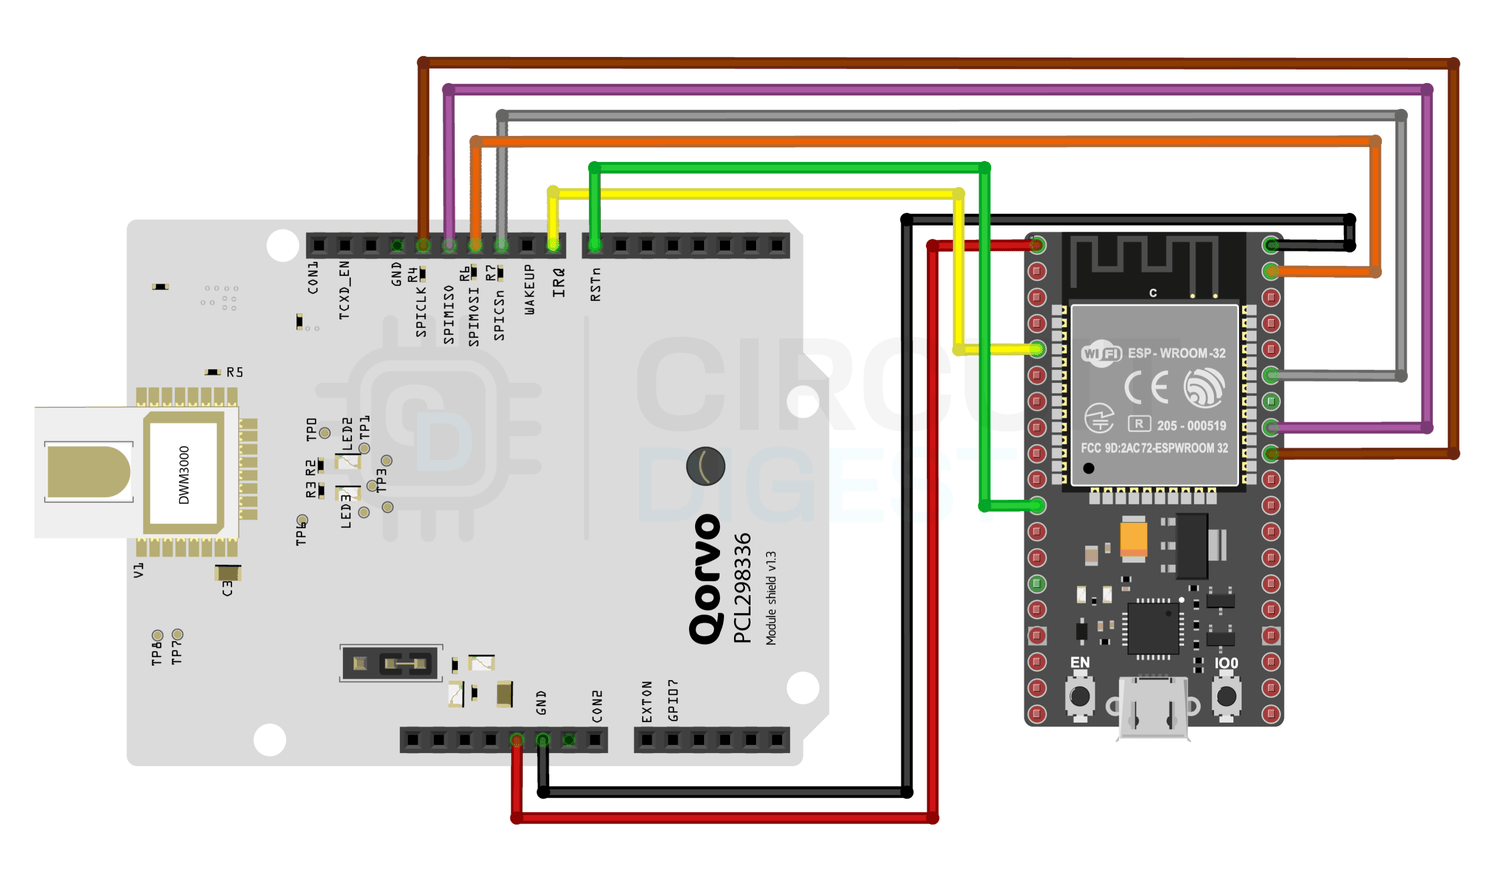
Hardware Setup and Pin Connections for UWB Indoor Localisation
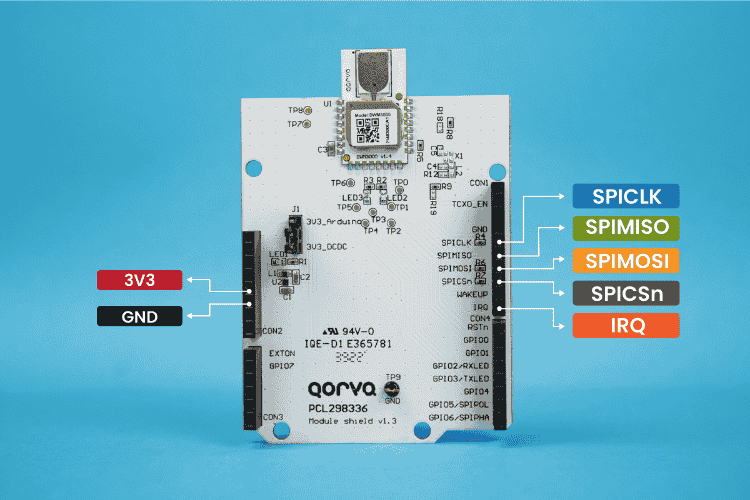
To make the DWM3000 modules work as a Tag and Anchor roles in this indoor UWB positioning system project, we connect them to ESP32 boards using SPI. To make the DWM3000 modules work as a Tag and Anchor roles in this indoor UWB positioning system project, we connect them to ESP32 boards using SPI. Each ESP32-DWM3000 pair will have the same wiring, but each Anchor will be given a unique ANCHOR_ID in code. The Tag’s ESP32 is programmed with the tag firmware, while Anchors run the anchor firmware.
Warning!: The DWM3000 module operates only at 3.3V. Supplying a higher voltage can damage it. Ensure the power source is clean and has minimal noise for stable operation.
We recommend placing three anchors in fixed, known positions for trilateration in your UWB location tracking system:
Note!: These coordinates should match the ANCHOR_POSITIONS array in your Python floorview script.
In our UWB indoor localisation setup, the tag is the initiator and the anchors are the responders. Each anchor’s position is fixed and known in advance. The tag’s job is to measure how far it is from each anchor, and it does that using a precise exchange of UWB messages. This process is called Two-Way Ranging (TWR), and for the highest accuracy, we use a version called Double-Sided TWR (DS-TWR) in our UWB positioning system.
Every time the DWM3000 transmits or receives a UWB frame, it records a hardware timestamp, an ultra-precise counter value straight from the radio’s internal clock. These timestamps are accurate to fractions of a nanosecond, and they are the secret to UWB’s centimetre-level precision in UWB asset tracking. The ESP32 never relies on its own CPU clock for this; it simply reads the radio’s timestamps using API functions like readtxtimestamp() and readrxtimestamp().
Here's what happens during a ranging session with one anchor in your UWB RTLS setup:
Poll: The tag sends a “Poll” message at time T1 and records the transmit timestamp.
Response: The anchor receives the Poll at T2, waits for a known reply delay, then transmits a “Response” at T3. The anchor records both T2 and T3
Final: The tag receives the Response at T4, then sends a “Final” message that includes its own recorded timestamps so the anchor can calculate the Time of Flight (ToF).
This three-step exchange allows both sides to share timing information and removes the need for synchronised clocks in the UWB indoor localisation process.
Asymmetric Double Sided Two Way Ranging algorithm Math
In Asymmetric Double Sided Two Way Ranging there is no waiting time When the Anchor receives a message, it replies immediately, Because the code processing speed varies, the Tag's reply time (T reply1 ) will not match the Anchor's reply time (T reply2 ). The system relies on measuring the clock drift to mathematically correct the errors caused by these unequal reply times. The calculation uses four time intervals, all measured in the DWM3000’s hardware tick units:
T round1 = T 4 - T 1 (tag’s round trip for the first exchange)
T reply1 = T 3 - T 2 (anchor’s reply delay after receiving poll)
Technologies used
Hardware components
- ESP32
- ESP8266
- Arduino
- DHT22
- Relay
- OLED
- NodeMCU
Software & tools
- Arduino IDE
- Blynk
- Firebase Console
- Node-RED
- MQTT Broker
Project demo video
What you get
- Working project / hardware kit, tested before delivery
- Complete source code with explanation
- Project demo and guidance for your viva
- Project report, PPT and IEEE paper support (on request)
Related IoT projects

DIY IoT Plant Watering System using Arduino
A remote plant-watering system that monitors soil moisture and lets you trigger a water pump from anywhere through the Blynk app, with LED-m...
View project
Build a smart mirror with an Arduino UNO Q
A wall-mounted smart mirror that shows the time, calendar, to-do list, room temperature/humidity and weather forecast behind a two-way glass...
View project
ESP32 Patient Health Monitor ECG SpO2 BPM Live Dashboard
Build a complete patient health monitoring system using ESP32 with AD8232 ECG sensor, MAX30102 pulse oximeter, BME280 and live web dashboard...
View project
IoT AC Energy Meter with PZEM-004T and ESP32 WebServer
Build an IoT-based AC energy meter using ESP32 and PZEM-004T to measure voltage, current, power, frequency and energy with live web dashboar...
View project