
How a KY-038 Sound Sensor works and how to Interface it with ESP32?
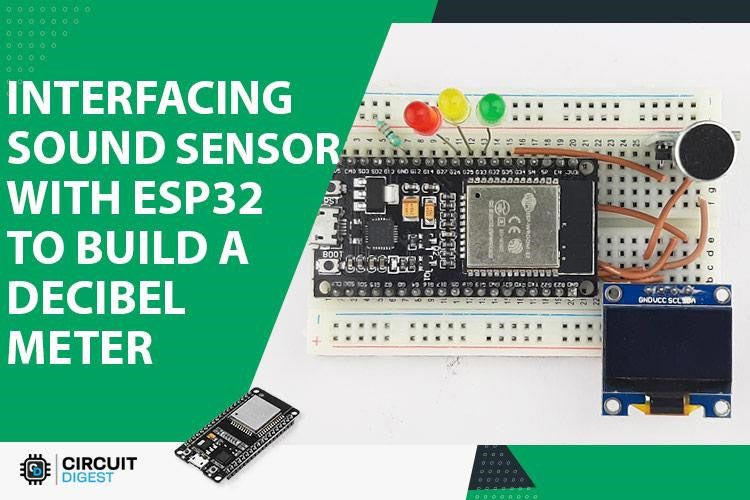
In this article, we interface a KY-038 sensor with ESP32 and build a simple decibel meter out of it. In the process, we will let you know how a sound sensor works, and pros and cons of it,
- Suitable forB.Tech IoT students
- Build time3-4 weeks
- LevelIntermediate
- Available atAjvika Labs, Kakinada
About this project
The KY-038 sound sensor module is a widely used sound detection sensor with ESP32 microcontrollers. This sensor, which uses a condenser microphone, is very stable and reliable when building decibel meters, noise detectors, and sound-activated switches. This guide will teach both ESP32 sound sensor programming and KY-038 sound sensor pinout details while also taking you through a working decibel meter project with a full ESP32 sound sensor wiring diagram.
What is the KY-038 Sound Sensor Module?
Pinout Configuration
How Does the KY-038 Microphone Sound Sensor Module Work?
Sound Sensor Module – Parts
Sound Sensor Wiring Diagram
└ KY-038 to ESP32 Connections
Complete Arduino Code
What is the KY-038 Sound Sensor Module?
The KY-038 sound sensor module is a sound detection sensor that detects sound waves from a high-sensitivity condenser microphone and converts sound into electrical signals. This microphone sound sensor module has analog and digital outputs, making it an adaptable solution for a number of sound detection applications, including burglar alarms, noise pollution monitoring, and voice-activated systems.
KY-038 Sound Sensor Pinout Configuration
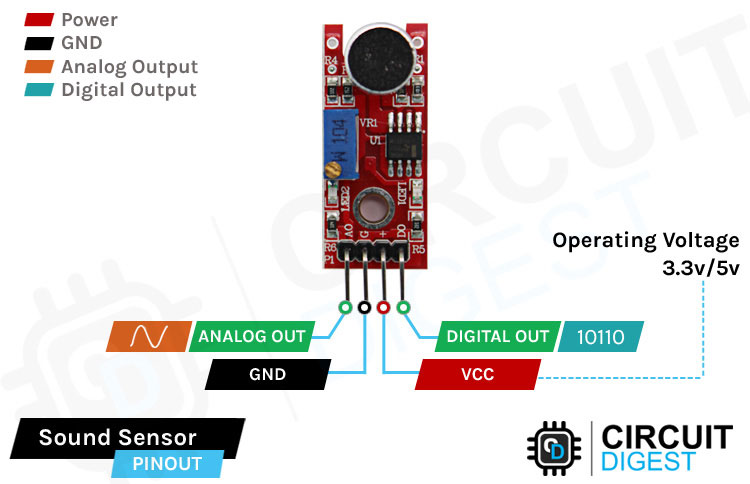
The KY-038 sound sensor pinout has 4 pins: VCC, GND, Digital Out, and Analog Out. We can either use the AO pin as an output for analog reading or the DO pin as an output for digital readout. The Sound sensor pinout is as follows:
VCC is the power supply pin of the Sound Sensor that can be connected to 3.3V or 5V of the supply. But note that the analog output will vary depending on the provided supply voltage.
GND is the ground pin of the Sound Sensor module, and it should be connected to the ground pin of the Arduino.
DOUT is the Digital output pin of the board; a low output indicates that no sound is detected by the sensor, and a high output indicates that the sensor has detected sound.
AOUT is the Analog output pin of the board that will give us an analog reading directly from the Sound sensor.
How Does the KY-038 Microphone Sound Sensor Module Work?
The working of the KY-038 sound sensor is very simple; the main component in this module is a condenser microphone. The microphone gives out only analog signals when a sound wave hits the diaphragm of the sensor. This analog signal gets processed by the op-amp, and we get the digital output.
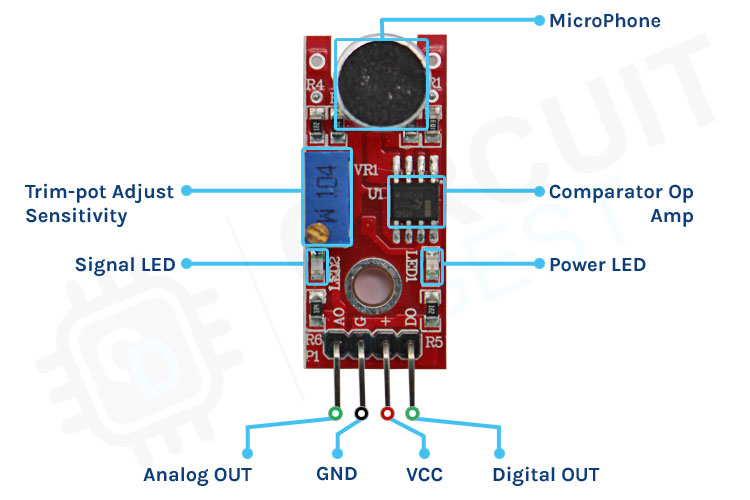
The main component of a sound sensor is a microphone. There are many different types of microphones, like Carbon Microphones, Fibre Optic Microphones, Ribbon Microphones, and Laser Microphones, but the sound sensor module we are using has a condenser microphone. An image of the sound sensor module is shown below.
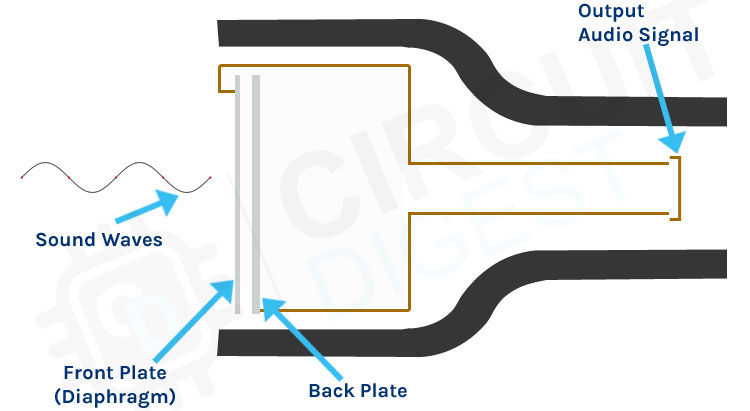
The KY-038 microphone sound sensor module consists of an electret condenser microphone, which is made up of two charged metal plates.
∗ Diaphragm (Front Plate): A very thin, flexible material that moves and vibrates when a sound pressure wave strikes it ∗ Backplate (Fixed Plate): An electrode that is not flexible and that stays charged ∗ Capacitor: The two plates together are a variable capacitor; changing the distance means changing the voltage ∗ Signal Conditioning: The LM393 op-amp amplifies the weak output signal for analog output and compares the digital level to a set threshold.
As you can see from the image, a condenser microphone consists of two charged metal plates. The first plate is called the diaphragm, and the second plate is the backplate of the microphone. These two plates together form a capacitor. When a sound wave hits the diaphragm of the microphone, the diaphragm starts to vibrate, and the distance between the two plates changes. The movement of the diaphragm and the change in spacing produce the electrical signal that corresponds to the sound picked up by the microphone, and this signal then gets processed by the onboard op-amp. This module also has two built-in onboard LEDs, one of which lights up when power is applied to the board, and the other one lights up when the incoming audio signal exceeds the threshold value set by the potentiometer.
We previously used a sound sensor with Arduin o to build an Arduino Whistle Detector, an Arduino-based musical fountain and a noise level meter.
Sound Sensor Module – Parts
For many different projects, this can be used to build sound-reactive switches or to build a sound-reactive LED visualizer. This is why this sensor is popular among beginners, as these are low-power, low-cost, rugged, and feature a wide sensing range that can be trimmed down to adjust the sensitivity.
This sensor has three pins, two of which are power pins, levelled VCC and GND, and the other two are analog and digital pins shown in the diagram above. It has an onboard power LED and a signal LED. The power LED turns on when power is applied to the board, and the signal LED turns on when the circuit is triggered. This board also has a comparator Op-amp that is responsible for converting the incoming analog signal to a digital signal. We also have a sensitivity adjustment potentiometer; with that, we can adjust the sensitivity of the device. Last, we have the condenser microphone that is used to detect sound. All these together make the total Sound Sensor Module.
Commonly Asked Questions about Sound Sensor Module
⇥ What are the types of sound sensors?
There are different types of microphones that are known as sound sensors, like dynamic, condenser, ribbon, carbon, etc.
⇥ What are the advantages of a sound sensor?
Sound sensors can be used for security systems; often, they work with speech recognition software where sound or speech is converted to text. This is a faster approach compared to typing using a keyboard.
⇥ What is the range of the sound sensor?
This sensor is capable of determining noise levels within 100 dB or decibels at 3 kHz and 6 kHz frequencies, approximately.
⇥ Can Arduino detect sound?
You'll learn how to use the KY-038 sound detection sensor with Arduino. You can measure changes in the intensity of sound in an environment with the ADC of the Arduino.
⇥ In what way do KY-038 and KY-037 sound sensor modules differ from each other? KY-037 sound sensor module is a larger sound sensor module with the same functionality but different PCB/Pad layout and component placement. The KY-038 sound sensor module has a smaller size, employs the same LM393 comparator with a condenser microphone, but is optimised in the circuitry to reject noise better. Both modules feature analog and digital outputs, which can be set to a regional threshold using an onboard wire potentiometer.
⇥ What do I need for prompt calibration of the KY-038 sound sensor for decibel reading?
For quick calibration, you will need a reference sound level meter. Produce [60dB, 80dB and 90dB] sound levels, and their corresponding ADC values can be tallied. Align or match your code's map() function parameters to these reference points. This is to indicate the penetrating sound level in relation to the threshold set on the onboard potentiometer switch. The potentiometer is simply set for adjusting the digital threshold, but the analog output used for calibrating the decibel reading cannot, of course, really benefit from it. A-weighting filters will need to be accounted, as well as frequency response.
⇥ What is the highest detectable range of KY-038 sound sensor? KY-038 sound sensor detects up to 100 dB at the frequency range 3-6 kHz with best sensitivity. Detection distance varies based on intensity of sound source: loud claps are detected up to 3-5 meters, everyday conversation at 1-2 meters. Sensitivity drops dramatically above 10 kHz and below 100 Hz because of microphone capsule frequency response characteristics.
ESP32 Sound Sensor Wiring Diagram
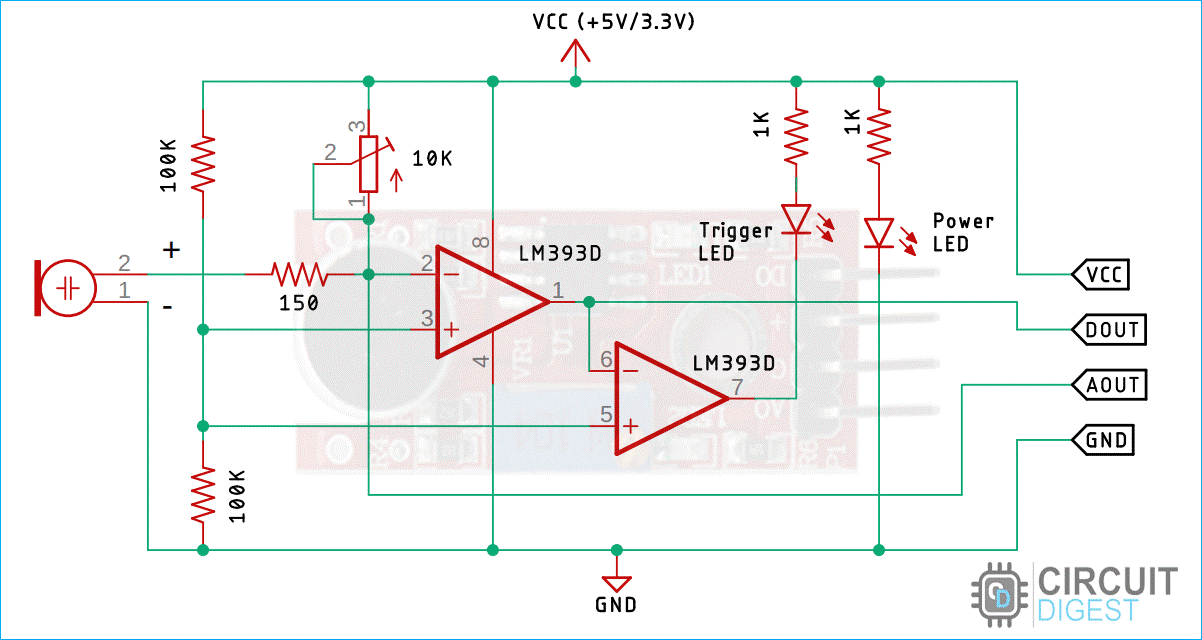
The schematic diagram for the Sound Sensor module is shown below. The schematic itself is very simple and needs a handful of generic components to build. If you don't have a prebuilt module on hand but still want to test your project, the schematic below will come in handy. To connect the sound sensor ESP32, you only need three basic wires to carry out basic sound detection. The sound sensor connection diagram below illustrates the connection of the KY-038 module and ESP32 to obtain analog readings with the integrated ADC (Analog to Digital Converter).
In the schematic, we have an LM393 op-amp that is a low-power, low-cost, low-offset voltage op-amp that can be powered from a 3.3V or 5V supply. Please note that the analog output voltage of the device will depend on the supply voltage of the device. The main job of this op-amp is to convert the incoming analog signal from the sensor probe to a digital signal. There is also this 10K potentiometer that is used to set a reference voltage for the op-amp; also this potentiometer is used to generate the reference voltage for the analog out function of the module.
If the input voltage of the sensor goes below the threshold voltage set by the potentiometer, the output of the op-map goes low. Other than that, we have two LEDs. The first one is a power LED, and the other one is the trigger LED. The power LED turns on when power is applied to the board, and the trigger LED turns on when a certain threshold is reached. This is how this basic circuit works.
Circuit Diagram for Decibel Meter with Sound Sensor and ESP32
Now that we have a good understanding of how the sound sensor works, we can connect all the required wires to the Arduino as per the schematic shown below.
To connect the sound sensor ESP32, you only need three basic wires to carry out basic sound detection. The sound sensor connection diagram below illustrates the connection of the KY-038 module and ESP32 to obtain analog readings with the integrated ADC (Analog to Digital Converter).
Connecting the sound sensor to the microcontroller is simple; we just need to power the module with 3.3V power and connect the analog out pin to the ESP32. Now we can process the signal with the ADC of the ESP32. We have also connected three LEDs to show the intensity of the device, and we are also showing the recorded decibel on the OLED display. The LEDs are connected to the GPIO pins of the ESP32, and the OLED module is connected to the I2C pins of the ESP32 device. Learn more about interfacing OLED with ESP32 here.
ESP32 Sound Sensor Programming Guide
ESP32 sound sensor programming includes reading Analog values from the ADC (Analog to Digital Converter) chip, taking samples over specific time windows, and converting peak-to-peak voltage changes to the decibel scale. This code is based on professional techniques for sound level monitoring.
Required Libraries in Arduino Before uploading your code, you will need to install the corresponding libraries by navigating through the Arduino IDE Library Manager (Sketch → Include Library → Manage Libraries)
Wire.h - The built-in I2C communication library
Adafruit_GFX.h - Core graphics library for displays
Adafruit_SSD1306.h - Display driver for the SSD1306 OLED screen.
Complete Arduino Code for ESP32 Decibel Meter
This optimised code reads sound levels from the KY-038 sound sensor, calculates decibel values, and displays results on an OLED screen with LED indicators for different noise levels.
The code for the Arduino-based decibel meter is very simple and easy to understand. In the code, we will just measure the audio noise coming from the microphone and convert it to a digital signal with an ADC sample and figure out the decibel noise.
We start our code, including all the required libraries; those are Wire.h, Adafruit_GFX.h, and Adafruit_SSD1306.h library. Next, we will define the screen width and screen height.
Next, we have defined the instance for the Adafruit_SSD1306 library, which is displayed.
Next, we have two variables to hold sampled data from the ADC.
Technologies used
Hardware components
- ESP32
- ESP8266
- Arduino
- DHT22
- Relay
- OLED
- NodeMCU
Software & tools
- Arduino IDE
- Blynk
- Firebase Console
- Node-RED
- MQTT Broker
What you get
- Working project / hardware kit, tested before delivery
- Complete source code with explanation
- Project demo and guidance for your viva
- Project report, PPT and IEEE paper support (on request)
Related IoT projects

DIY IoT Plant Watering System using Arduino
A remote plant-watering system that monitors soil moisture and lets you trigger a water pump from anywhere through the Blynk app, with LED-m...
View project
Build a smart mirror with an Arduino UNO Q
A wall-mounted smart mirror that shows the time, calendar, to-do list, room temperature/humidity and weather forecast behind a two-way glass...
View project
ESP32 Patient Health Monitor ECG SpO2 BPM Live Dashboard
Build a complete patient health monitoring system using ESP32 with AD8232 ECG sensor, MAX30102 pulse oximeter, BME280 and live web dashboard...
View project
IoT AC Energy Meter with PZEM-004T and ESP32 WebServer
Build an IoT-based AC energy meter using ESP32 and PZEM-004T to measure voltage, current, power, frequency and energy with live web dashboar...
View project