




ESP32 Active Mode and Deep Sleep Mode Power Consumption Comparison
In this project, we will check the current consumption of widely popular Wi-Fi and Bluetooth enabled microcontroller unit ESP32 in normal working mode and deep sleep mode.
- Suitable forB.Tech IoT students
- Build time3-4 weeks
- LevelIntermediate
- Available atAjvika Labs, Kakinada
About this project
ESP32 is one of the most popular Wi-Fi based microcontroller modules and it is a popular choice in many Portable IoT Applications. It is a powerful controller that supports Dual Core Programming and also has in-built Bluetooth Low Energy (BLE) support making it a good choice for portable applications like in iBeacon devices, GPS Trackers, etc. However, in Battery-powered applications like these, the major concern is battery backup. This battery backup can be increased by smarter control over the microcontroller unit like one can program ESP32 in sleep mode during the ideal condition to increase the battery backup of the device.
In this project, we will check the current consumption of widely popular Wi-Fi and Bluetooth enabled microcontroller unit ESP32 in normal working mode and deep sleep mode. Also, we will test the difference and check how to put the ESP32 in deep sleep mode. You can also check out the article on how to minimize power consumption in microcontrollers for other tips that can be used to make your design much more power-efficient. Furthermore, if you are interested in the sleep mode of other microcontrollers you can chek out Arduino Sleep mode and ESP8266 NodeMCU Sleep mode as well.
To do this, we will use ESP32 based Devkit V4.0 from Espressif that has USB to UART bridge as well as other ESP32 pinouts for easy connection. The programming will be done with Arduino IDE. If you are completely new, then for Getting started with ESP32 using Arduino, read the linked article before you proceed.
The requirements of this project are the following-
It will go into the deep sleep mode by a press of a button.
It will wake up from the deep sleep mode by the press of another button.
To detect the state of the ESP32, a LED will blink with a turn-on time of 1000 milliseconds. During the sleep mode, it will be turned off.
Therefore, additional components required-
Push-button (Tactile switch) - 2 pcs
4.7k resistors - 2 pcs
680R resistor - 1 pc
5V adapter or power supply unit
Arduino IDE with ESP32 programming interface in a PC or Laptop.
ESP32 Sleep Mode Circuit Diagram
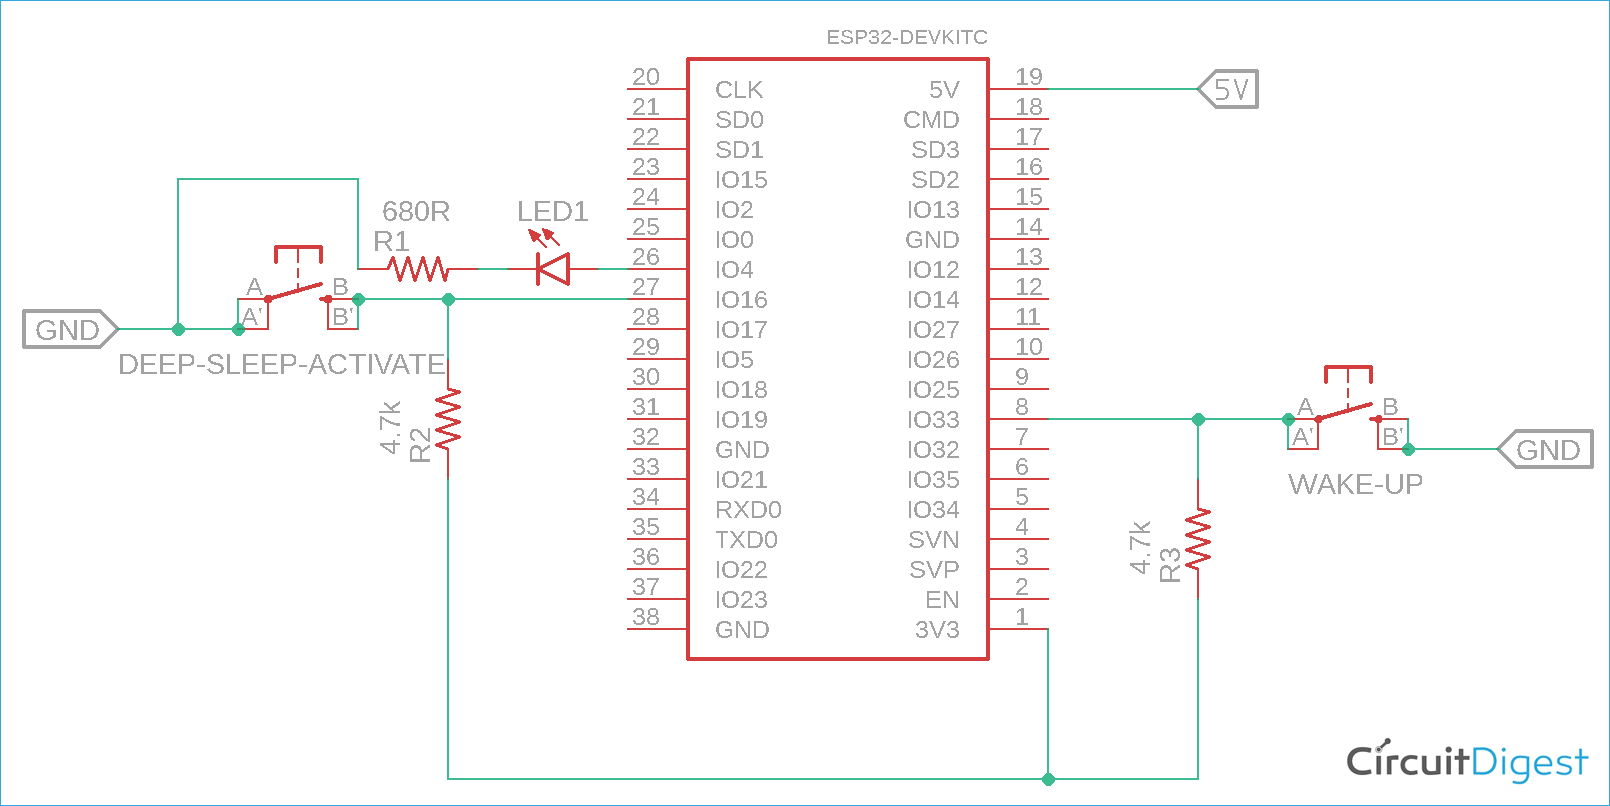
The schematic to put ESP32 to sleep on with push button is shown below.
The schematic is pretty simple. It has two buttons. The sleep button will put the ESP32 in deep sleep mode and another switch is used for waking up the ESP32 from sleep mode. Both buttons are connected in PIN 16 and PIN 33. Both buttons are configured as active low when pressed, therefore an additional pull-up is given. However, to detect whether the ESP 32 is in sleep mode or normal working condition mode, LED is connected to IO Pin 4.
Overview of Sleep Modes in ESP32
There are many different power modes for ESP32, namely active mode, modem sleep mode, light sleep mode, deep sleep mode, and hibernation mode.
During the normal working condition, the ESP32 runs on active mode. During ESP32 active mode, the CPU, WiFi/BT hardware, RTC memory, and RTC peripherals, ULP co-processors, all are activated and work depending on the workload. However, on different power modes, one or more peripherals are turned off. To check different power mode operations, follow the table below-
RTC and RTC Peripherals
As we can see in the above table that in ESP32 deep sleep mode that is often called as ULP sensor monitored pattern - the CPU, WiFi/BT, RTC memory and peripherals, ULP co-processors all are turned off. Only the RTC memory and RTC peripherals are turned on.
During the wake-up situation, the ESP32 needs to be notified by a wake-up source that will wake up the ESP32 from the deep sleep mode. However, since the RTC peripherals are turned on, the ESP32 can be wake up through RTC enabled GPIOs. There are other options as well. It can be wake up through an external wake up interrupt pins or using a timer to wake up the ESP32. In this project, we are using ext0 wakeup on pin 33.
Programming ESP32 for Deep Sleep Mode
The complete program can be found at the bottom of this page. It is written for Arduino IDE and can hence be easily adapted into your requirements. The explanation of the code is as follows.
At the beginning of the code,
The above three lines define the wake-up pin, LED pin, and the sleep mode pin.
In the above, the interrupt is set to a falling mode by the code snippet
Therefore, whenever the switch is pressed, the logic level will get changed from logic 1 (3.3V) to logic 0 (0V). The voltage of the button pin will fall and the ESP32 will identify that the switch is pressed. There is also a task created to blink the LED.
The pin 33 is also configured using the below code snippet as an external wake up source identified as ext0.
Next, in the while loop-
The while loop constantly checking if the sleep button is pressed or not. If the button is pressed, it will stop or suspend the LED blink task and run the esp deep sleep start function-
In this situation, if the ext0 external interrupt button is pressed, it will immediately wake up from the deep sleep mode, and resume the led blink task.
Lastly, the LED blink function can be seen in the below snippets, it will blink the LED 1000 ms seconds.
Testing ESP32 in Deep Sleep Mode
The circuit is constructed in a breadboard and a Metravi XB edition multimeter is used to measure the current. The current drawn by the circuit in active mode is almost 58 mA but in deep sleep mode, the current is almost 4.10 mA. Below image is showing the ESP32 active mode current consumption -
In deep sleep mode, the current consumption is recorded dropped to around 3.95mA, the below image shows the ESP32 Deep Sleep Mode Current Consumption-
However, in deep sleep mode, ESP32’s current consumption is almost 150 uA. But the recorded current consumption for this ESP32 Devkit board is almost 4.10 mA. This is due to the CP2102 and the Linear Regulator. These two are connected to the 5V power line. There is also a power LED connected in the power line that is consuming almost 2mA of current.
Therefore, it can be easily identified that the ESP32 consumes a very low amount of energy in deep sleep mode condition that is very useful for battery powered operations. For more information on how it worked, check out the video linked below. If you have any questions, leave them in the comment section below or use our Forums for other technical questions.
Complete Project Code
In this project, we will check the current consumption of widely popular Wi-Fi and Bluetooth enabled microcontroller unit ESP32 in normal working mode and deep sleep mode. Also, we will test the difference and check how to put the ESP32 in deep sleep mode. You can also check out the article on how to minimize power consumption in microcontrollers for other tips that can be used to make your design much more power-efficient. Furthermore, if you are interested in the sleep mode of other microcontrollers you can chek out Arduino Sleep mode and ESP8266 NodeMCU Sleep mode as well.
To do this, we will use ESP32 based Devkit V4.0 from Espressif that has USB to UART bridge as well as other ESP32 pinouts for easy connection. The programming will be done with Arduino IDE. If you are completely new, then for Getting started with ESP32 using Arduino, read the linked article before you proceed.
The requirements of this project are the following-
It will go into the deep sleep mode by a press of a button.
It will wake up from the deep sleep mode by the press of another button.
To detect the state of the ESP32, a LED will blink with a turn-on time of 1000 milliseconds. During the sleep mode, it will be turned off.
Therefore, additional components required-
Push-button (Tactile switch) - 2 pcs
4.7k resistors - 2 pcs
680R resistor - 1 pc
5V adapter or power supply unit
Arduino IDE with ESP32 programming interface in a PC or Laptop.
ESP32 Sleep Mode Circuit Diagram
The schematic to put ESP32 to sleep on with push button is shown below.
The schematic is pretty simple. It has two buttons. The sleep button will put the ESP32 in deep sleep mode and another switch is used for waking up the ESP32 from sleep mode. Both buttons are connected in PIN 16 and PIN 33. Both buttons are configured as active low when pressed, therefore an additional pull-up is given. However, to detect whether the ESP 32 is in sleep mode or normal working condition mode, LED is connected to IO Pin 4.
Overview of Sleep Modes in ESP32
There are many different power modes for ESP32, namely active mode, modem sleep mode, light sleep mode, deep sleep mode, and hibernation mode.
During the normal working condition, the ESP32 runs on active mode. During ESP32 active mode, the CPU, WiFi/BT hardware, RTC memory, and RTC peripherals, ULP co-processors, all are activated and work depending on the workload. However, on different power modes, one or more peripherals are turned off. To check different power mode operations, follow the table below-
RTC and RTC Peripherals
As we can see in the above table that in ESP32 deep sleep mode that is often called as ULP sensor monitored pattern - the CPU, WiFi/BT, RTC memory and peripherals, ULP co-processors all are turned off. Only the RTC memory and RTC peripherals are turned on.
During the wake-up situation, the ESP32 needs to be notified by a wake-up source that will wake up the ESP32 from the deep sleep mode. However, since the RTC peripherals are turned on, the ESP32 can be wake up through RTC enabled GPIOs. There are other options as well. It can be wake up through an external wake up interrupt pins or using a timer to wake up the ESP32. In this project, we are using ext0 wakeup on pin 33.
Programming ESP32 for Deep Sleep Mode
The complete program can be found at the bottom of this page. It is written for Arduino IDE and can hence be easily adapted into your requirements. The explanation of the code is as follows.
At the beginning of the code,
The above three lines define the wake-up pin, LED pin, and the sleep mode pin.
In the above, the interrupt is set to a falling mode by the code snippet
Therefore, whenever the switch is pressed, the logic level will get changed from logic 1 (3.3V) to logic 0 (0V). The voltage of the button pin will fall and the ESP32 will identify that the switch is pressed. There is also a task created to blink the LED.
The pin 33 is also configured using the below code snippet as an external wake up source identified as ext0.
Next, in the while loop-
The while loop constantly checking if the sleep button is pressed or not. If the button is pressed, it will stop or suspend the LED blink task and run the esp deep sleep start function-
In this situation, if the ext0 external interrupt button is pressed, it will immediately wake up from the deep sleep mode, and resume the led blink task.
Lastly, the LED blink function can be seen in the below snippets, it will blink the LED 1000 ms seconds.
Testing ESP32 in Deep Sleep Mode
The circuit is constructed in a breadboard and a Metravi XB edition multimeter is used to measure the current. The current drawn by the circuit in active mode is almost 58 mA but in deep sleep mode, the current is almost 4.10 mA. Below image is showing the ESP32 active mode current consumption -
In deep sleep mode, the current consumption is recorded dropped to around 3.95mA, the below image shows the ESP32 Deep Sleep Mode Current Consumption-
However, in deep sleep mode, ESP32’s current consumption is almost 150 uA. But the recorded current consumption for this ESP32 Devkit board is almost 4.10 mA. This is due to the CP2102 and the Linear Regulator. These two are connected to the 5V power line. There is also a power LED connected in the power line that is consuming almost 2mA of current.
Therefore, it can be easily identified that the ESP32 consumes a very low amount of energy in deep sleep mode condition that is very useful for battery powered operations. For more information on how it worked, check out the video linked below. If you have any questions, leave them in the comment section below or use our Forums for other technical questions.
Complete Project Code
Technologies used
Hardware components
- ESP32
- ESP8266
- Arduino
- DHT22
- Relay
- OLED
- NodeMCU
Software & tools
- Arduino IDE
- Blynk
- Firebase Console
- Node-RED
- MQTT Broker
Project demo video
What you get
- Working project / hardware kit, tested before delivery
- Complete source code with explanation
- Project demo and guidance for your viva
- Project report, PPT and IEEE paper support (on request)
Delivery & Payment
Delivery takes a minimum of two weeks from the date your inquiry is confirmed.
Payment is in two parts:
• 50% advance to start the project
• Remaining 50% before delivery
Note:
• Documentation and PPT are not included by default
• If you need documentation/PPT, it can be arranged for extra time and cost
We'll confirm the exact timeline and cost with you after reviewing your requirements.
Related IoT projects

IoT
DIY IoT Plant Watering System using Arduino
A remote plant-watering system that monitors soil moisture and lets you trigger a water pump from anywhere through the Blynk app, with LED-m...
View project
IoT
Build a smart mirror with an Arduino UNO Q
A wall-mounted smart mirror that shows the time, calendar, to-do list, room temperature/humidity and weather forecast behind a two-way glass...
View project
IoT
ESP32 Patient Health Monitor ECG SpO2 BPM Live Dashboard
Build a complete patient health monitoring system using ESP32 with AD8232 ECG sensor, MAX30102 pulse oximeter, BME280 and live web dashboard...
View project
IoT
IoT AC Energy Meter with PZEM-004T and ESP32 WebServer
Build an IoT-based AC energy meter using ESP32 and PZEM-004T to measure voltage, current, power, frequency and energy with live web dashboar...
View project