



Designing a Smartwatch using ESP32 Part 3 - Magnetometer and Gyroscope
In this part, we will be looking at how to interface some sensors to our smartwatch. We will be interfacing the HMC5883L/QMC5883L Magnetometer sensor and the MPU6050 accelerometer gyroscope sensor.
- Suitable forB.Tech IoT students
- Build time3-4 weeks
- LevelIntermediate
- Available atAjvika Labs, Kakinada
About this project
Prerequisites – Installing Necessary Libraries
All the required libraries are provided in the GitHub repository given below the article. Download them and extract them to the library folder in the Arduino document folder. If you have already installed them, you don’t need to do the previous step except for the display library. For display, you must use the attached TFT_eSPI library. Once it’s done let’s move forward with the interface.
TFT_eSPI Library (Modified)
TFT_eSPI Library (Modified)
QMC5883L Library from DFRobots
QMC5883L Library from DFRobots
Interfacing Magnetic Sensor
For the magnetic sensor, we are going to use the HMC5883L/QMC5883L. Since the sensor could indicate the geographic North, South, East, and West, we can use it as a digital compass. HMC5883L/QMC5883L has 3 magneto-resistive materials inside, which are arranged in the axes x, y, and z. The amount of current flowing through these materials is sensitive to the earth’s magnetic field. So, by measuring the change in current flowing through these materials we can detect the change in Earth’s magnetic field. Once the change in the magnetic field is absorbed, the values can then be sent to any embedded controller like a microcontroller or processor through the I2C protocol.
HMC5883L/QMC5883L Module Pinout
The HMC5883L/QMC5883L module has a total of 5 pins. All the pins of this sensor module are digital, except VCC and Ground. In which 4 pins are used for interfacing with the MCU and one optional interrupt pin. The pinout of the HMC5883L/QMC5883L module is as follows:
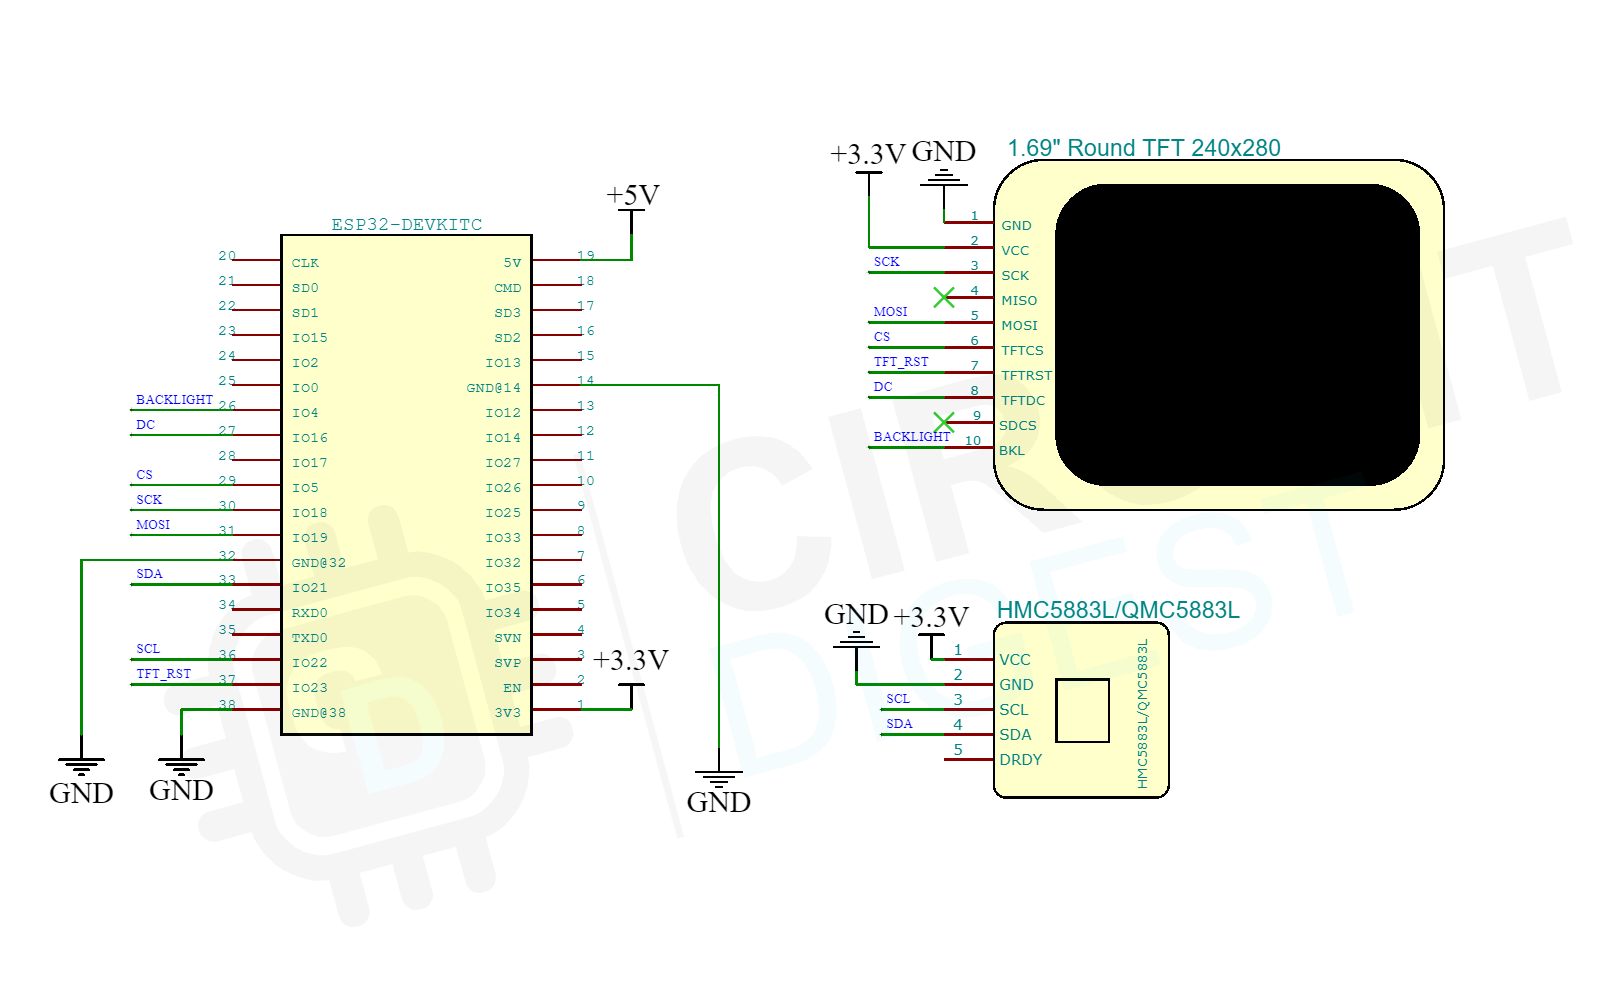
GND Ground connection for the module. Connect to the GND pin of the ESP32.
VCC Provides power for the module. Connect to the 3.3V pin of the ESP32.
SCL Serial Clock pin. Used for providing clock pulse for I2C Communication.
SDA Serial Data pin. Used for transferring Data through I2C communication.
DRDY When the output value of the sensor is ready, an interrupt occurs in this pin. This pin is pulled up inside the module by default. When the output value of the module is ready, the pin is set to “0” for 250 microseconds.
Circuit Diagram to Interface Magnetic sensor with ESP32
For testing, connect the Magnetic sensor module along with the display module to the ESP32 Devkit as per the Circuit diagram below. Connect the sensor to the I2C line and the display to the SPI bus as before.
Here is the actual setup. The QMC5883L module is connected to the ESP32 through I2C lines.
Once all the connections are done as per the schematics, download the QMC5883L demo code and the relevant libraries from GitHub. Extract the libraries to the Arduino library folder and extract the code to any folder and open it using the Arduino IDE. Select ESP32 Devkit as the board and compile the code. Once the code is compiled, upload it to the ESP32. The display will show a digital compass. You can observe that the compass is showing the correct direction and will keep it that way as long as there is no magnetic interference. While testing, make sure that there is no magnetic materials or magnetic field near the sensor. Otherwise, it may affect the readings. The below video will demonstrate the same.
In the code, we have used the TFT_eSPI and DFRobot_QMC5883 libraries. The DFRobot QMC5883 library supports both HMC5883L and QMC5883L chips. Because both of these sensors have different I2C addresses and different internal register mapping, we will set the corresponding configuration based on the chip address we have received after initializing the library. Once it’s done, we will read the corresponding register for the reading from each axis and will calculate the heading from it. For the accurate calculation, we have to change the declination angle as per our location. You can find the instructions for the same in the code itself.
Once the heading is calculated, we will load the compass dial image to the sprite we have created in the memory. Then the sprite is pushed to the display at an angle. For this, we have used the pushRotated function from the TFT_eSPI library. This function will rotate the image which is pushed to the display as per the angle we have calculated from the QMC5883L. This will give us a smooth display with an accurate digital compass pointing to the north. For accuracy, make sure to fix the sensor in the correct orientation, away from any magnetic material. Keep in mind that even the contacts in the breadboard can affect the sensor.
Interfacing Accelerometer Gyroscope sensor
For the accelerometer gyroscope sensor, we have selected the popular MPU6050 sensor. It is very popular among the DIY Community because it is very cheap and easy to interface with. We will use this sensor for detecting motion and to enable features like rise to wake up. Let’s look at the specifications of the sensor itself.
The MPU6050 is a very popular accelerometer gyroscope chip that has six axes sense with a 16-bit measurement resolution. This high accuracy in sense and the cheap cost make it very popular among the DIY community. Even many commercial products are equipped with the MPU6050. The combination of gyroscope and accelerometers is commonly referred to as an Inertial Measurement Unit or IMU.
IMU sensors are used in a wide variety of applications such as mobile phones, tablets, satellites, spacecraft, drones, UAVs, robotics, and many more. They are used for motion tracking, orientation and position detection, flight control, etc.
MPU6050 Module Pinout
The MPU6050 module has a total of 8 pins. In which at least 4 pins are necessary for the interfacing. The pinout of the MPU6050 module is as follows:
GND Ground connection for the module. Connect to the GND pin of the ESP32.
VCC Provides power for the module. Connect to the 3.3V pin of the ESP32.
SCL Serial Clock pin. Used for providing clock pulse for I2C Communication.
SDA Serial Data pin. Used for transferring Data through I2C communication.
XDA Auxiliary Serial Data - Can be used to interface other I2C modules with MPU6050.
XCL Auxiliary Serial Clock - Can be used to interface other I2C modules with MPU6050.
ADD/AD0 Address select pin if multiple MPU6050 modules are used.
INT Interrupt pin to indicate that data is available for MCU to read.
Circuit Diagram to Interface Accelerometer Gyroscope sensor with ESP32
For testing, connect the accelerometer gyroscope sensor module along with the display module to the ESP32 Devkit as per the Circuit diagram below. Connect the sensor to the I2C line and the display to the SPI bus as before.
Here is the actual setup. The MPU6050 module is connected using the jumper cable, to get the flexibility to move the module during the test.
Once all the connections are done as per the schematics, download the MPU6050 demo code from GitHub. Extract it to a folder and open it using the Arduino IDE. Select ESP32 Devkit as the board and compile the code. Once the code is compiled, upload it to the ESP32. The display will show a 3D cube. You can rotate the cube by rotating the MPU6050 module. The ESP32 will read Gyroscope data from MPU6050 and will process the 3D cube as per those values. The below video will demonstrate the same.
In the code, we have created a 3D cube with a total of 12 lines. The cube will rotate as per the reading from the gyroscope sensor. You can rotate the cube by rotating the MPU6050 module. The ESP32 will read Gyroscope data from MPU6050 and will process data to calculate the coordinates of each line that is used to create the 3D.
For reading the values from the MPU6050, we haven’t used any specific library. Instead, we have read those values directly from the MPU6050 registers through I2C with Wire.read function. We will read a total of 14 registers which will have the x, y, and z data from the accelerometer and gyroscope.
You can download all the required files including the libraries from the Circuit Digest GitHub Repo.
Complete Project Code
Technologies used
Hardware components
- ESP32
- ESP8266
- Arduino
- DHT22
- Relay
- OLED
- NodeMCU
Software & tools
- Arduino IDE
- Blynk
- Firebase Console
- Node-RED
- MQTT Broker
What you get
- Working project / hardware kit, tested before delivery
- Complete source code with explanation
- Project demo and guidance for your viva
- Project report, PPT and IEEE paper support (on request)
Related IoT projects

DIY IoT Plant Watering System using Arduino
A remote plant-watering system that monitors soil moisture and lets you trigger a water pump from anywhere through the Blynk app, with LED-m...
View project
Build a smart mirror with an Arduino UNO Q
A wall-mounted smart mirror that shows the time, calendar, to-do list, room temperature/humidity and weather forecast behind a two-way glass...
View project
ESP32 Patient Health Monitor ECG SpO2 BPM Live Dashboard
Build a complete patient health monitoring system using ESP32 with AD8232 ECG sensor, MAX30102 pulse oximeter, BME280 and live web dashboard...
View project
IoT AC Energy Meter with PZEM-004T and ESP32 WebServer
Build an IoT-based AC energy meter using ESP32 and PZEM-004T to measure voltage, current, power, frequency and energy with live web dashboar...
View project