

Building a High-Resolution POV Display using ESP32
Explore how to build an Arduino POV display using ESP32, 74HC595D shift registers, and 3D-printed parts. Learn about the concept, circuit diagram, components required, Arduino code, and image conversion process.
- Suitable forB.Tech IoT students
- Build time3-4 weeks
- LevelIntermediate
- Available atAjvika Labs, Kakinada
About this project
The complete project was made possible by our sponsor Viasion Technology, who are also the manufacturers of the PCBs used in this project. We will discuss more about them later in this article.
Features of our POV Display
128 Pixel resolution.
128 Pixel resolution.
Frame rate of 20 FPS.
Frame rate of 20 FPS.
Companion web app to easily convert images.
Companion web app to easily convert images.
Components Required to Build the POV Display
The components required to build a POV Display are listed below. The exact value of each component can be found in the schematics or the BOM.
ESP32 WROOM Module – x1
ESP32 WROOM Module – x1
74HC595D shift register – x16
74HC595D shift register – x16
CH340K USB - UART controller – x1
CH340K USB - UART controller – x1
TP4056 Li-ion charger IC – x1
TP4056 Li-ion charger IC – x1
AMS1117 3.3v LDO – x1
AMS1117 3.3v LDO – x1
AO3401 P - MOSFET – x1
AO3401 P - MOSFET – x1
2N7002DW dual N - MOSFET – x1
2N7002DW dual N - MOSFET – x1
Hall effect sensors – x2
Hall effect sensors – x2
Type C USB Connector 16Pin – x1
Type C USB Connector 16Pin – x1
SMD LED Blue 0603 - x128
SMD LED Blue 0603 - x128
DC Motor Speed controller – x1
DC Motor Speed controller – x1
SMD resistors and capacitors
SMD resistors and capacitors
SMD Tactile switches
SMD Tactile switches
3D printed part and mounting screws.
3D printed part and mounting screws.
Other tools and consumables.
Other tools and consumables.
POV Display using ESP32 - Circuit Diagram
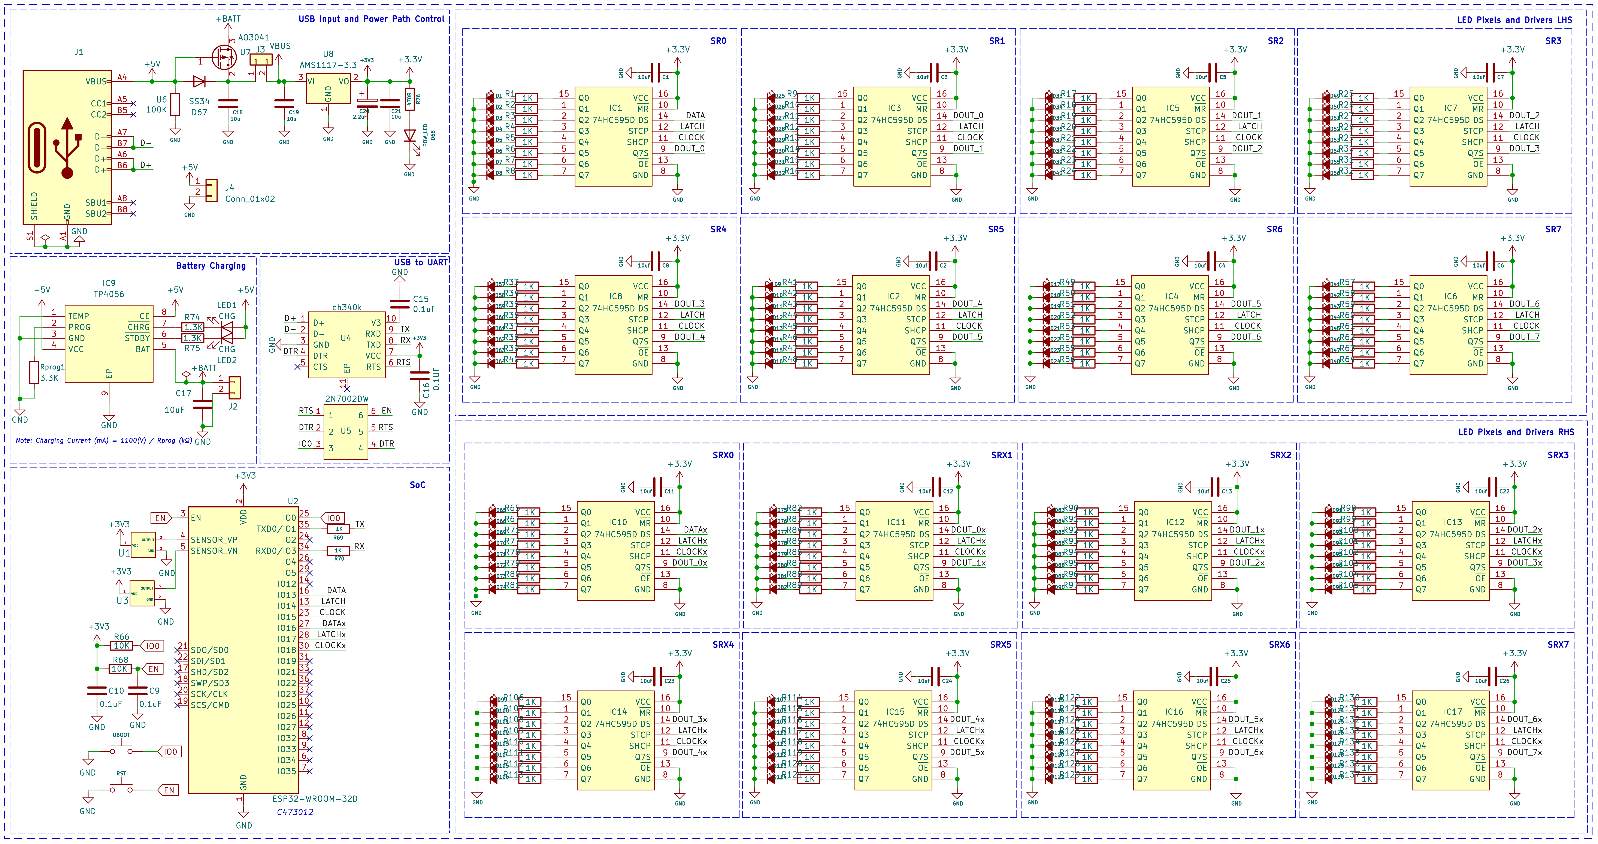
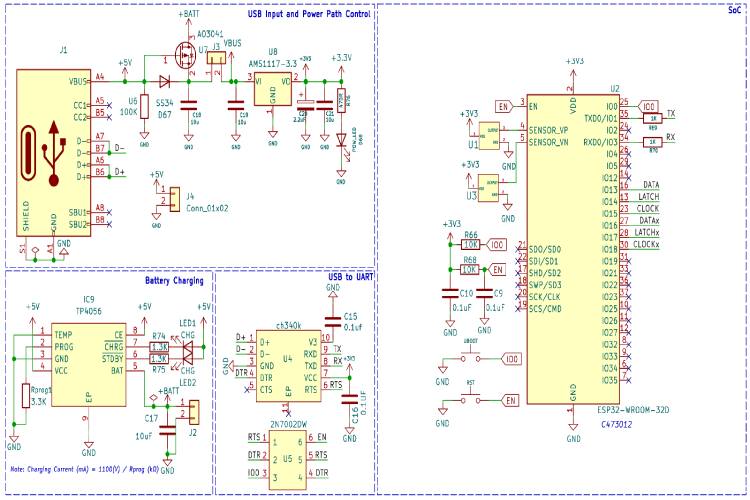
The complete circuit diagram for the POV Display is shown below. It can also be downloaded in PDF format from the link given at the end.
Let’s discuss the Schematics section by section for better understanding. A type C USB port is used for both charging as well as programming purposes. The power from the USB port is connected to a power path controller circuit built around a P-Channel MOSFET U7 and a diode D67. The connector J4 can be used to provide external 5V. The same port can be used to connect a wireless charger module, in case we want to operate it continuously without charging. For voltage regulation, we have used the popular AMS1117 3.3V LDO, which is capable of providing up to 1A of current with an approximate dropout voltage of 1.1V at full load. The connector J3 is used to connect an external switch for turning on and off the entire circuit. For charging the internal battery we are using a TP4056 charge controller which can charge the battery with a maximum charge current of 1A. Now if we look at the programming circuit it is built around the CH340K chip from WCH. For auto reset, we have utilized a dual MOSFET 2N7002DW. Now the brain of the whole circuit is an ESP32-WROOM module. We have chosen this SoC because it is cheap, easily available and powerful enough to drive the display with an adequate frame rate. We have connected the pixels as two sections or hands. Each hand has 64 pixels or LEDs. So, in total, we have a 128-pixel resolution. We have also used two hall effect sensors for RPM measurement and position sensing. In the PCB we have added an SMD footprint for it, but later decided to use a normal A3144 sensor in a TO-92 package since they are easier to procure and easy to mount with the current holder design.
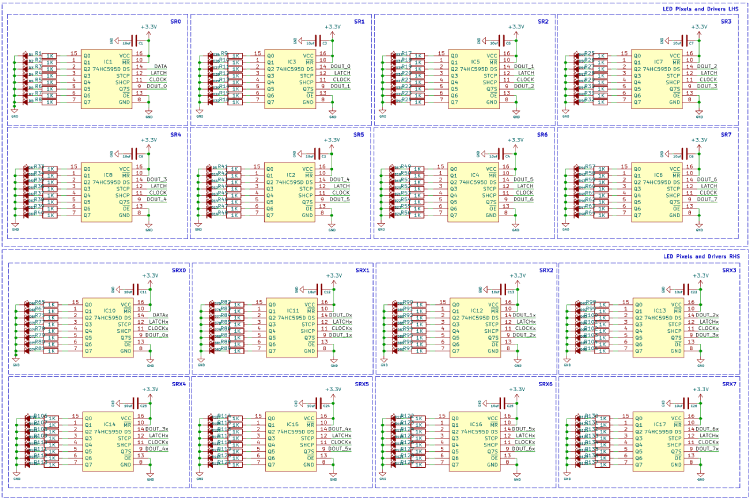
In the next section, we have the LEDs and their drivers. We have used 74HC595D shift registers to drive the LEDs. Since a single s74HC595 can drive up to 8 LEDs, we have used a total of 16 such chips to drive the entire 128 LEDs. We have used a 1KOhms resistor for current limiting, but you can change this value depending on the brightness you need. Since we have two hands, we only need half of a revolution to draw an entire frame or image. The one hand will draw half of the image and the other hand will draw the other half of the image. By doing this we were able to double the frame rate. The display can provide an approximate frame rate of 20FPS.
Each pixel will be controlled through these daisy-chained shift registers.
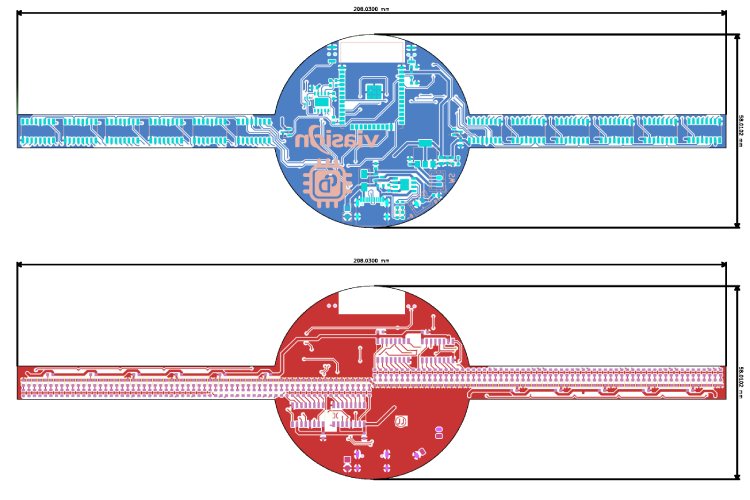
For this project, we have decided to make a custom PCB using KiCad. This will ensure that the final product is as compact as possible as well as easy to assemble and use. The PCB has a dimension of approximately 210mm x 60mm. Here are the top and bottom layers of the PCB.
And here is the 3D view of the PCB.
Here is the fully assembled PCB.
Viasion Technology - PCB Manufacturers
As mentioned earlier the PCB used in this project was fabricated using Viasion Technology, who is an expert in PCB Fabrication and PCB Assembly in China. They have supplied high-quality PCBs to more than 1000 customers worldwide since 2007. Their factory is UL, ISO9001:2016 and ISO13485:2016 certified and is one of the most trusted PCB manufacturers in China for low and medium-volume production.
You can also download the Gerber file for POV display PCB, and contact Viasion Technology to get your PCBs fabricated just like we did. Their packaging and delivery of boards were highly satisfactory and you can also checkout the quality of their PCB boards below.
3D Printed Parts for POV Display
We have designed a cool-looking 3D-printed POV Display using Fusion360. The files for all the 3D printed parts can be downloaded from GitHub link provided at the end of the article along with the Arduino sketch and bitmap file. Learn more about 3D printing and how to get started with it by following the link. Here is the PCB holder with the PCB
And here is the 3D view of POV display along with the mounting stand. All the models that you see here was created using fusion360.
And here is the fully assembled POV LED Display.
How Does the Persistence of Viasion Display Work?
Now let's look at how the POV display works. If you look at the image below you can see that we have divided a circle into 32 equal parts. This indicates a row of pixels. So, if we divide it like this to complete an image, we must draw 32 lines of pixels on every rotation. While displaying each of these lines we must on or off each pixel depending on the pixel data.
In our display, we are dividing each image into 360 pieces radially. This means we must draw 360 lines, that are 1 degree apart, on each rotation to draw an image. In each line, there will be 64 pixels or LEDs (in total 128 LEDs from both arms.) that we should manipulate according to the pixel data. The problem with displaying a normal image is that they use a Cartesian coordinate system. But in order to display an image on a rotating POV display we must need the image with polar coordinates. In a Cartesian coordinate system, The pixels are square, and position is specified by horizontal distance (x) and vertical distance (y). Polar coordinates, on the other hand, are based on a circular grid. The pixels look like wedges or keystones, and position is specified by radius (r) and angle-from-horizontal (θ). Thus, pixels are not uniform: as the distance from the origin increases, the pixels increase in area and change in shape.
To get pixel data from an image we must use some trigonometric calculations and some interpolation. However, doing this for every pixel of every image will take a lot of time and will slowly increase the pixel response time. In order to avoid this and get very minimal pixel repose time and thus maximum refresh rate we will use precomputed value to process the image, which will be explained in the coding section. With our present setup, drawing one frame or an image, with 128-pixel resolution and 360 segments will take around 50ms, thus giving an effective frame rate of 20fps.
Technologies used
Hardware components
- ESP32
- ESP8266
- Arduino
- DHT22
- Relay
- OLED
- NodeMCU
Software & tools
- Arduino IDE
- Blynk
- Firebase Console
- Node-RED
- MQTT Broker
Project demo video
What you get
- Working project / hardware kit, tested before delivery
- Complete source code with explanation
- Project demo and guidance for your viva
- Project report, PPT and IEEE paper support (on request)
Related IoT projects

DIY IoT Plant Watering System using Arduino
A remote plant-watering system that monitors soil moisture and lets you trigger a water pump from anywhere through the Blynk app, with LED-m...
View project
Build a smart mirror with an Arduino UNO Q
A wall-mounted smart mirror that shows the time, calendar, to-do list, room temperature/humidity and weather forecast behind a two-way glass...
View project
ESP32 Patient Health Monitor ECG SpO2 BPM Live Dashboard
Build a complete patient health monitoring system using ESP32 with AD8232 ECG sensor, MAX30102 pulse oximeter, BME280 and live web dashboard...
View project
IoT AC Energy Meter with PZEM-004T and ESP32 WebServer
Build an IoT-based AC energy meter using ESP32 and PZEM-004T to measure voltage, current, power, frequency and energy with live web dashboar...
View project