Wireless Gesture Controller for Home Automation using Raspberry Pi
We created a Wireless Gesture Controller System that tracks finger movement, recognizes gestures, and uses them to control lights.
- Suitable forB.Tech Embedded students
- Build time3-4 weeks
- LevelIntermediate
- Available atAjvika Labs, Kakinada
About this project
Today, we will create a Wireless Gesture Controller System that tracks finger movement, recognizes gestures, and uses them to control lights. This system can be expanded to control other functions like adjusting volume or fan speed.
Controlling lights, speaker volume, or fan speed with voice commands and hand gestures is fascinating. It adds a modern and futuristic touch to our homes, making it convenient to operate without physical contact.
With the rise of technologies like metaverse and AR/VR, finger tracking and gesture control have become essential.
Additionally, the code can be integrated into metaverse and AR/VR environments for gesture-based control.
Join us as we explore the exciting possibilities of gesture-based control for a more intuitive and immersive home automation experience.
So let’s start the project with a collection of the following components-
To recognize the hand and fingers, calculate the distance between fingertips, and detect gestures; we can employ two different approaches-
The first approach involves using Numpy and OpenCV , while the second approach combines OpenCV with Mediapipe.
Although the Mediapipe-based system is accurate and efficient, there may be installation issues with the library. For now, we will focus on using OpenCV exclusively for coding purposes.
However, we plan to update this project in the next version by incorporating Mediapipe.
To begin, you need to install OpenCV and Numpy on your Raspberry Pi using the Linux terminal. Execute the following commands:
sudo pip3 install opencv sudo pip3 install numpy
Once the installation is complete, you can proceed with the code implementation.
First, import the OpenCV and Numpy libraries. Then, utilize the gpiozero library to control the GPIO pins on the Raspberry Pi. Assign the appropriate LED number to control the light based on finger movements. Next, capture the frames in the code.
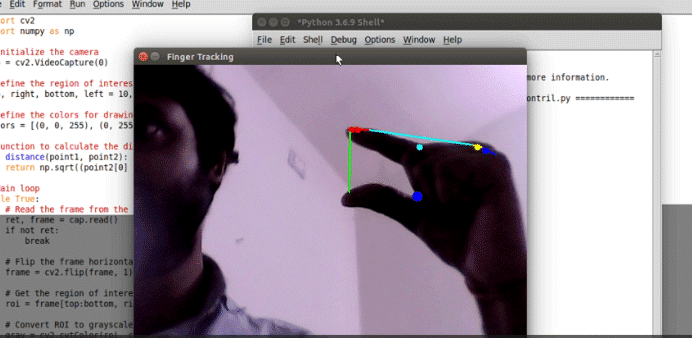
Afterward, process the video frames to detect the hand and fingers. Use an if condition to determine the distance between the index and thumb fingers. If the thumb and index finger touch each other, set a function to turn the lights on.
Gesture Controller Circuit Diagram
To connect the relay to your Raspberry Pi , follow these steps:
Locate the 5V and GND pins on the Raspberry Pi. Connect the corresponding pins of the relay to these pins. The 5V pin provides power to the relay, while the GND pin establishes the ground connection.
Choose a free pin on the Raspberry Pi for relay control. In this example, we’ll use pin 17, but you can use any available pin that suits your needs.
Connect the input pin of the relay to pin 17 on the Raspberry Pi. This pin will control the relay’s state.
Make sure to refer to the circuit diagram for a visual representation of the connections. Remember that you can use any free pin on the Raspberry Pi for relay control, not just pin 17.
To test the code, follow these steps:
Run the code you have implemented.
Position your finger in front of the Raspberry Pi camera.
Move your fingers and touch your index finger to your thumb.
If the code is functioning correctly, touching the index and thumb fingers should activate the relay, turning it on. However, please note that the accuracy of finger and palm detection may not be optimal since you did not utilize any machine learning (ML) models in the current implementation.
Also Check : Implementing Gesture Recognition in DIY Projects
To enhance the accuracy of finger and palm detection, consider updating the project by incorporating Mediapipe. Mediapipe provides robust ML models for hand and gesture recognition, leading to improved accuracy in detecting fingers and palm positions.
Gesture Controlled Smart Home Solution
AI-Based Hand Tracking for Robotic Arm Control
SHARE YOUR THOUGHTS & COMMENTS Register or Login to leave a comment.
Smart Speed Monitoring System For Road Safety
Real-Time Face Tracking Using Raspberry Pi 4 Versus Raspberry Pi 5 With Hailo-8L
High-Voltage Capacitor Discharger
Real-time Web-based Home Automation
World’s Smallest Open-Source LoRa + GPS Module for Wearables and IoT (Only 3cm!)
Smallest Spy Video Streaming Camera
Wirelessly Control Multiple AC Appliances with Web Interface
Ultra-Low-Loss Isolated Current Sensor
STMicroelectronics has Introduced First Automotive Microcontroller With built-in AI Acceleration
Samsung Launched 200MP Image Sensor Called ISOCELL HP5
Aeva Introduced 4D LiDAR Sensor for Physical AI Systems
Racetrack Shaped Resonators Enhances Light Trapping
AI Chip Uses Light Instead Of Electricity
AI Mini PC Targets Edge Computing Workloads
Battery-Free In-Tire Sensors For Autonomous Vehicles
DIY: Audio Signal–Controlled LED Display Using LM3914
State Reduction In Sequential Circuits
Make Your Own Musical Temperature Alarm
Buck Converter vs Linear Voltage Regulator
Ultra-Compact RGB LED For Space-Constrained Designs
Compact Varistors For High Surge Protection
Gold Plated Reed Relays For High Voltage Systems
28nm Automotive MCU For Zonal E/E Architectures
DSP / Audio Firmware Engineer (Intern) At Chordy.ai In Bengaluru
JOB: System Engineer At General Electric In Chennai
JOB: Analog Layout Engineer At Accenture In Bengaluru
JOB: HVDC HMI Engineer At Quest Global In Bengaluru
Circuit Design Calculators for Engineers and Students
Technologies used
Hardware components
- Raspberry Pi
- Relay
- MPU
- LED
- Sensor
- Module
- Capacitor
- Battery
- Speaker
- Camera
- GPS
- LoRa
- RF
What you get
- Working project / hardware kit, tested before delivery
- Complete source code with explanation
- Project demo and guidance for your viva
- Project report, PPT and IEEE paper support (on request)
Delivery & Payment
Delivery takes a minimum of two weeks from the date your inquiry is confirmed.
Payment is in two parts:
• 50% advance to start the project
• Remaining 50% before delivery
Note:
• Documentation and PPT are not included by default
• If you need documentation/PPT, it can be arranged for extra time and cost
We'll confirm the exact timeline and cost with you after reviewing your requirements.
Related Embedded projects

Embedded
ESP32 Fingerprint Attendance System with Live Web Dashboard
Build a biometric attendance system using ESP32 with AS608 fingerprint sensor that logs attendance with timestamp to web dashboard and Googl...
View project
Embedded
Mars Rover Robot Replica using ESP32 CAM and Arduino
Build a Mars Rover robot replica using ESP32-CAM and Arduino with a rocker-bogie suspension system, live video streaming, and smartphone app...
View project
Embedded
ESP32 CAN Bus Tutorial Interfacing MCP2515 with ESP32
Learn CAN bus communication with ESP32 and MCP2515 CAN controller to send and receive data in automotive and industrial applications.
View project
Embedded
ESP32 MP3 Music Player with SD Card and I2S Amplifier
Build a standalone ESP32 MP3 music player that reads audio from SD card and outputs high-quality audio via I2S DAC amplifier with web contro...
View project