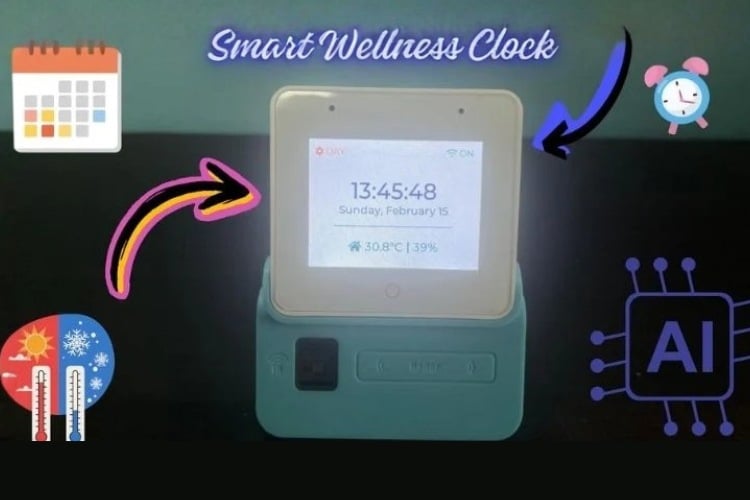
Smart Wellness Clock
Smart Wellness Clock: ESP32-S3 smart display with touch, Wi-Fi, real-time clock, temperature & humidity monitoring, and visual alerts.
- Suitable forB.Tech Embedded students
- Build time3-4 weeks
- LevelBeginner
- Available atAjvika Labs, Kakinada
About this project
By Shekhar Nandanwar
The rapid advancement of Internet of Things (IoT) technology has made smart home and smart environment monitoring systems increasingly accessible and affordable. Embedded systems powered by low-cost, high-performance microcontrollers such as the ESP32 series now allow developers to create feature-rich, user-friendly interfaces with graphical displays, touch input, real-time sensing, and audio feedback — all within compact and power-efficient designs.
This project presents the design and implementation of a Smart Room Display and Monitoring System based on the ESP32-S3 microcontroller. The system combines:
A modern graphical user interface (GUI) built with LVGL (Light and Versatile Graphics Library)
A modern graphical user interface (GUI) built with LVGL (Light and Versatile Graphics Library)
Real-time display of time, date, room temperature and humidity
Real-time display of time, date, room temperature and humidity
Wi-Fi connection status indication
Wi-Fi connection status indication
Touch-based interaction
Touch-based interaction
Visual alert/notification system
Visual alert/notification system
The main objectives of the project are:
To create an attractive, responsive, and intuitive user interface suitable for smart home or environment monitoring applications
To create an attractive, responsive, and intuitive user interface suitable for smart home or environment monitoring applications
To integrate multiple sensors and peripherals (display, touch, temperature/humidity sensor, audio codec) using clean and modular code
To integrate multiple sensors and peripherals (display, touch, temperature/humidity sensor, audio codec) using clean and modular code
To demonstrate proper usage of the ESP-IDF framework, BSP (Board Support Package) abstraction layer, and LVGL on modern ESP32-S3 hardware
To demonstrate proper usage of the ESP-IDF framework, BSP (Board Support Package) abstraction layer, and LVGL on modern ESP32-S3 hardware
To handle real-world challenges such as API changes in LVGL, correct I2S audio configuration, and clean separation between UI logic and application behavior
To handle real-world challenges such as API changes in LVGL, correct I2S audio configuration, and clean separation between UI logic and application behavior
The system is developed using ESP-IDF (Espressif IoT Development Framework) and targets typical ESP32-S3 development boards equipped with TFT displays (such as ILI9341, ST7789, or similar), capacitive touch, I2S audio output (e.g. MAX98357A / PCM5102 / ES8388), and a temperature-humidity sensor AHT20
This project was developed and demonstrated using the Espressif ESP32-S3-BOX development kit (ESP-BOX).
The ESP-BOX is a ready-to-use, integrated development platform that contains:
ESP32-S3 microcontroller
ESP32-S3 microcontroller
2.4-inch capacitive touch display (320×240)
2.4-inch capacitive touch display (320×240)
Built-in speaker (via I²S audio codec)
Built-in speaker (via I²S audio codec)
Dual digital microphones
Dual digital microphones
USB Type-C power interface
USB Type-C power interface
All major peripherals (display, touch controller, audio codec, etc.) are already soldered and internally connected on the board according to Espressif’s official design.
No custom circuit diagram is provided because:
No additional external components or wiring were added No custom PCB was designed All hardware connections follow the standard layout of the ESP-BOX development kit Peripheral initialization and pin configuration are handled automatically by calling bsp_board_init() from the official esp-bsp component.
Hardware assembly was kept minimal due to the use of the fully integrated Espressif ESP32-S3-BOX development kit.
The ESP-BOX already includes:
ESP32-S3 microcontroller
ESP32-S3 microcontroller
2.4-inch capacitive touch TFT display (320×240)
2.4-inch capacitive touch TFT display (320×240)
Built-in speaker (connected via I²S)
Built-in speaker (connected via I²S)
USB Type-C connector for power and programming
USB Type-C connector for power and programming
No additional sensors, displays, audio modules, or breakout boards were connected.
The only hardware modification / addition was:
One 18650 Li-ion battery cell (3.7V nominal) connected to provide portable / standalone power.
One 18650 Li-ion battery cell (3.7V nominal) connected to provide portable / standalone power.
Assembly steps performed:
The original USB Type-C cable that came with the ESP-BOX (or a good quality USB-C cable) was used for initial programming and debugging.
The original USB Type-C cable that came with the ESP-BOX (or a good quality USB-C cable) was used for initial programming and debugging.
For portable operation (demonstration without constant USB connection): A single 18650 3.7V battery cell was connected to the board’s power input. Connection was made to the 5V / VBUS line (most commonly via the USB-C connector breakout pads or using a simple battery holder + protection circuit + boost converter to 5V if required). Important note: The ESP-BOX is designed to be powered via USB-C at 5V. Direct connection of a 3.7V battery without proper voltage conversion is not recommended for long-term use.
For portable operation (demonstration without constant USB connection):
A single 18650 3.7V battery cell was connected to the board’s power input.
A single 18650 3.7V battery cell was connected to the board’s power input.
Connection was made to the 5V / VBUS line (most commonly via the USB-C connector breakout pads or using a simple battery holder + protection circuit + boost converter to 5V if required).
Connection was made to the 5V / VBUS line (most commonly via the USB-C connector breakout pads or using a simple battery holder + protection circuit + boost converter to 5V if required).
Important note: The ESP-BOX is designed to be powered via USB-C at 5V. Direct connection of a 3.7V battery without proper voltage conversion is not recommended for long-term use.
Important note: The ESP-BOX is designed to be powered via USB-C at 5V. Direct connection of a 3.7V battery without proper voltage conversion is not recommended for long-term use.
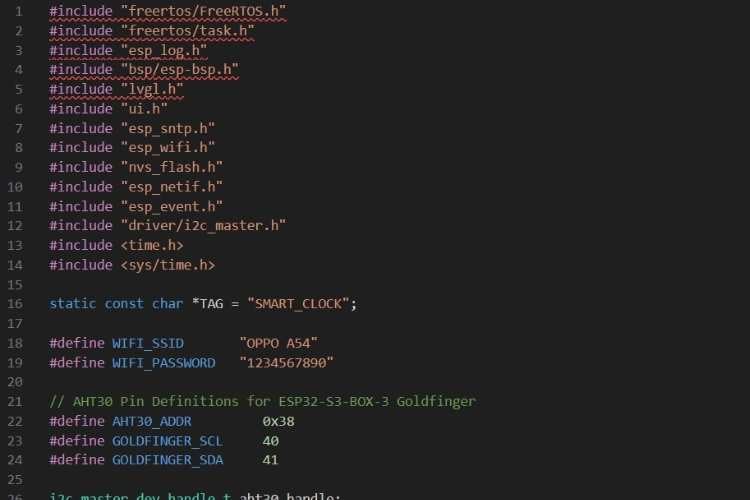
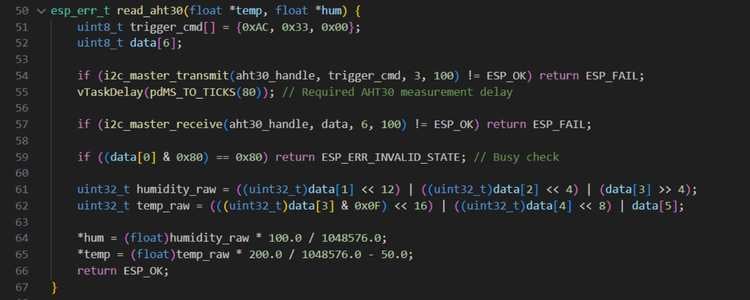
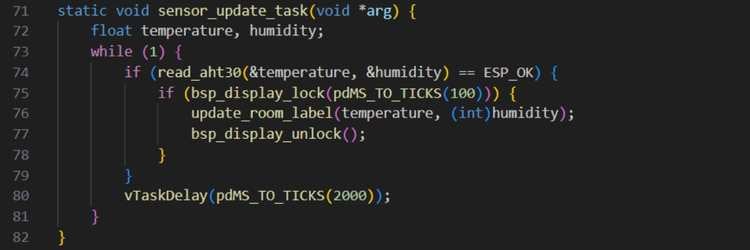
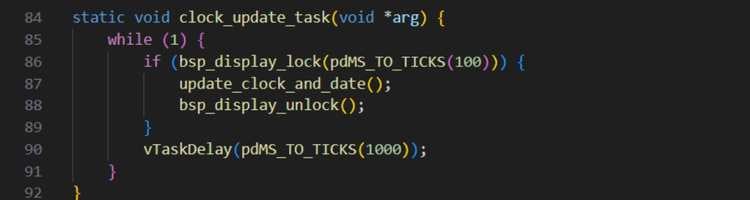
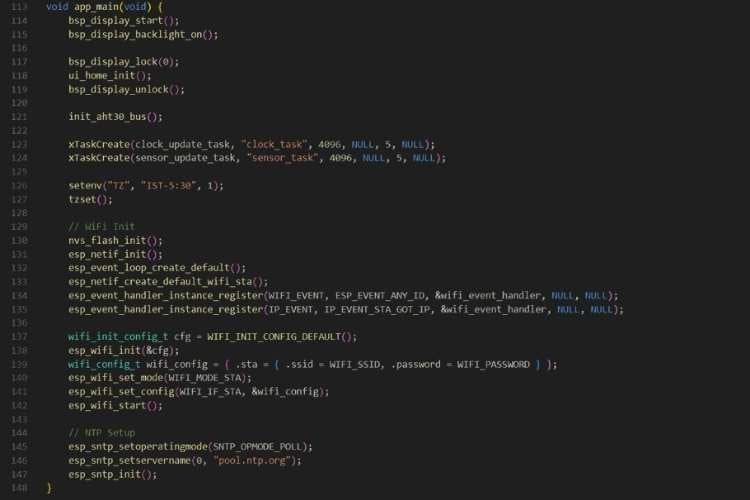
This is the main application code for your Smart Wellness Clock project running on ESP32-S3-BOX
What the complete program does:
Initializes the display and shows the LVGL-based user interface (clock, date, room temp/humidity, Wi-Fi status, alert popup)
Initializes the display and shows the LVGL-based user interface (clock, date, room temp/humidity, Wi-Fi status, alert popup)
Connects to Wi-Fi (using your home network credentials)
Connects to Wi-Fi (using your home network credentials)
Synchronizes time from the internet using NTP (so the clock shows real time)
Synchronizes time from the internet using NTP (so the clock shows real time)
Reads temperature and humidity from an AHT30 sensor every 2 seconds
Reads temperature and humidity from an AHT30 sensor every 2 seconds
Updates the UI every second with current time/date
Updates the UI every second with current time/date
Updates the room temperature & humidity display when new sensor values are available
Updates the room temperature & humidity display when new sensor values are available
Shows correct Wi-Fi connected/disconnected status on the screen Code Structure:
Shows correct Wi-Fi connected/disconnected status on the screen Code Structure:
We are using FreeRTOS (tasks, delays)
The rapid advancement of Internet of Things (IoT) technology has made smart home and smart environment monitoring systems increasingly accessible and affordable. Embedded systems powered by low-cost, high-performance microcontrollers such as the ESP32 series now allow developers to create feature-rich, user-friendly interfaces with graphical displays, touch input, real-time sensing, and audio feedback — all within compact and power-efficient designs.
This project presents the design and implementation of a Smart Room Display and Monitoring System based on the ESP32-S3 microcontroller. The system combines:
A modern graphical user interface (GUI) built with LVGL (Light and Versatile Graphics Library)
A modern graphical user interface (GUI) built with LVGL (Light and Versatile Graphics Library)
Real-time display of time, date, room temperature and humidity
Real-time display of time, date, room temperature and humidity
Wi-Fi connection status indication
Wi-Fi connection status indication
Touch-based interaction
Touch-based interaction
Visual alert/notification system
Visual alert/notification system
The main objectives of the project are:
To create an attractive, responsive, and intuitive user interface suitable for smart home or environment monitoring applications
To create an attractive, responsive, and intuitive user interface suitable for smart home or environment monitoring applications
To integrate multiple sensors and peripherals (display, touch, temperature/humidity sensor, audio codec) using clean and modular code
To integrate multiple sensors and peripherals (display, touch, temperature/humidity sensor, audio codec) using clean and modular code
To demonstrate proper usage of the ESP-IDF framework, BSP (Board Support Package) abstraction layer, and LVGL on modern ESP32-S3 hardware
To demonstrate proper usage of the ESP-IDF framework, BSP (Board Support Package) abstraction layer, and LVGL on modern ESP32-S3 hardware
To handle real-world challenges such as API changes in LVGL, correct I2S audio configuration, and clean separation between UI logic and application behavior
To handle real-world challenges such as API changes in LVGL, correct I2S audio configuration, and clean separation between UI logic and application behavior
The system is developed using ESP-IDF (Espressif IoT Development Framework) and targets typical ESP32-S3 development boards equipped with TFT displays (such as ILI9341, ST7789, or similar), capacitive touch, I2S audio output (e.g. MAX98357A / PCM5102 / ES8388), and a temperature-humidity sensor AHT20
This project was developed and demonstrated using the Espressif ESP32-S3-BOX development kit (ESP-BOX).
The ESP-BOX is a ready-to-use, integrated development platform that contains:
ESP32-S3 microcontroller
ESP32-S3 microcontroller
2.4-inch capacitive touch display (320×240)
2.4-inch capacitive touch display (320×240)
Built-in speaker (via I²S audio codec)
Built-in speaker (via I²S audio codec)
Dual digital microphones
Dual digital microphones
USB Type-C power interface
USB Type-C power interface
All major peripherals (display, touch controller, audio codec, etc.) are already soldered and internally connected on the board according to Espressif’s official design.
No custom circuit diagram is provided because:
No additional external components or wiring were added No custom PCB was designed All hardware connections follow the standard layout of the ESP-BOX development kit Peripheral initialization and pin configuration are handled automatically by calling bsp_board_init() from the official esp-bsp component.
Hardware assembly was kept minimal due to the use of the fully integrated Espressif ESP32-S3-BOX development kit.
The ESP-BOX already includes:
ESP32-S3 microcontroller
ESP32-S3 microcontroller
2.4-inch capacitive touch TFT display (320×240)
2.4-inch capacitive touch TFT display (320×240)
Built-in speaker (connected via I²S)
Built-in speaker (connected via I²S)
USB Type-C connector for power and programming
USB Type-C connector for power and programming
No additional sensors, displays, audio modules, or breakout boards were connected.
The only hardware modification / addition was:
One 18650 Li-ion battery cell (3.7V nominal) connected to provide portable / standalone power.
One 18650 Li-ion battery cell (3.7V nominal) connected to provide portable / standalone power.
Assembly steps performed:
The original USB Type-C cable that came with the ESP-BOX (or a good quality USB-C cable) was used for initial programming and debugging.
The original USB Type-C cable that came with the ESP-BOX (or a good quality USB-C cable) was used for initial programming and debugging.
For portable operation (demonstration without constant USB connection): A single 18650 3.7V battery cell was connected to the board’s power input. Connection was made to the 5V / VBUS line (most commonly via the USB-C connector breakout pads or using a simple battery holder + protection circuit + boost converter to 5V if required). Important note: The ESP-BOX is designed to be powered via USB-C at 5V. Direct connection of a 3.7V battery without proper voltage conversion is not recommended for long-term use.
For portable operation (demonstration without constant USB connection):
A single 18650 3.7V battery cell was connected to the board’s power input.
A single 18650 3.7V battery cell was connected to the board’s power input.
Connection was made to the 5V / VBUS line (most commonly via the USB-C connector breakout pads or using a simple battery holder + protection circuit + boost converter to 5V if required).
Connection was made to the 5V / VBUS line (most commonly via the USB-C connector breakout pads or using a simple battery holder + protection circuit + boost converter to 5V if required).
Important note: The ESP-BOX is designed to be powered via USB-C at 5V. Direct connection of a 3.7V battery without proper voltage conversion is not recommended for long-term use.
Important note: The ESP-BOX is designed to be powered via USB-C at 5V. Direct connection of a 3.7V battery without proper voltage conversion is not recommended for long-term use.
This is the main application code for your Smart Wellness Clock project running on ESP32-S3-BOX
What the complete program does:
Initializes the display and shows the LVGL-based user interface (clock, date, room temp/humidity, Wi-Fi status, alert popup)
Initializes the display and shows the LVGL-based user interface (clock, date, room temp/humidity, Wi-Fi status, alert popup)
Connects to Wi-Fi (using your home network credentials)
Connects to Wi-Fi (using your home network credentials)
Synchronizes time from the internet using NTP (so the clock shows real time)
Synchronizes time from the internet using NTP (so the clock shows real time)
Reads temperature and humidity from an AHT30 sensor every 2 seconds
Reads temperature and humidity from an AHT30 sensor every 2 seconds
Updates the UI every second with current time/date
Updates the UI every second with current time/date
Updates the room temperature & humidity display when new sensor values are available
Updates the room temperature & humidity display when new sensor values are available
Shows correct Wi-Fi connected/disconnected status on the screen Code Structure:
Shows correct Wi-Fi connected/disconnected status on the screen Code Structure:
We are using FreeRTOS (tasks, delays)
Technologies used
Hardware components
- ESP32
- LED
- Sensor
- Module
- Board
- Speaker
- Microphone
- PCB
- Battery
- MAX98357
Project demo video
What you get
- Working project / hardware kit, tested before delivery
- Complete source code with explanation
- Project demo and guidance for your viva
- Project report, PPT and IEEE paper support (on request)
Delivery & Payment
Delivery takes a minimum of two weeks from the date your inquiry is confirmed.
Payment is in two parts:
• 50% advance to start the project
• Remaining 50% before delivery
Note:
• Documentation and PPT are not included by default
• If you need documentation/PPT, it can be arranged for extra time and cost
We'll confirm the exact timeline and cost with you after reviewing your requirements.
Related Embedded projects

Embedded
ESP32 Fingerprint Attendance System with Live Web Dashboard
Build a biometric attendance system using ESP32 with AS608 fingerprint sensor that logs attendance with timestamp to web dashboard and Googl...
View project
Embedded
Mars Rover Robot Replica using ESP32 CAM and Arduino
Build a Mars Rover robot replica using ESP32-CAM and Arduino with a rocker-bogie suspension system, live video streaming, and smartphone app...
View project
Embedded
ESP32 CAN Bus Tutorial Interfacing MCP2515 with ESP32
Learn CAN bus communication with ESP32 and MCP2515 CAN controller to send and receive data in automotive and industrial applications.
View project
Embedded
ESP32 MP3 Music Player with SD Card and I2S Amplifier
Build a standalone ESP32 MP3 music player that reads audio from SD card and outputs high-quality audio via I2S DAC amplifier with web contro...
View project