KinoVision - Where Visual Sensing Meets Motion-Driven Control
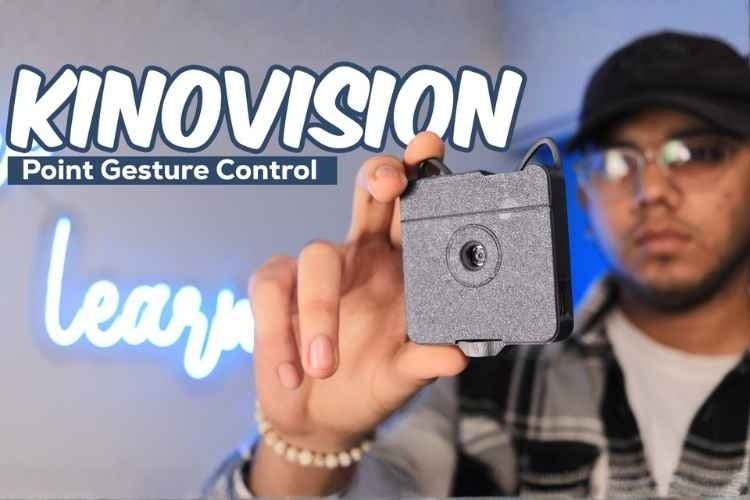
KinoVision is a wearable, vision-based smart home automation system that uses hand gestures and AI-powered device recognition to control appliances without apps or voice commands.
- Suitable forB.Tech Embedded students
- Build time3-4 weeks
- LevelBeginner
- Available atAjvika Labs, Kakinada
About this project
KinoVision is a wearable, gesture-controlled, vision-based smart home automation system that reimagines how users interact with their living spaces. Unlike traditional smart home systems that rely on mobile apps, voice commands, or physical remotes, KinoVision enables appliance control using natural hand gestures combined with visual context awareness. By simply looking at a device, performing a wrist shake to identify it, and tilting the hand left or right, users can turn appliances ON or OFF in an intuitive and touchless manner.
The motivation behind this project was to address the friction and limitations commonly found in existing smart home interfaces - such as app dependency, voice recognition errors, false triggers, and a lack of natural interaction. KinoVision explores a more human-centric approach, where what the user sees and how the user moves become the primary modes of interaction.
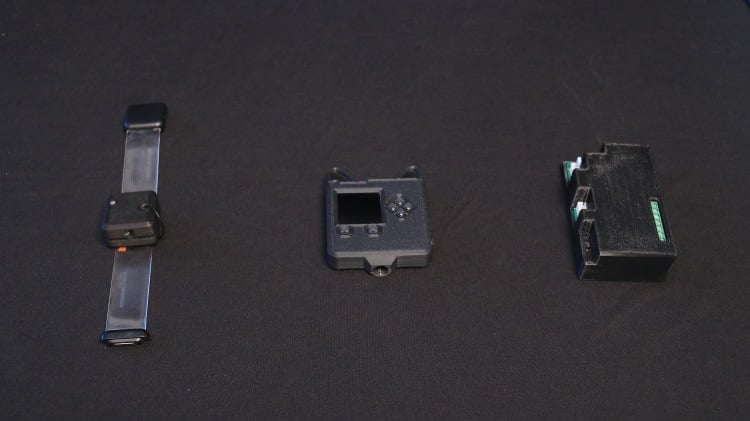
The system is built around three cooperating modules: a gesture wristband that detects hand movements, a vision pendant that identifies appliances using a camera and AI-based image understanding, and a home hub that executes control actions through relays. Together, these components form a seamless interaction loop that allows users to select and control appliances using vision-based selection followed by gesture-based commands.
KinoVision is implemented as a fully working prototype and is designed as a stepping stone toward future AR-based smart home interaction systems, where vision and motion can merge into an even more immersive and hands-free control experience. This project was developed as part of the CircuitDigest Smart Home & Wearables Contest 2025, with hardware support from DigiKey.
Adafruit Memento Programmable Camera
ESP32 Development Board
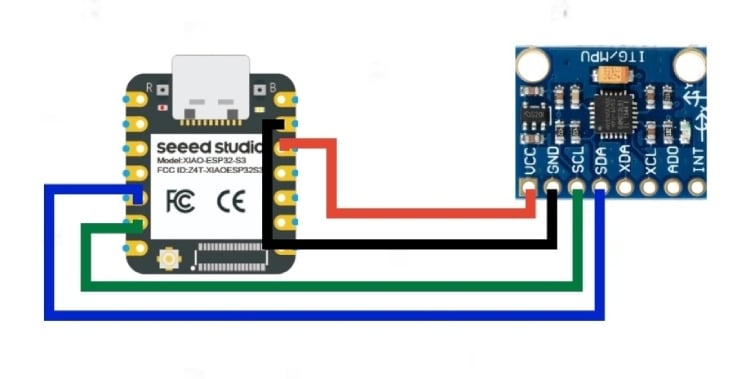
KinoVision Wristband - XIAO ESP32-S3 to MPU6050 Connection
The wristband uses I2C communication between the XIAO ESP32-S3 and the MPU6050 accelerometer/gyroscope module.
The MPU6050 continuously measures acceleration across three axes (X, Y,Z). The XIAO ESP32-S3 reads these values via I2C at the default address 0x68 and classifies them into gestures. The entire wristband assembly is powered by a small LiPo battery connected to the ESP's battery input.
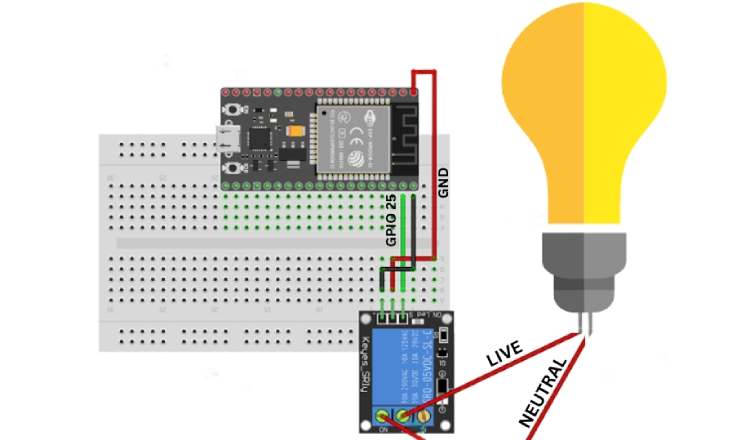
HUB Circuit Diagram:
The hub uses an ESP-32 connected to a 5V single-channel relay module. GPIO 25 acts as the control signal; when it goes HIGH, the relay coil activates and closes the circuit between the LIVE wire and the light bulb. The NEUTRAL wire connects directly to the bulb without interruption. This configuration means the appliance is OFF by default (Normally Open), ensuring safety on power-up.
Vision Pendant Integration & System Communication:
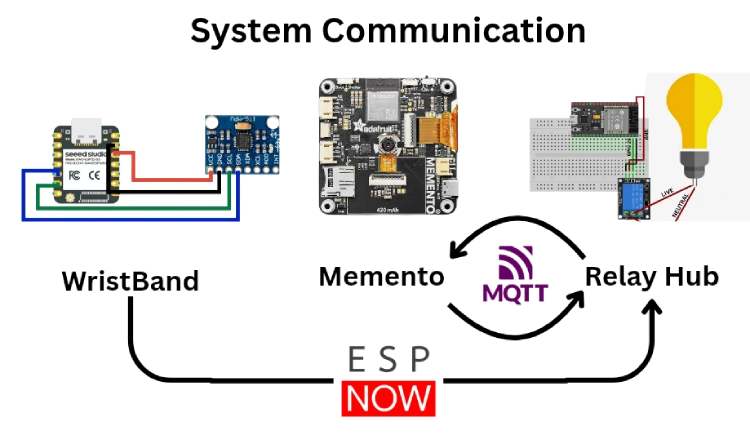
The Adafruit Memento - Vision Pendant is integrated into the system through MQTT communication rather than direct wiring with the relay circuit. While the wristband communicates with the hub using ESP-NOW, the hub and Memento exchange messages through Adafruit IO - MQTT broker.
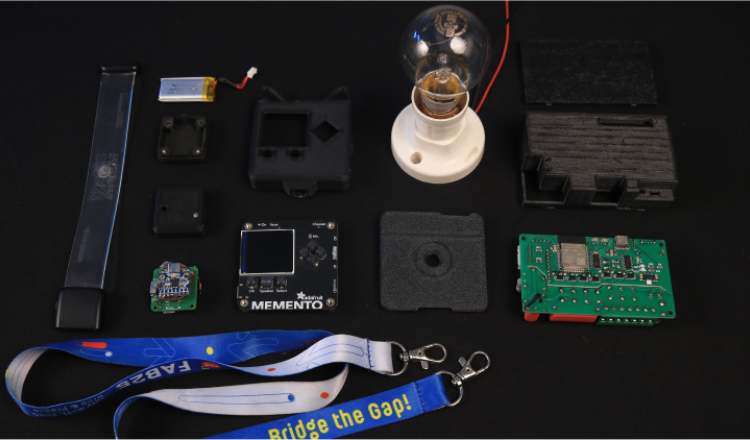
The KinoVision system consists of three hardware modules assembled separately and later integrated: the Gesture Wristband, the ESP32 Home Hub, and the Vision Pendant (Memento). The following steps describe the complete assembly process.
1. Gesture Wristband Assembly
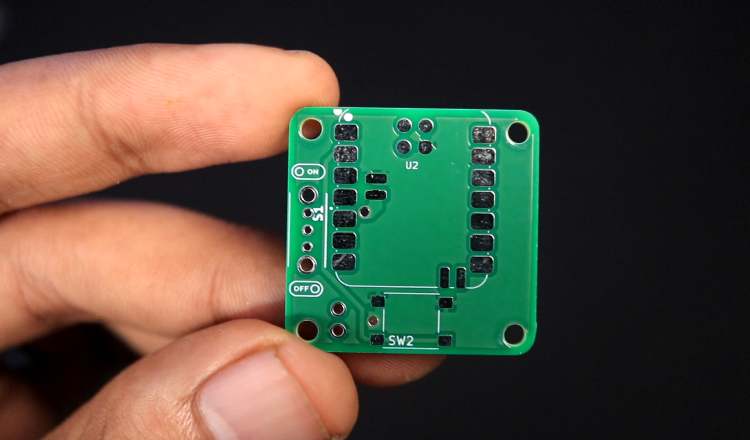
The gesture wristband is built around a custom PCB based on the XIAO ESP32-S3 and the MPU6050 IMU sensor.
Step 1: Solder the XIAO ESP32-S3
Mount the XIAO ESP32-S3 onto the custom PCB.
Ensure proper alignment of all pins.
Solder each pad carefully to avoid cold joints.
Step 2: Solder the MPU6050 IMU Sensor
Connect the MPU6050 using I2C (SDA, SCL).
Ensure VCC and GND are properly connected.
Double-check continuity before powering.
Step 3: Connect Power Supply
Connect a 3.7V LiPo battery to the board.
Verify voltage output before powering the system.
Ensure polarity is correct.
Step 4: Initial Testing
Upload firmware to the XIAO ESP32-S3.
Open serial monitor to verify gesture classification output.
Confirm that SHAKE, LEFT, and RIGHT are detected reliably.
Step 5: Enclosure Assembly
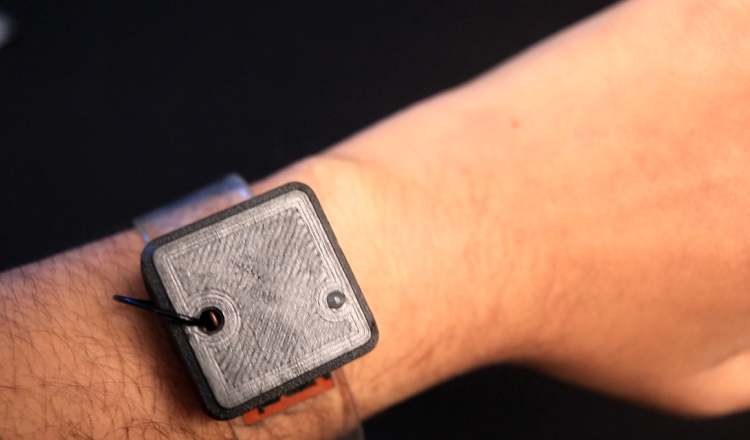
Place the PCB inside the 3D-printed wristband enclosure.
Secure using screws or adhesive.
Attach the wearable strap.
2. ESP32 Home Hub Assembly
The demonstration in this project uses the ESP32-based Home Automation V3 module developed at Techiesms Studio. This board integrates the ESP32, relay driver circuitry, power regulation, and enclosure in a compact form factor.
For clarity and reproducibility, the essential wiring logic of the hub is shown below using a simplified ESP32 + relay configuration.
Step 1: Mount ESP32 on Breadboard / PCB
Insert ESP32 development board.
Connect 5V and GND rails.
Step 2: Connect Relay Module
Step 3: Connect Appliance
Connect LIVE wire through relay COM and NO terminals.
Connect NEUTRAL wire directly to bulb.
Step 4: Upload Hub Firmware
Flash ESP32 hub firmware.
Verify MQTT connection.
Confirm relay toggles when gesture command is received.
3. Vision Pendant Assembly (Adafruit Memento)
The Memento is used as a wearable vision module housed in a 3D-printed pendant enclosure.
Step 1: Flash Firmware
Upload vision detection firmware to the Memento.
Configure Wi-Fi and OpenAI API key.
Verify image capture functionality.
Step 2: Test MQTT Subscription
Verify image capture is triggered when SHAKE is published.
Step 3: Mount in 3D Enclosure
Insert the Memento into the 3D-printed pendant case.
Ensure camera lens remains unobstructed.
Attach wearable chain or strap.
KinoVision consists of three distinct programs working together to create the complete gesture control system. Each program runs on different hardware and handles specific responsibilities in the workflow.
The system architecture consists of:
Wristband Code (Arduino C++) - Gesture detection and ESP-NOW transmission
Hub Code (Arduino C++) - Central coordinator with ESP-NOW receiver and MQTT bridge
Memento Code (CircuitPython) - AI vision and device identification
1. WRISTBAND CODE (Arduino C++) Hardware: XIAO ESP32-S3 + MPU6050 Accelerometer
Detects hand gestures (SHAKE, LEFT, RIGHT) and wirelessly transmits them to the hub using ESP-NOW.
A. Gesture Detection Configuration // ---------- EASY GESTURE CONFIG ----------
#define SHAKE_THRESHOLD 18.0 // Rapid movement threshold
#define TILT_THRESHOLD 6.0 // Left/right tilt sensitivity
#define MIN_MOVEMENT 10.0 // Minimum movement to register
#define GESTURE_COOLDOWN 1200 // Milliseconds between gestures
SHAKE_THRESHOLD: To make shake gestures easier to trigger
TILT_THRESHOLD: Set to 6.0 for comfortable left/right wrist tilts
MIN_MOVEMENT: Prevents false triggers from minor hand tremors
GESTURE_COOLDOWN: 1.2 seconds prevents accidental rapid-fire gestures
B. Sensor Calibration
Takes 100 samples over 2 seconds while wrist is at rest
The motivation behind this project was to address the friction and limitations commonly found in existing smart home interfaces - such as app dependency, voice recognition errors, false triggers, and a lack of natural interaction. KinoVision explores a more human-centric approach, where what the user sees and how the user moves become the primary modes of interaction.
The system is built around three cooperating modules: a gesture wristband that detects hand movements, a vision pendant that identifies appliances using a camera and AI-based image understanding, and a home hub that executes control actions through relays. Together, these components form a seamless interaction loop that allows users to select and control appliances using vision-based selection followed by gesture-based commands.
KinoVision is implemented as a fully working prototype and is designed as a stepping stone toward future AR-based smart home interaction systems, where vision and motion can merge into an even more immersive and hands-free control experience. This project was developed as part of the CircuitDigest Smart Home & Wearables Contest 2025, with hardware support from DigiKey.
Adafruit Memento Programmable Camera
ESP32 Development Board
KinoVision Wristband - XIAO ESP32-S3 to MPU6050 Connection
The wristband uses I2C communication between the XIAO ESP32-S3 and the MPU6050 accelerometer/gyroscope module.
The MPU6050 continuously measures acceleration across three axes (X, Y,Z). The XIAO ESP32-S3 reads these values via I2C at the default address 0x68 and classifies them into gestures. The entire wristband assembly is powered by a small LiPo battery connected to the ESP's battery input.
HUB Circuit Diagram:
The hub uses an ESP-32 connected to a 5V single-channel relay module. GPIO 25 acts as the control signal; when it goes HIGH, the relay coil activates and closes the circuit between the LIVE wire and the light bulb. The NEUTRAL wire connects directly to the bulb without interruption. This configuration means the appliance is OFF by default (Normally Open), ensuring safety on power-up.
Vision Pendant Integration & System Communication:
The Adafruit Memento - Vision Pendant is integrated into the system through MQTT communication rather than direct wiring with the relay circuit. While the wristband communicates with the hub using ESP-NOW, the hub and Memento exchange messages through Adafruit IO - MQTT broker.
The KinoVision system consists of three hardware modules assembled separately and later integrated: the Gesture Wristband, the ESP32 Home Hub, and the Vision Pendant (Memento). The following steps describe the complete assembly process.
1. Gesture Wristband Assembly
The gesture wristband is built around a custom PCB based on the XIAO ESP32-S3 and the MPU6050 IMU sensor.
Step 1: Solder the XIAO ESP32-S3
Mount the XIAO ESP32-S3 onto the custom PCB.
Ensure proper alignment of all pins.
Solder each pad carefully to avoid cold joints.
Step 2: Solder the MPU6050 IMU Sensor
Connect the MPU6050 using I2C (SDA, SCL).
Ensure VCC and GND are properly connected.
Double-check continuity before powering.
Step 3: Connect Power Supply
Connect a 3.7V LiPo battery to the board.
Verify voltage output before powering the system.
Ensure polarity is correct.
Step 4: Initial Testing
Upload firmware to the XIAO ESP32-S3.
Open serial monitor to verify gesture classification output.
Confirm that SHAKE, LEFT, and RIGHT are detected reliably.
Step 5: Enclosure Assembly
Place the PCB inside the 3D-printed wristband enclosure.
Secure using screws or adhesive.
Attach the wearable strap.
2. ESP32 Home Hub Assembly
The demonstration in this project uses the ESP32-based Home Automation V3 module developed at Techiesms Studio. This board integrates the ESP32, relay driver circuitry, power regulation, and enclosure in a compact form factor.
For clarity and reproducibility, the essential wiring logic of the hub is shown below using a simplified ESP32 + relay configuration.
Step 1: Mount ESP32 on Breadboard / PCB
Insert ESP32 development board.
Connect 5V and GND rails.
Step 2: Connect Relay Module
Step 3: Connect Appliance
Connect LIVE wire through relay COM and NO terminals.
Connect NEUTRAL wire directly to bulb.
Step 4: Upload Hub Firmware
Flash ESP32 hub firmware.
Verify MQTT connection.
Confirm relay toggles when gesture command is received.
3. Vision Pendant Assembly (Adafruit Memento)
The Memento is used as a wearable vision module housed in a 3D-printed pendant enclosure.
Step 1: Flash Firmware
Upload vision detection firmware to the Memento.
Configure Wi-Fi and OpenAI API key.
Verify image capture functionality.
Step 2: Test MQTT Subscription
Verify image capture is triggered when SHAKE is published.
Step 3: Mount in 3D Enclosure
Insert the Memento into the 3D-printed pendant case.
Ensure camera lens remains unobstructed.
Attach wearable chain or strap.
KinoVision consists of three distinct programs working together to create the complete gesture control system. Each program runs on different hardware and handles specific responsibilities in the workflow.
The system architecture consists of:
Wristband Code (Arduino C++) - Gesture detection and ESP-NOW transmission
Hub Code (Arduino C++) - Central coordinator with ESP-NOW receiver and MQTT bridge
Memento Code (CircuitPython) - AI vision and device identification
1. WRISTBAND CODE (Arduino C++) Hardware: XIAO ESP32-S3 + MPU6050 Accelerometer
Detects hand gestures (SHAKE, LEFT, RIGHT) and wirelessly transmits them to the hub using ESP-NOW.
A. Gesture Detection Configuration // ---------- EASY GESTURE CONFIG ----------
#define SHAKE_THRESHOLD 18.0 // Rapid movement threshold
#define TILT_THRESHOLD 6.0 // Left/right tilt sensitivity
#define MIN_MOVEMENT 10.0 // Minimum movement to register
#define GESTURE_COOLDOWN 1200 // Milliseconds between gestures
SHAKE_THRESHOLD: To make shake gestures easier to trigger
TILT_THRESHOLD: Set to 6.0 for comfortable left/right wrist tilts
MIN_MOVEMENT: Prevents false triggers from minor hand tremors
GESTURE_COOLDOWN: 1.2 seconds prevents accidental rapid-fire gestures
B. Sensor Calibration
Takes 100 samples over 2 seconds while wrist is at rest
Technologies used
Hardware components
- ESP32
- Arduino
- Relay
- MPU
- LED
- Sensor
- Module
- Board
- Camera
- PCB
- Battery
Project demo video
What you get
- Working project / hardware kit, tested before delivery
- Complete source code with explanation
- Project demo and guidance for your viva
- Project report, PPT and IEEE paper support (on request)
Delivery & Payment
Delivery takes a minimum of two weeks from the date your inquiry is confirmed.
Payment is in two parts:
• 50% advance to start the project
• Remaining 50% before delivery
Note:
• Documentation and PPT are not included by default
• If you need documentation/PPT, it can be arranged for extra time and cost
We'll confirm the exact timeline and cost with you after reviewing your requirements.
Related Embedded projects

Embedded
ESP32 Fingerprint Attendance System with Live Web Dashboard
Build a biometric attendance system using ESP32 with AS608 fingerprint sensor that logs attendance with timestamp to web dashboard and Googl...
View project
Embedded
Mars Rover Robot Replica using ESP32 CAM and Arduino
Build a Mars Rover robot replica using ESP32-CAM and Arduino with a rocker-bogie suspension system, live video streaming, and smartphone app...
View project
Embedded
ESP32 CAN Bus Tutorial Interfacing MCP2515 with ESP32
Learn CAN bus communication with ESP32 and MCP2515 CAN controller to send and receive data in automotive and industrial applications.
View project
Embedded
ESP32 MP3 Music Player with SD Card and I2S Amplifier
Build a standalone ESP32 MP3 music player that reads audio from SD card and outputs high-quality audio via I2S DAC amplifier with web contro...
View project