
Interfacing the RTC Module with Raspberry Pi Pico
Learn to interface Raspberry Pi Pico RTC DS3231 using Arduino IDE. Build an accurate digital clock with 16x2 I²C LCD. Includes circuit diagram, code & troubleshooting.
- Suitable forB.Tech Embedded students
- Build time3-4 weeks
- LevelBeginner
- Available atAjvika Labs, Kakinada
About this project
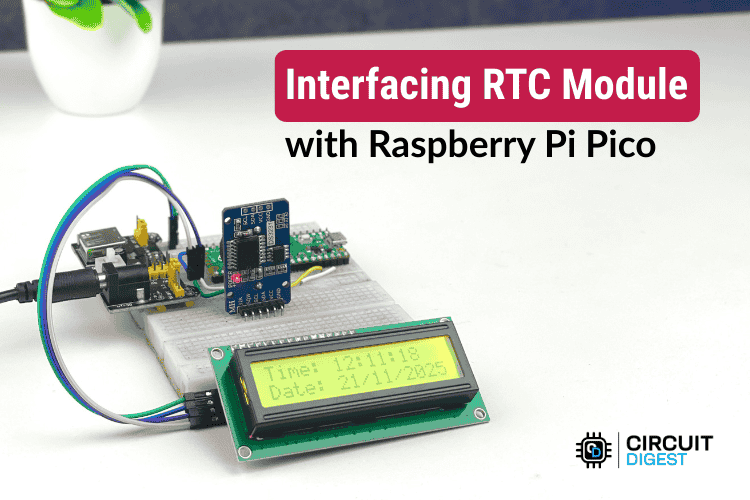
In this guide, we will create a simple and precise digital clock using the Raspberry Pi Pico RTC DS3231 Module through the Arduino IDE. We will use a 16x2 I²C LCD screen to display the information. Since the screen is small, we will write smart code that changes what is shown on the screen. For a few seconds, it will display the time and date, and then switch to show the temperature.
Connecting a DS3231 RTC Module to a Raspberry Pi Pico via I²C
Techniques for properly syncing up a new RTC module with an accurate time source when initially setting the date and time.
Creating an efficient program that does not disrupt the main program flow while updating LCD display.
Interfacing the Raspberry Pi Pico RTC DS3231 RTC Module for accurate timekeeping & reliable operation.
This isn't just about making a clock—it's about creating a reliable timekeeping system that you can later use in alarm systems, scheduling tools, or automation controllers. Related reading: If you're working on cross-platform RTC integrations, also see Interfacing the RTC with Arduino and Interfacing the RTC with ESP32 for extended applications.
Understanding the DS3231 RTC Module
└ DS3231 RTC Module Specifications
DS3231 RTC Module Pin Configuration
Setting Up and Time Adjustment
└ ⇒ Method 1: Auto-Set the Time from Your Computer (Compile-Time Sync)
└ ⇒ Method 2: Manually Set a Custom Date and Time
Complete Arduino Code
Why Choose DS3231 RTC for Raspberry Pi Pico Projects?
If you're building a data logger, an automatic pet feeder, or a reliable desk clock, your system needs to keep track of the exact time, especially when there's no power. That's where the Real-Time Clock (RTC) comes in. There are many RTC options available, but the DS3231 RTC module is usually considered the best choice for both hobbyists and professionals. So why is the DS3231 so special? Older models, like the DS1307, aren't as accurate. They can gain or lose several minutes each month, depending on the temperature. The DS3231 RTC module specification includes a built-in Temperature-Compensated Crystal Oscillator (TCXO). In simple terms, it checks the temperature around it and adjusts how fast it counts time internally. This helps it stay extremely accurate, whether it's in a cold garage or a hot server room.
Understanding the DS3231 RTC Module
The DS3231 RTC module is like a more advanced version of a typical clock chip. Most basic real-time clock (RTC) modules have a problem. They rely on an external crystal to keep time, but crystals are sensitive to temperature changes. When the temperature rises or drops, the crystal vibrates differently, causing the clock to gain or lose time over days or weeks. The DS3231 has a built-in Temperature-Compensated Crystal Oscillator (TCXO) that constantly monitors the temperature and makes small adjustments to keep the time accurate. This means you don’t need to manually fix it. It stays precise whether it’s in a cold or warm environment. The DS3231 is a highly accurate real-time clock and calendar module that tracks seconds, minutes, hours, day, date, month, and year. It also automatically handles leap years.
The DS3231 is reliable and has a built-in battery compartment, usually for a CR2032 coin battery.
If your Pico disconnects or there's a power cut, it switches to the battery and continues working without any problems.
It also includes additional sensors. Because it measures temperature to keep the clock accurate, you can also use the temperature readings for other tasks.
This chip uses very little power, making it ideal for devices that run on batteries or need to operate for a long time without needing frequent charging.
The DS3231 is the best choice if your project requires precise timing.
+/- 2 ppm (temperature compensated)
+/- 2 ppm (temperature compensated)
I²C (400kHz Fast Mode compatible)
I²C (400kHz Fast Mode compatible)
2.3V to 5.5V (3.3V compatible with Raspberry Pi Pico)
2.3V to 5.5V (3.3V compatible with Raspberry Pi Pico)
CR2032 coin cell (maintains time during power loss)
CR2032 coin cell (maintains time during power loss)
+/- 3°C accuracy, 0.25°C resolution
+/- 3°C accuracy, 0.25°C resolution
Two time-of-day alarms
Two time-of-day alarms
32KHz programmable output
32KHz programmable output
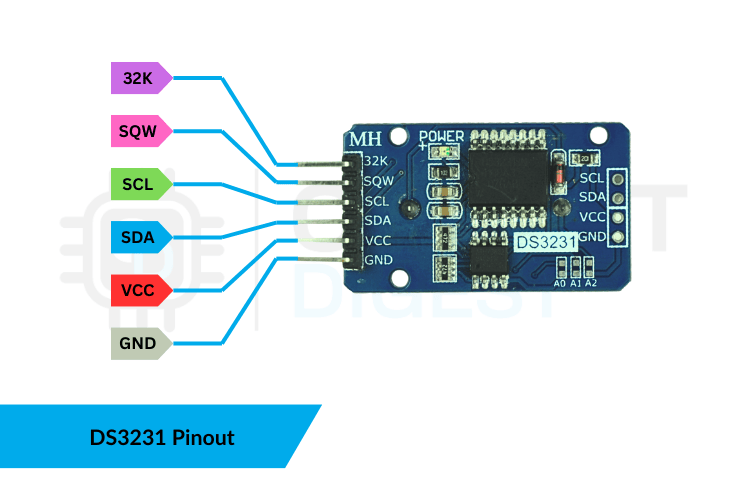
DS3231 RTC Module Pin Configuration
The image below shows the DS3231 RTC module pin configuration.
The DS3231 module typically exposes the following pins:
32K - 32K oscillator output.
SQW - Square Wave output pin.
SCL - I²C clock line.
SDA - I²C data line.
VCC - 3.3V / 5V power input (use 3.3V for Pico).
Raspberry Pi Pico RTC DS3231 Module Schematic Diagram
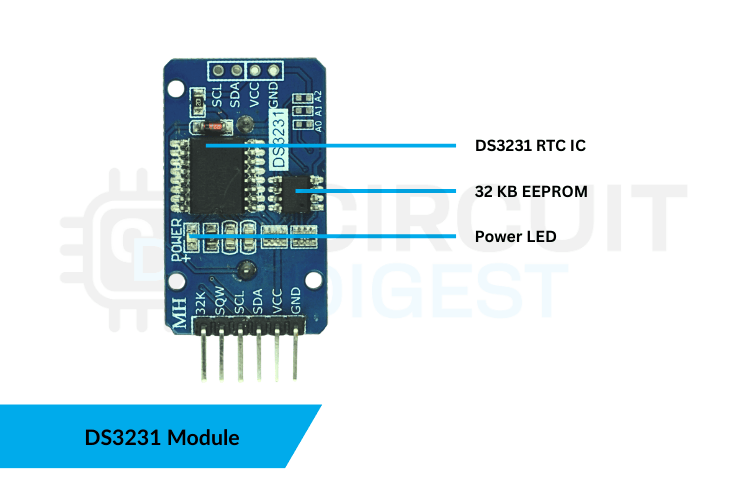
The schematic diagram of the DS323 RTC module is given below.
The Raspberry Pi Pico RTC DS3231 Module has a few basic parts that work together to keep accurate time. The image shows these DS3231 RTC module specifications clearly, so you can understand what each one does on the board.
DS3231 vs DS1307: Which RTC Module to Choose?
When choosing an RTC for your Raspberry Pi Pico RTC project, understanding the differences between DS3231 and DS1307 is crucial. The table below shows the key differences between the DS3231 and the DS1307.
Temperature Compensation
High (significantly drifts per month)
DS3231 is the reliable choice in the industry for interfacing the RTC module with Raspberry Pi Pico. DS1307 is outdated for any application that needs accuracy.
Setting Up and Time Adjustment of DS3231 RTC Module
Required Arduino Libraries
You can download the Libraries from the attached GitHub links. These are essential for DS3231 with Pico using Arduino IDE programming.
The DS3231 only needs its time set once when you first set it up. After that, the battery inside keeps the time accurate even if the main power is turned off. There are two practical approaches to setting the time in the Arduino environment when working with the Raspberry Pi Pico RTC DS3231.
This is the most efficient and widely used method. When you add:
The Arduino compiler adds the current date and time from your computer into the code right when you compile it. When you upload this program to the microcontroller, the DS3231 gets a precise time stamp that matches your computer’s clock.
How to do it correctly
1. Enable the line in your code. 2. Upload the sketch right away after compiling to reduce the time between compiling and flashing. 3. After that, comment out the line and upload again.
If you don't comment out the code, the RTC will reset to the compile time each time the microcontroller starts up, which is a common beginner error and results in incorrect time tracking.
If you need to set a specific date for testing, a scheduled demo, or to sync multiple devices, use the manual method.
This method allows you to set a specific time, giving you full control when you need the RTC to match a time that's not the current one. This is useful for tasks like:
Making sure multiple clocks in a network all show the same time
Testing when alarms go off
Creating events that happen based on time
Going back to a specific time after being away for a long time
Just like with the auto-set method, you upload the sketch once, check that the RTC has been updated, and then remove the command so it doesn't run again by mistake.
Components Required for Interfacing the Raspberry Pi Pico RTC DS3231 Module
To make the digital clock using the DS3231 RTC module interfacing with Raspberry Pi Pico, the following components are used.
Keeps accurate time even when power is off
For easy prototyping
Electrical connections
To power Pico and I2C LCD
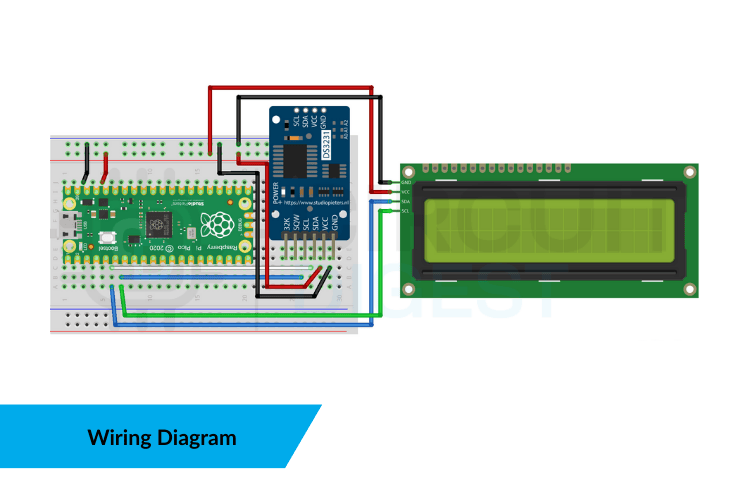
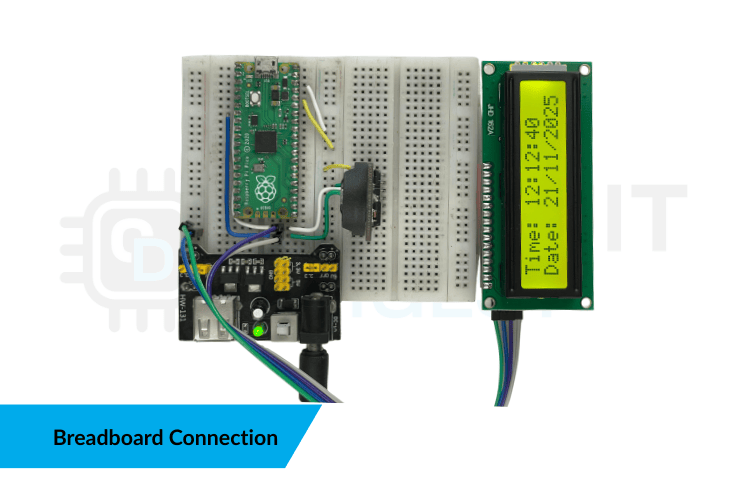
Circuit Diagram of Interfacing Raspberry Pi Pico RTC DS3231
The circuit diagram shows the connection of the Interfacing Raspberry Pi Pico RTC DS3231 with a 16x2 I2C LCD.
To connect the DS3231 RTC module to the Raspberry Pi Pico and 16x2 LCD, follow the table.
Complete Arduino Code for Raspberry Pi Pico RTC DS3231
The system is set up using I²C. The Pico communicates with both the DS3231 RTC module and the 16×2 LCD through the same two wires, SDA and SCL. That's the great thing about I²C. It allows multiple devices to share the same bus, each with its own unique address. The DS3231 has the address 0x68, and the LCD backpack is at 0x27. This library basically informs the compiler, I’m going to use an RTC and an I²C LCD. This code demonstrates interfacing the RTC module with Raspberry Pi Pico to display time, date, and temperature on a 16x2 I²C LCD:
Library Initialization
Connecting a DS3231 RTC Module to a Raspberry Pi Pico via I²C
Techniques for properly syncing up a new RTC module with an accurate time source when initially setting the date and time.
Creating an efficient program that does not disrupt the main program flow while updating LCD display.
Interfacing the Raspberry Pi Pico RTC DS3231 RTC Module for accurate timekeeping & reliable operation.
This isn't just about making a clock—it's about creating a reliable timekeeping system that you can later use in alarm systems, scheduling tools, or automation controllers. Related reading: If you're working on cross-platform RTC integrations, also see Interfacing the RTC with Arduino and Interfacing the RTC with ESP32 for extended applications.
Understanding the DS3231 RTC Module
└ DS3231 RTC Module Specifications
DS3231 RTC Module Pin Configuration
Setting Up and Time Adjustment
└ ⇒ Method 1: Auto-Set the Time from Your Computer (Compile-Time Sync)
└ ⇒ Method 2: Manually Set a Custom Date and Time
Complete Arduino Code
Why Choose DS3231 RTC for Raspberry Pi Pico Projects?
If you're building a data logger, an automatic pet feeder, or a reliable desk clock, your system needs to keep track of the exact time, especially when there's no power. That's where the Real-Time Clock (RTC) comes in. There are many RTC options available, but the DS3231 RTC module is usually considered the best choice for both hobbyists and professionals. So why is the DS3231 so special? Older models, like the DS1307, aren't as accurate. They can gain or lose several minutes each month, depending on the temperature. The DS3231 RTC module specification includes a built-in Temperature-Compensated Crystal Oscillator (TCXO). In simple terms, it checks the temperature around it and adjusts how fast it counts time internally. This helps it stay extremely accurate, whether it's in a cold garage or a hot server room.
Understanding the DS3231 RTC Module
The DS3231 RTC module is like a more advanced version of a typical clock chip. Most basic real-time clock (RTC) modules have a problem. They rely on an external crystal to keep time, but crystals are sensitive to temperature changes. When the temperature rises or drops, the crystal vibrates differently, causing the clock to gain or lose time over days or weeks. The DS3231 has a built-in Temperature-Compensated Crystal Oscillator (TCXO) that constantly monitors the temperature and makes small adjustments to keep the time accurate. This means you don’t need to manually fix it. It stays precise whether it’s in a cold or warm environment. The DS3231 is a highly accurate real-time clock and calendar module that tracks seconds, minutes, hours, day, date, month, and year. It also automatically handles leap years.
The DS3231 is reliable and has a built-in battery compartment, usually for a CR2032 coin battery.
If your Pico disconnects or there's a power cut, it switches to the battery and continues working without any problems.
It also includes additional sensors. Because it measures temperature to keep the clock accurate, you can also use the temperature readings for other tasks.
This chip uses very little power, making it ideal for devices that run on batteries or need to operate for a long time without needing frequent charging.
The DS3231 is the best choice if your project requires precise timing.
+/- 2 ppm (temperature compensated)
+/- 2 ppm (temperature compensated)
I²C (400kHz Fast Mode compatible)
I²C (400kHz Fast Mode compatible)
2.3V to 5.5V (3.3V compatible with Raspberry Pi Pico)
2.3V to 5.5V (3.3V compatible with Raspberry Pi Pico)
CR2032 coin cell (maintains time during power loss)
CR2032 coin cell (maintains time during power loss)
+/- 3°C accuracy, 0.25°C resolution
+/- 3°C accuracy, 0.25°C resolution
Two time-of-day alarms
Two time-of-day alarms
32KHz programmable output
32KHz programmable output
DS3231 RTC Module Pin Configuration
The image below shows the DS3231 RTC module pin configuration.
The DS3231 module typically exposes the following pins:
32K - 32K oscillator output.
SQW - Square Wave output pin.
SCL - I²C clock line.
SDA - I²C data line.
VCC - 3.3V / 5V power input (use 3.3V for Pico).
Raspberry Pi Pico RTC DS3231 Module Schematic Diagram
The schematic diagram of the DS323 RTC module is given below.
The Raspberry Pi Pico RTC DS3231 Module has a few basic parts that work together to keep accurate time. The image shows these DS3231 RTC module specifications clearly, so you can understand what each one does on the board.
DS3231 vs DS1307: Which RTC Module to Choose?
When choosing an RTC for your Raspberry Pi Pico RTC project, understanding the differences between DS3231 and DS1307 is crucial. The table below shows the key differences between the DS3231 and the DS1307.
Temperature Compensation
High (significantly drifts per month)
DS3231 is the reliable choice in the industry for interfacing the RTC module with Raspberry Pi Pico. DS1307 is outdated for any application that needs accuracy.
Setting Up and Time Adjustment of DS3231 RTC Module
Required Arduino Libraries
You can download the Libraries from the attached GitHub links. These are essential for DS3231 with Pico using Arduino IDE programming.
The DS3231 only needs its time set once when you first set it up. After that, the battery inside keeps the time accurate even if the main power is turned off. There are two practical approaches to setting the time in the Arduino environment when working with the Raspberry Pi Pico RTC DS3231.
This is the most efficient and widely used method. When you add:
The Arduino compiler adds the current date and time from your computer into the code right when you compile it. When you upload this program to the microcontroller, the DS3231 gets a precise time stamp that matches your computer’s clock.
How to do it correctly
1. Enable the line in your code. 2. Upload the sketch right away after compiling to reduce the time between compiling and flashing. 3. After that, comment out the line and upload again.
If you don't comment out the code, the RTC will reset to the compile time each time the microcontroller starts up, which is a common beginner error and results in incorrect time tracking.
If you need to set a specific date for testing, a scheduled demo, or to sync multiple devices, use the manual method.
This method allows you to set a specific time, giving you full control when you need the RTC to match a time that's not the current one. This is useful for tasks like:
Making sure multiple clocks in a network all show the same time
Testing when alarms go off
Creating events that happen based on time
Going back to a specific time after being away for a long time
Just like with the auto-set method, you upload the sketch once, check that the RTC has been updated, and then remove the command so it doesn't run again by mistake.
Components Required for Interfacing the Raspberry Pi Pico RTC DS3231 Module
To make the digital clock using the DS3231 RTC module interfacing with Raspberry Pi Pico, the following components are used.
Keeps accurate time even when power is off
For easy prototyping
Electrical connections
To power Pico and I2C LCD
Circuit Diagram of Interfacing Raspberry Pi Pico RTC DS3231
The circuit diagram shows the connection of the Interfacing Raspberry Pi Pico RTC DS3231 with a 16x2 I2C LCD.
To connect the DS3231 RTC module to the Raspberry Pi Pico and 16x2 LCD, follow the table.
Complete Arduino Code for Raspberry Pi Pico RTC DS3231
The system is set up using I²C. The Pico communicates with both the DS3231 RTC module and the 16×2 LCD through the same two wires, SDA and SCL. That's the great thing about I²C. It allows multiple devices to share the same bus, each with its own unique address. The DS3231 has the address 0x68, and the LCD backpack is at 0x27. This library basically informs the compiler, I’m going to use an RTC and an I²C LCD. This code demonstrates interfacing the RTC module with Raspberry Pi Pico to display time, date, and temperature on a 16x2 I²C LCD:
Library Initialization
Technologies used
Hardware components
- ESP32
- Arduino
- Raspberry Pi
- MPU
- LCD
- LED
- Sensor
- Module
- Board
- Battery
Software & tools
- Arduino IDE
Project demo video
What you get
- Working project / hardware kit, tested before delivery
- Complete source code with explanation
- Project demo and guidance for your viva
- Project report, PPT and IEEE paper support (on request)
Delivery & Payment
Delivery takes a minimum of two weeks from the date your inquiry is confirmed.
Payment is in two parts:
• 50% advance to start the project
• Remaining 50% before delivery
Note:
• Documentation and PPT are not included by default
• If you need documentation/PPT, it can be arranged for extra time and cost
We'll confirm the exact timeline and cost with you after reviewing your requirements.
Related Embedded projects

Embedded
ESP32 Fingerprint Attendance System with Live Web Dashboard
Build a biometric attendance system using ESP32 with AS608 fingerprint sensor that logs attendance with timestamp to web dashboard and Googl...
View project
Embedded
Mars Rover Robot Replica using ESP32 CAM and Arduino
Build a Mars Rover robot replica using ESP32-CAM and Arduino with a rocker-bogie suspension system, live video streaming, and smartphone app...
View project
Embedded
ESP32 CAN Bus Tutorial Interfacing MCP2515 with ESP32
Learn CAN bus communication with ESP32 and MCP2515 CAN controller to send and receive data in automotive and industrial applications.
View project
Embedded
ESP32 MP3 Music Player with SD Card and I2S Amplifier
Build a standalone ESP32 MP3 music player that reads audio from SD card and outputs high-quality audio via I2S DAC amplifier with web contro...
View project