
How to Send WhatsApp Messages from Arduino Uno R4 Wifi Board
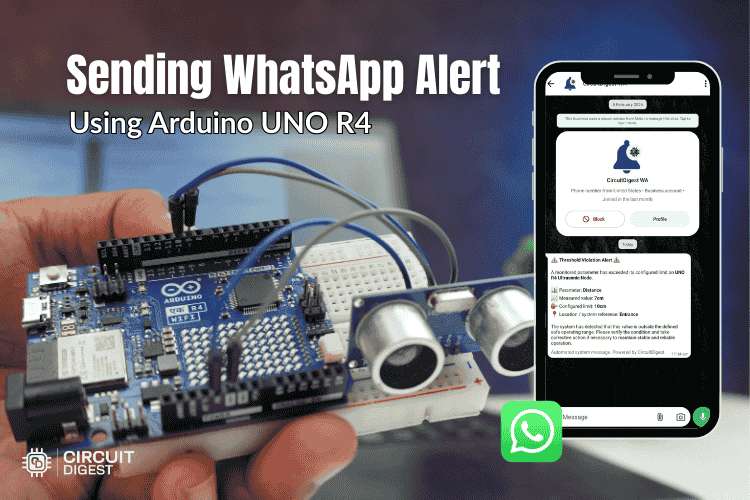
Learn how to send instant WhatsApp notifications from Arduino UNO R4 WiFi using an ultrasonic sensor and CircuitDigest Cloud API without GSM or SIM cards.
- Suitable forB.Tech Embedded students
- Build time3-4 weeks
- LevelBeginner
- Available atAjvika Labs, Kakinada
About this project
In this tutorial, you will learn how to send WhatsApp messages directly from an Arduino UNO R4 WiFi using the CircuitDigest Cloud Whastapp API. Instead of using a GSM module, SIM card, or complex WhatsApp Business API setup, this method allows your Arduino to send alerts over WiFi using a simple HTTPS request. This makes it much easier and more cost-effective to add real-time WhatsApp notifications to your Arduino projects.
To demonstrate how it works, we will connect an HC-SR04 ultrasonic sensor to the Arduino UNO R4 WiFi (because we will need wifi for this project, the normal Arduino UNO R3 or nano will not work). Whenever an object comes closer than a defined distance, the Arduino sends the measured value to CircuitDigest Cloud. The cloud platform then handles message formatting, template management, and WhatsApp delivery. In short, your Arduino only needs to send sensor data and CircuitDigest Cloud takes care of the rest. By the end of this tutorial, you will have a fully working proximity alert system that sends WhatsApp notifications instantly to your registered phone number. You can also explore WhatsApp alert implementations using ESP32 and Raspberry Pi Pico for WiFi-based setups. For more projects using Arduino boards, explore our comprehensive collection of Arduino projects and discover additional microcontroller projects for various platforms.
How the Arduino Sends WhatsApp Alerts
Templates Payload Structure
Example Payload Formats
Source Code Explanation
Programming the Arduino
How the Arduino Sends WhatsApp Alerts
At a high level, the process is very straightforward. The Arduino reads data from a sensor, checks if a condition is met, and then sends that data to CircuitDigest Cloud. The cloud platform takes care of converting that data into a properly formatted WhatsApp message and delivering it to your phone.
Here’s what actually happens step by step:
The Arduino UNO R4 WiFi connects to your local WiFi network.
The ultrasonic sensor continuously measures distance.
When the measured distance crosses the defined threshold (for example, an object comes closer than 20 cm), the Arduino prepares a small JSON message.
This JSON message contains your phone number, a template ID, and the sensor value.
The Arduino sends this data securely to CircuitDigest Cloud using an HTTPS POST request.
CircuitDigest Cloud verifies your API key and confirms that the recipient number is registered.
The platform inserts your sensor value into a pre-approved WhatsApp template.
The formatted message is then delivered instantly to WhatsApp.
The important thing to understand is this: Your Arduino does not communicate directly with WhatsApp servers. Instead, it sends structured data to CircuitDigest Cloud. The cloud handles authentication, template compliance, formatting, and delivery. This removes the complexity of integrating with the official WhatsApp Business API yourself. Also, to maintain security and prevent misuse, the API allows messages to be sent only to pre-verified phone numbers (maximum 5 recipients), with a limit of 100 messages per user per month
This project uses minimal hardware components that are readily available and simple to connect. The HC-SR04 ultrasonic sensor provides accurate distance measurements up to several meters, making it suitable for Arduino to send notifications to smartphone applications like proximity detection, parking assistance, or intrusion alerts.
Arduino UNO R4 WiFi Development Board
HC-SR04 Ultrasonic Distance Sensor
Circuit Diagram to Connect HC-SR04 with Arduino UNO R4
The wiring for this Arduino WhatsApp alert project is straightforward and requires only four connections between the Arduino UNO R4 and the ultrasonic sensor. Review the circuit diagram below to understand the complete layout before making physical connections.
The table below shows the connection between the Ultrasonic Sensor and the Arduino UNO R4
The ultrasonic sensor operates on 5V logic, which matches the Arduino UNO R4's digital pin output levels. The TRIG pin receives a brief pulse from the Arduino to initiate a measurement, while the ECHO pin returns a signal whose duration corresponds to the measured distance. Ensure all connections are secure before powering the board.
The image below shows the assembled Arduino WhatsApp alert system prototype on a breadboard.
Mount the sensor at a height and angle appropriate for your Arduino send WhatsApp alert application. For proximity alerts, position it facing the monitored area with minimal obstructions. The sensor's effective range extends from approximately 2cm to 400cm, though accuracy decreases beyond 3 meters. Avoid placing the sensor near sound-absorbing materials that might interfere with ultrasonic reflections.
Before the Arduino can send a WhatsApp alert, you need to generate an API key from CircuitDigest Cloud and register the recipient phone numbers. Follow the step-by-step instructions below to complete the setup process.
Step 1: Access CircuitDigest Cloud
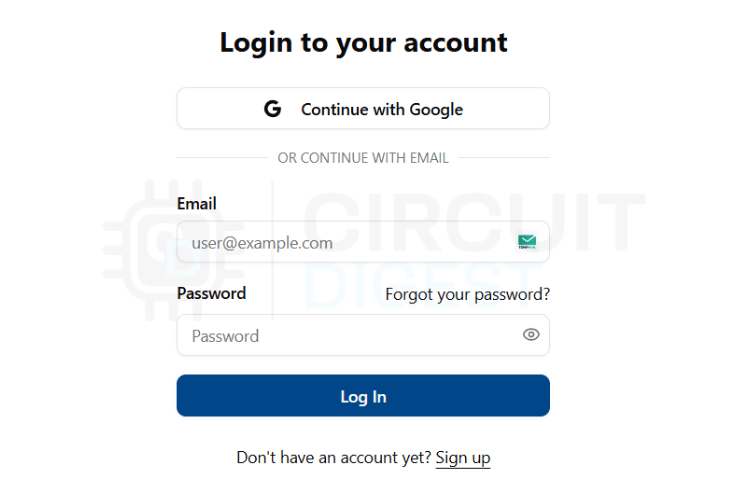
Navigate to CircuitDigest Cloud in your web browser. Click the Login button and enter your account credentials. New users should select the Register option to create an account first.
Step 2: Navigate to API Settings
Step 3: Create New API Key
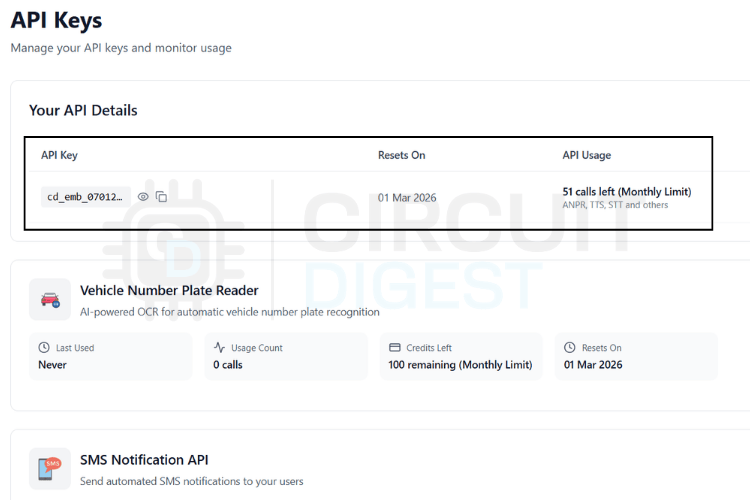
Click the button to generate a new API key. The system provides a free usage quota that renews periodically. Copy this key immediately and store it securely, as you will need to paste it into your Arduino sketch. Never share your API key publicly or commit it to version control systems.
Step 4: Access WhatsApp Settings
Scroll down to locate the WhatsApp Notification API section in the dashboard. Click View Details to expand the configuration panel. This area contains all controls related to recipient management and alert templates.
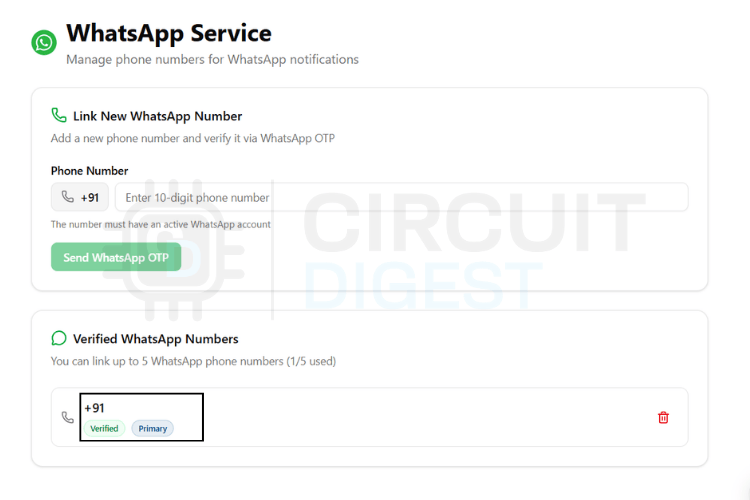
Step 5: Register Phone Numbers
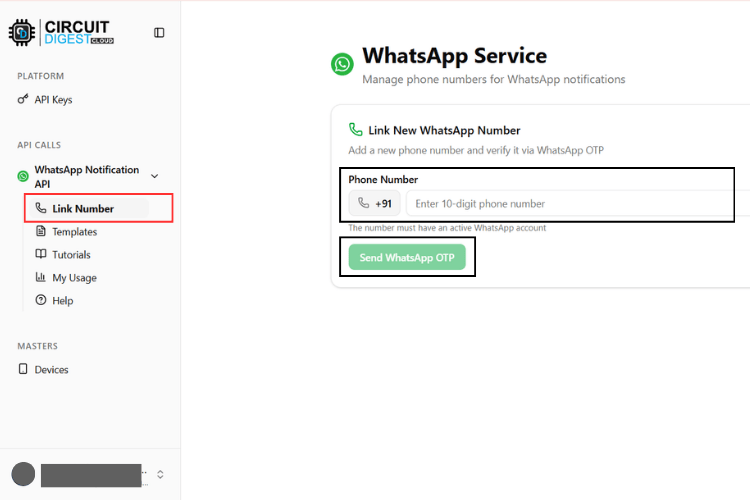
Click the Link Phone Number option to add recipient numbers. You can register up to 5 different phone numbers for receiving notifications. Each number must be verified before it can receive alert from your device.
Step 6: Verify Ownership
Enter the phone number with the country code and request verification. CircuitDigest Cloud sends a one-time verification code to confirm that you own the number. After entering the code successfully, the number appears in your approved list and becomes eligible to receive WhatsApp alerts from your Arduino project.
CircuitDigest Cloud offers several pre-approved WhatsApp templates designed for different IoT notification scenarios. These templates comply with WhatsApp's business messaging guidelines and ensure reliable delivery. Rather than constructing alert text manually in your code, you simply select a template ID and provide the variable values that populate the placeholders.
Each template contains placeholders written as {#var#} that get replaced with your sensor data at runtime. The table below lists all available templates with their identifiers and alert formats.
system_error_diagnostics
A diagnostic issue has been reported by {#var#}. Error type: {#var#}. Error detail: {#var#}. Location: {#var#}. Please inspect the system.
critical_event_alert
High priority alert from {#var#}. Event type: {#var#}. Recorded value: {#var#}. Location: {#var#}. Immediate attention required.
threshold_violation_alert
A monitored parameter exceeded limits on {#var#}. Parameter: {#var#}. Measured value: {#var#}. Configured limit: {#var#}. Location: {#var#}.
operational_status_update
Status update from {#var#}. Current status: {#var#}. Detail: {#var#}. Location: {#var#}. No action required unless unexpected.
command_execution_confirmation
{#var#} processed a command. Command: {#var#}. Result: {#var#}. Location: {#var#}.
location_movement_update
Update from {#var#}. Movement status: {#var#}. Current location: {#var#}. Recorded at: {#var#}.
service_reminder_notification
Service reminder for {#var#}. Service type: {#var#}. Usage detail: {#var#}. Recommended service date: {#var#}.
responsible_contact_information
For alerts from {#var#}, contact {#var#}. Phone: {#var#}. Department or location: {#var#}.
The placeholders in each template get replaced with actual sensor values when you send the API request. For proximity detection using an ultrasonic sensor, the critical_event_alert template works well as it emphasizes urgency and includes fields for event type, measured value, and location.
Templates Payload Structure
Every WhatsApp notification sent from your Arduino WhatsApp notification system follows an identical HTTPS request structure. You do not need to write different code for each template. The only changes required are the template_id field and the values inside the variables object. Think of the JSON payload as a form with fixed field names but dynamic content. The CircuitDigest Cloud platform reads your submitted data, identifies which template you selected, and automatically inserts your variable values into the corresponding placeholders before delivering the alert.
Standard JSON Structure
The following code block shows the basic structure. Do not modify the field names, as the API requires them.
YOUR_NUMBER - The recipient WhatsApp number, including country code (e.g., 919876543210 for India)
YOUR_TEMPLATE_ID - Specifies which alert template to use from the available options
variables - Contains the dynamic values that populate the template placeholders
device_name / var1 / var2 / var3 / var4 - Sensor readings or descriptive text from your application
You can rename the variable fields to match your template requirements. For example, use parameter, measured_value, or location for clarity. The platform automatically maps them to the template's placeholder positions in order.
Example Payload Formats
The following examples demonstrate different payload configurations for various use cases. These are reference examples only. Replace all values with your actual sensor data and device information.
Proximity Detection Alert
Template: critical_event_alert
Used when an object enters the detection zone, and immediate notification is required.
Distance Threshold Violation
Template: threshold_violation_alert
Used when the measured distance crosses a predefined safety limit.
System Status Update
Template: operational_status_update
Used for routine status reports or non-urgent notifications.
To demonstrate how it works, we will connect an HC-SR04 ultrasonic sensor to the Arduino UNO R4 WiFi (because we will need wifi for this project, the normal Arduino UNO R3 or nano will not work). Whenever an object comes closer than a defined distance, the Arduino sends the measured value to CircuitDigest Cloud. The cloud platform then handles message formatting, template management, and WhatsApp delivery. In short, your Arduino only needs to send sensor data and CircuitDigest Cloud takes care of the rest. By the end of this tutorial, you will have a fully working proximity alert system that sends WhatsApp notifications instantly to your registered phone number. You can also explore WhatsApp alert implementations using ESP32 and Raspberry Pi Pico for WiFi-based setups. For more projects using Arduino boards, explore our comprehensive collection of Arduino projects and discover additional microcontroller projects for various platforms.
How the Arduino Sends WhatsApp Alerts
Templates Payload Structure
Example Payload Formats
Source Code Explanation
Programming the Arduino
How the Arduino Sends WhatsApp Alerts
At a high level, the process is very straightforward. The Arduino reads data from a sensor, checks if a condition is met, and then sends that data to CircuitDigest Cloud. The cloud platform takes care of converting that data into a properly formatted WhatsApp message and delivering it to your phone.
Here’s what actually happens step by step:
The Arduino UNO R4 WiFi connects to your local WiFi network.
The ultrasonic sensor continuously measures distance.
When the measured distance crosses the defined threshold (for example, an object comes closer than 20 cm), the Arduino prepares a small JSON message.
This JSON message contains your phone number, a template ID, and the sensor value.
The Arduino sends this data securely to CircuitDigest Cloud using an HTTPS POST request.
CircuitDigest Cloud verifies your API key and confirms that the recipient number is registered.
The platform inserts your sensor value into a pre-approved WhatsApp template.
The formatted message is then delivered instantly to WhatsApp.
The important thing to understand is this: Your Arduino does not communicate directly with WhatsApp servers. Instead, it sends structured data to CircuitDigest Cloud. The cloud handles authentication, template compliance, formatting, and delivery. This removes the complexity of integrating with the official WhatsApp Business API yourself. Also, to maintain security and prevent misuse, the API allows messages to be sent only to pre-verified phone numbers (maximum 5 recipients), with a limit of 100 messages per user per month
This project uses minimal hardware components that are readily available and simple to connect. The HC-SR04 ultrasonic sensor provides accurate distance measurements up to several meters, making it suitable for Arduino to send notifications to smartphone applications like proximity detection, parking assistance, or intrusion alerts.
Arduino UNO R4 WiFi Development Board
HC-SR04 Ultrasonic Distance Sensor
Circuit Diagram to Connect HC-SR04 with Arduino UNO R4
The wiring for this Arduino WhatsApp alert project is straightforward and requires only four connections between the Arduino UNO R4 and the ultrasonic sensor. Review the circuit diagram below to understand the complete layout before making physical connections.
The table below shows the connection between the Ultrasonic Sensor and the Arduino UNO R4
The ultrasonic sensor operates on 5V logic, which matches the Arduino UNO R4's digital pin output levels. The TRIG pin receives a brief pulse from the Arduino to initiate a measurement, while the ECHO pin returns a signal whose duration corresponds to the measured distance. Ensure all connections are secure before powering the board.
The image below shows the assembled Arduino WhatsApp alert system prototype on a breadboard.
Mount the sensor at a height and angle appropriate for your Arduino send WhatsApp alert application. For proximity alerts, position it facing the monitored area with minimal obstructions. The sensor's effective range extends from approximately 2cm to 400cm, though accuracy decreases beyond 3 meters. Avoid placing the sensor near sound-absorbing materials that might interfere with ultrasonic reflections.
Before the Arduino can send a WhatsApp alert, you need to generate an API key from CircuitDigest Cloud and register the recipient phone numbers. Follow the step-by-step instructions below to complete the setup process.
Step 1: Access CircuitDigest Cloud
Navigate to CircuitDigest Cloud in your web browser. Click the Login button and enter your account credentials. New users should select the Register option to create an account first.
Step 2: Navigate to API Settings
Step 3: Create New API Key
Click the button to generate a new API key. The system provides a free usage quota that renews periodically. Copy this key immediately and store it securely, as you will need to paste it into your Arduino sketch. Never share your API key publicly or commit it to version control systems.
Step 4: Access WhatsApp Settings
Scroll down to locate the WhatsApp Notification API section in the dashboard. Click View Details to expand the configuration panel. This area contains all controls related to recipient management and alert templates.
Step 5: Register Phone Numbers
Click the Link Phone Number option to add recipient numbers. You can register up to 5 different phone numbers for receiving notifications. Each number must be verified before it can receive alert from your device.
Step 6: Verify Ownership
Enter the phone number with the country code and request verification. CircuitDigest Cloud sends a one-time verification code to confirm that you own the number. After entering the code successfully, the number appears in your approved list and becomes eligible to receive WhatsApp alerts from your Arduino project.
CircuitDigest Cloud offers several pre-approved WhatsApp templates designed for different IoT notification scenarios. These templates comply with WhatsApp's business messaging guidelines and ensure reliable delivery. Rather than constructing alert text manually in your code, you simply select a template ID and provide the variable values that populate the placeholders.
Each template contains placeholders written as {#var#} that get replaced with your sensor data at runtime. The table below lists all available templates with their identifiers and alert formats.
system_error_diagnostics
A diagnostic issue has been reported by {#var#}. Error type: {#var#}. Error detail: {#var#}. Location: {#var#}. Please inspect the system.
critical_event_alert
High priority alert from {#var#}. Event type: {#var#}. Recorded value: {#var#}. Location: {#var#}. Immediate attention required.
threshold_violation_alert
A monitored parameter exceeded limits on {#var#}. Parameter: {#var#}. Measured value: {#var#}. Configured limit: {#var#}. Location: {#var#}.
operational_status_update
Status update from {#var#}. Current status: {#var#}. Detail: {#var#}. Location: {#var#}. No action required unless unexpected.
command_execution_confirmation
{#var#} processed a command. Command: {#var#}. Result: {#var#}. Location: {#var#}.
location_movement_update
Update from {#var#}. Movement status: {#var#}. Current location: {#var#}. Recorded at: {#var#}.
service_reminder_notification
Service reminder for {#var#}. Service type: {#var#}. Usage detail: {#var#}. Recommended service date: {#var#}.
responsible_contact_information
For alerts from {#var#}, contact {#var#}. Phone: {#var#}. Department or location: {#var#}.
The placeholders in each template get replaced with actual sensor values when you send the API request. For proximity detection using an ultrasonic sensor, the critical_event_alert template works well as it emphasizes urgency and includes fields for event type, measured value, and location.
Templates Payload Structure
Every WhatsApp notification sent from your Arduino WhatsApp notification system follows an identical HTTPS request structure. You do not need to write different code for each template. The only changes required are the template_id field and the values inside the variables object. Think of the JSON payload as a form with fixed field names but dynamic content. The CircuitDigest Cloud platform reads your submitted data, identifies which template you selected, and automatically inserts your variable values into the corresponding placeholders before delivering the alert.
Standard JSON Structure
The following code block shows the basic structure. Do not modify the field names, as the API requires them.
YOUR_NUMBER - The recipient WhatsApp number, including country code (e.g., 919876543210 for India)
YOUR_TEMPLATE_ID - Specifies which alert template to use from the available options
variables - Contains the dynamic values that populate the template placeholders
device_name / var1 / var2 / var3 / var4 - Sensor readings or descriptive text from your application
You can rename the variable fields to match your template requirements. For example, use parameter, measured_value, or location for clarity. The platform automatically maps them to the template's placeholder positions in order.
Example Payload Formats
The following examples demonstrate different payload configurations for various use cases. These are reference examples only. Replace all values with your actual sensor data and device information.
Proximity Detection Alert
Template: critical_event_alert
Used when an object enters the detection zone, and immediate notification is required.
Distance Threshold Violation
Template: threshold_violation_alert
Used when the measured distance crosses a predefined safety limit.
System Status Update
Template: operational_status_update
Used for routine status reports or non-urgent notifications.
Technologies used
Hardware components
- Arduino UNO R4 WiFi Development Board
- HC-SR04 Ultrasonic Distance Sensor
- Breadboard
- Jumper Wires
- USB Cable
What you get
- Working project / hardware kit, tested before delivery
- Complete source code with explanation
- Project demo and guidance for your viva
- Project report, PPT and IEEE paper support (on request)
Delivery & Payment
Delivery takes a minimum of two weeks from the date your inquiry is confirmed.
Payment is in two parts:
• 50% advance to start the project
• Remaining 50% before delivery
Note:
• Documentation and PPT are not included by default
• If you need documentation/PPT, it can be arranged for extra time and cost
We'll confirm the exact timeline and cost with you after reviewing your requirements.
Related Embedded projects

Embedded
ESP32 Fingerprint Attendance System with Live Web Dashboard
Build a biometric attendance system using ESP32 with AS608 fingerprint sensor that logs attendance with timestamp to web dashboard and Googl...
View project
Embedded
Mars Rover Robot Replica using ESP32 CAM and Arduino
Build a Mars Rover robot replica using ESP32-CAM and Arduino with a rocker-bogie suspension system, live video streaming, and smartphone app...
View project
Embedded
ESP32 CAN Bus Tutorial Interfacing MCP2515 with ESP32
Learn CAN bus communication with ESP32 and MCP2515 CAN controller to send and receive data in automotive and industrial applications.
View project
Embedded
ESP32 MP3 Music Player with SD Card and I2S Amplifier
Build a standalone ESP32 MP3 music player that reads audio from SD card and outputs high-quality audio via I2S DAC amplifier with web contro...
View project