How to Display Images in ESP32 and ESP8266 Web Server
Learn how to display images in your ESP32 or ESP8266 web servers using Arduino IDE. Embedded images in an asynchronous web server or simple HTTP server.
- Suitable forB.Tech/Diploma IoT/ESP32 students
- Build time1-2 weeks
- LevelBeginner
- Available atAjvika Labs, Kakinada
About this project
This tutorial shows how to display images (.png and .jpg) in your ESP32 or ESP8266 web servers using Arduino IDE. We cover how to embedded images in an asynchronous web server using the ESPAsyncWebServer library or in a simple HTTP server.
Display Images on ESP Web Server
There are different ways to display an image in your ESP32/ESP8266 web servers. In this article, we’ll cover the following methods:
Embed the image by referring to its URL (
hyperlink
to where the image is stored);
Store the image in the ESP32/ESP8266 filesystem (LittleFS);
Convert the images to base64.
Option #1: Image URL
To include images in HTML, you use the
tag with the
src
attribute, as follows:
<img src=\"image_source\">
You can use an URL that links to the source of any image that is store on the internet.
<img src=\"https://example.com/your_image_source_url.png\">
So, to display the image, you just need to include the previous HTML text in your web server code.
For a web server example, you can read the following articles:
ESP8266:
Simple HTTP Server
Asynchronous Web Server
ESP32:
Simple HTTP Server
Asynchronous Web Server
Option #2: Store the Image on the ESP32/ESP8266 LittleFS
Little FS is a lightweight filesystem created for microcontrollers with a flash chip like the ESP32 and ESP8266.
It lets you access the flash memory like you would do in a normal filesystem in your computer. You can store HTML and CSS files in LittleFS to build a web server, including small images and icons.
In this section, we’ll show you how to save the images on the flash memory and serve the images to a client in an
asynchronous web server
Filesystem Uploader Plugin
To upload images to the ESP32 and ESP8266 flash memory, we’ll use a plugin for Arduino IDE:
Filesystem uploader
. Follow one of the next tutorials to install the filesystem uploader (it is compatible with both boards).
Arduino IDE 2: Install ESP32 LittleFS Uploader (Upload Files to the Filesystem)
Arduino IDE 2: Install ESP8266 NodeMCU LittleFS Uploader (Upload Files to the Filesystem)
After installing the plugin, you can proceed with the tutorial.
Installing Libraries for Asynchronous Web Server
This section shows how to display an image stored in the ESP32 or ESP8266 flash memory in a web server using the
ESPAsyncWebServer library
. To build this web server, you need to install the following libraries:
If you’re using ESP32:
you need to install the
ESPAsyncWebServer
and the
AsyncTCP
libraries.
If you’re using an ESP8266:
you need to install the
ESPAsyncWebServer
and the
ESPAsyncTCP
libraries.
Code – Display Images in Asynchronous Web Server
Create a new sketch in Arduino IDE and copy the following code. This code works with the ESP32 and ESP8266. It includes the proper libraries depending on the board you’re using.
#ifdef ESP32
#include `WiFi.h`
#include `ESPAsyncWebServer.h`
#include `LittleFS.h`
#else
#include `Arduino.h`
#include `ESP8266WiFi.h`
#include `Hash.h`
#include `ESPAsyncTCP.h`
#include `ESPAsyncWebServer.h`
#include \"LittleFS.h\"
#endif
// Replace with your network credentials
const char* ssid = \"REPLACE_WITH_YOUR_SSID\";
const char* password = \"REPLACE_WITH_YOUR_PASSWORD\";
// Create AsyncWebServer object on port 80
AsyncWebServer server(80);
const char index_html[] PROGMEM = R\"rawliteral(
<!DOCTYPE HTML><html>
<head>
<meta name=\"viewport\" content=\"width=device-width, initial-scale=1\">
</head>
<body>
ESP Image Web Server</h2>
<img src=\"sun\">
<img src=\"sun-cloud\">
<img src=\"cloud\">
<img src=\"rain\">
<img src=\"storm\">
<img src=\"snow\">
</body>
</html>)rawliteral\";
void setup(){
// Serial port for debugging purposes
Serial.begin(115200);
// Connect to Wi-Fi
WiFi.begin(ssid, password);
while (WiFi.status() != WL_CONNECTED) {
delay(1000);
Serial.println(\"Connecting to WiFi..\");
}
if(!LittleFS.begin()){
Serial.println(\"An Error has occurred while mounting LittleFS\");
return;
}
// Print ESP32 Local IP Address
Serial.println(WiFi.localIP());
// Route for root / web page
server.on(\"/\", HTTP_GET, [](AsyncWebServerRequest *request){
request->send(200, \"text/html\", index_html);
});
server.on(\"/sun\", HTTP_GET, [](AsyncWebServerRequest *request){
request->send(LittleFS, \"/sun.png\", \"image/png\");
});
server.on(\"/sun-cloud\", HTTP_GET, [](AsyncWebServerRequest *request){
request->send(LittleFS, \"/sun-cloud.png\", \"image/png\");
});
server.on(\"/cloud\", HTTP_GET, [](AsyncWebServerRequest *request){
request->send(LittleFS, \"/cloud.png\", \"image/png\");
});
server.on(\"/rain\", HTTP_GET, [](AsyncWebServerRequest *request){
request->send(LittleFS, \"/rain.png\", \"image/png\");
});
server.on(\"/storm\", HTTP_GET, [](AsyncWebServerRequest *request){
request->send(LittleFS, \"/storm.png\", \"image/png\");
});
server.on(\"/snow\", HTTP_GET, [](AsyncWebServerRequest *request){
request->send(LittleFS, \"/snow.png\", \"image/png\");
});
// Start server
server.begin();
}
void loop(){
}
Insert your network credentials in the following variables:
const char* ssid = \"REPLACE_WITH_YOUR_SSID\";
const char* password = \"REPLACE_WITH_YOUR_PASSWORD\";
Save your code, but don’t upload it yet. First, you need to upload the images to the ESP filesystem.
Upload Images to ESP32/ESP8266 LittleFS
With your sketch open, go to
Sketch
>
Show Sketch Folder
. The folder where your sketch is saved should open.
Inside that folder, create a new folder called
data
Inside the
data
folder is where you should put the images you want to display on the web server. In our case, we have the following images.
Note:
make sure that the files size doesn’t excess the flash memory size.
In case you want to experiment with these images,
you can download them here
Then, in your Arduino IDE, upload the images to your board. Press [
Ctrl
] + [
Shift
] + [
P
] on Windows or [
⌘
] + [
Shift
] + [
P
] on MacOS to open the command palette. Search for the
Upload LittleFS to Pico/ESP8266/ESP32
command and click on it.
If you don’t have this option is because you didn’t install the filesystem uploader plugin.
Check this tutorial
Important:
make sure the Serial Monitor is closed before uploading to the filesystem. Otherwise, the upload will fail.
Upload the Code
Next, you can upload the code to your board. Don’t forget to select the right board and COM port in the
Tools
menu.
Also, don’t forget that you need to include your network credentials in the following variables:
const char* ssid = \"REPLACE_WITH_YOUR_SSID\";
const char* password = \"REPLACE_WITH_YOUR_PASSWORD\";
Access the Web Server
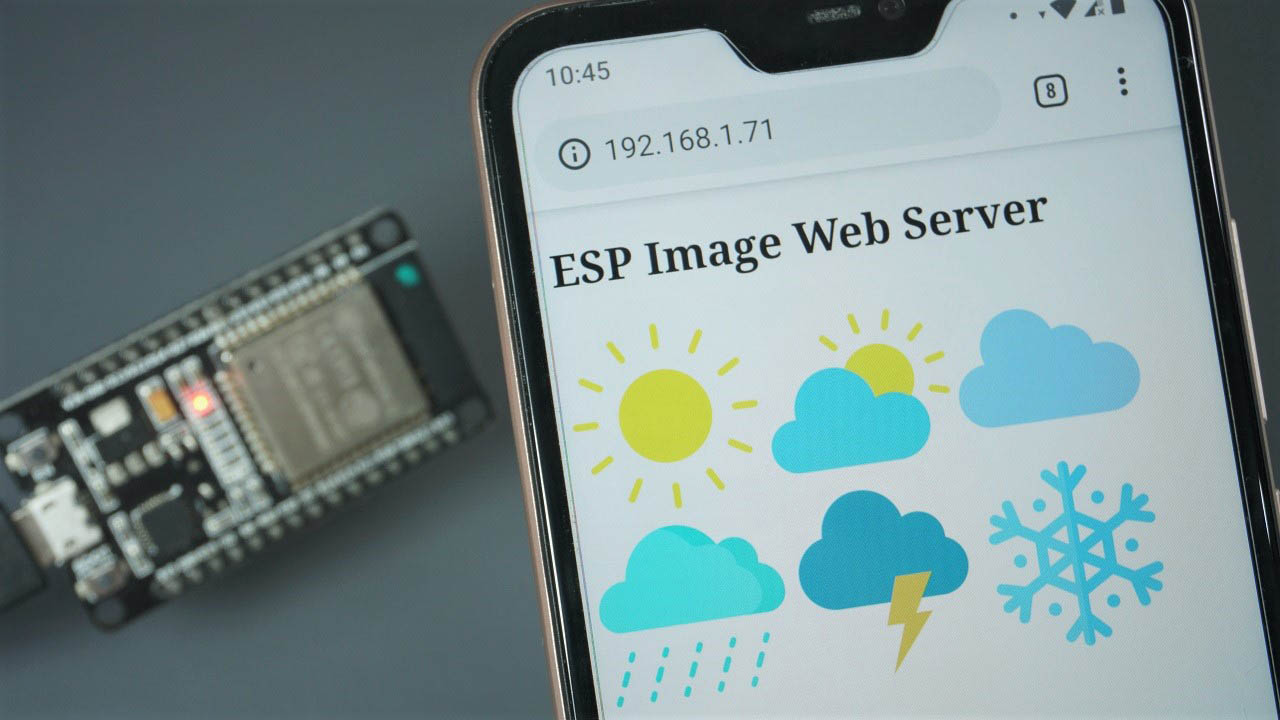
After uploading the code, open the Serial Monitor at a baud rate of 115200 and press the ESP RST button. The IP address should be printed (in our case, it’s 192.168.1.71).
Access the web server in any web browser and all images should be displayed.
How the Code Works
Continue reading this section to learn how the code works.
Include Libraries
The code starts by including the necessary libraries. If you’re using an ESP32, it includes the following libraries:
#include `WiFi.h`
#include `ESPAsyncWebServer.h`
If you’re using an ESP8266, include these next libraries:
#include `Arduino.h`
#include `ESP8266WiFi.h`
#include `Hash.h`
#include `ESPAsyncTCP.h`
#include `ESPAsyncWebServer.h`
Network credentials
Insert your network credentials in the following variables so that the ESP can connect to your network:
// Replace with your network credentials
const char* ssid = \"REPLACE_WITH_YOUR_SSID\";
const char* password = \"REPLACE_WITH_YOUR_PASSWORD\";
Create an
AsyncWebServer
object on port 80:
AsyncWebServer server(80);
The HTML code to build the web server is saved on the
index_html
variable. To include the images on the HTML text, you jus
Technologies used
Hardware components
- ESP32
- ESP8266
- Arduino
Software & tools
- Arduino IDE
What you get
- Working project / hardware kit, tested before delivery
- Complete source code with explanation
- Project demo and guidance for your viva
- Project report, PPT and IEEE paper support (on request)
Delivery & Payment
Delivery takes a minimum of two weeks from the date your inquiry is confirmed.
Payment is in two parts:
• 50% advance to start the project
• Remaining 50% before delivery
Note:
• Documentation and PPT are not included by default
• If you need documentation/PPT, it can be arranged for extra time and cost
We'll confirm the exact timeline and cost with you after reviewing your requirements.
Related IoT/ESP32 projects

IoT/ESP32
ESP32 External Wake Up from Deep Sleep
This article shows how to put the ESP32 in deep sleep mode and wake it with an external wake up like a button press. We'll cover how to use...
View project
IoT/ESP32
ESP32: Upload Files to LittleFS using Arduino IDE
Upload files to the ESP32 Filesystem (LittleFS) by using a plugin for Arduino IDE (1.8.X). The plugin lets you use three different filesyste...
View project
IoT/ESP32
ESP32: Guide for MicroSD Card Module using Arduino IDE
Use a microSD card with the ESP32: you'll learn how to read and write files to the microSD card. To interface a microSD card with an ESP32 b...
View project
IoT/ESP32
ESP32 Save Data Permanently using Preferences Library
Save data permanently on the ESP32 flash memory using Preferences.h library. The data held in the flash memory persists across resets or pow...
View project