


How to build a simple GPS Tracker using ESP32 and Visualize Data on Map
Build a real-time GPS tracker using ESP32 and NEO-6M with GeoLinker API for seamless data visualization. Get step-by-step guides, circuit diagrams, and code to track locations.
- Suitable forB.Tech Embedded students
- Build time3-4 weeks
- LevelBeginner
- Available atAjvika Labs, Kakinada
About this project
This GPS tracker using ESP32 should be an exciting project, especially for beginners interested in electronics and software development. It’s a project that brings childhood curiosity about tracking everything around us to life. While the hardware setup is relatively simple, the real challenge lies in the software. But that’s no longer a concern, thanks to the introduction of the GeoLinker API.
At Circuit Digest Cloud, we’ve launched an easy-to-use, free API called GeoLinker. This API enables you to plot and route the location data sent from your device to a server, making it effortless to visualize and track positions.
In this tutorial, we’ll build a GPS tracker using a Neo-6M GPS module with ESP32, covering the hardware setup and GeoLinker as the software component. Let's dive in and get started! Explore our other GPS tracker projects, like an Arduino GPS tracker using SIM800L and Neo-6M and a Raspberry Pi Pico GPS tracker. We've built many other projects using an ESP32 that we think you'll enjoy.
GPS Tracker using ESP32 and GeoLinker API - Quick Overview
Build Time: 3-5 hours | Cost: $20-30 | Difficulty: Beginner-Intermediate
What You'll Learn: ESP32 programming, Neo-6M GPS module, GeoLinker API, UART communication
Applications: Vehicle tracking, Personal location monitoring, Asset management, Route visualization
How Does the ESP32 GPS Tracker Work?
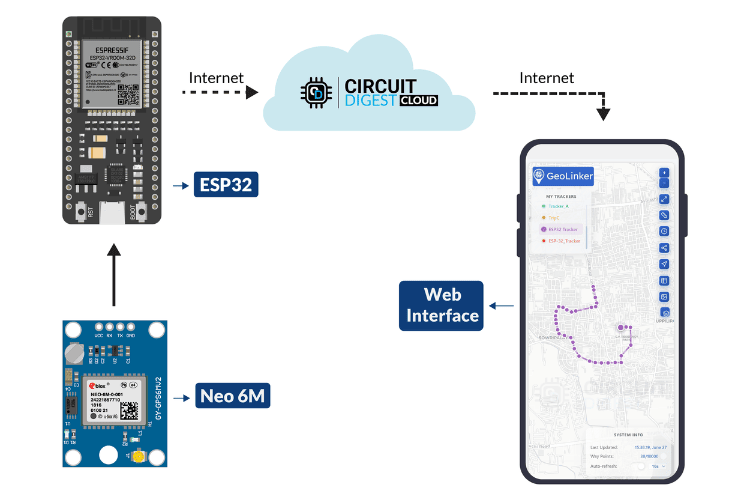
In this project, we are going to build a simple GPS tracker that combines a GPS module for ESP32 with cloud connectivity, making it easier to implement at both the hardware and software levels. For hardware, we will be using the well-known ESP32 Development Board along with the Neo-6M GPS Module. On the software side, we will utilize the GeoLinker API, developed by Circuit Digest Cloud.
We will fetch GPS data from the Neo-6M GPS module using the ESP32 and send this data to a map plotting and routing API via a simple HTTP request. Each data point will be appended to the database. By logging into our Circuit Digest Cloud account, we can view the live plotted data along with the route tracking.
An extra feature implemented in this project is online/offline data handling. Specifically, when the internet is unavailable, the data is stored in a local variable. Once the connection is restored, the stored data is pushed to the server first, followed by the newly fetched data. This is quite an interesting and useful feature, especially in areas where internet connectivity is unreliable.
With this, let's move on to the components required for this project.
Only a minimal number of components are required for this project. However, it is important to verify the functionality of each component before use. As always, selecting components is your choice, depending on your budget and creativity, with no limitations on customization. Below are the components we have used to build a GPS tracker using esp32.
ESP32 Development Board - 1
ESP32 Development Board - 1
Neo-6M GPS Module - 1
Neo-6M GPS Module - 1
Connecting Wires - As required
Connecting Wires - As required
There is no specific reason for selecting the Neo-6M GPS module apart from its cost-effectiveness. If you are using the Neo-6M, as I did, and if your GPS module is not working check out the linked article for troubleshooting. You can also use any other GPS module for ESP32 to complete this project. Keeping theory Things apart let's move to the actual project, starting from software.
GeoLinker Setup for GPS Tracker
Like most CircuitDigest Cloud APIs, GeoLinker also requires an API key for authorization. Follow the steps below to receive your free API key.
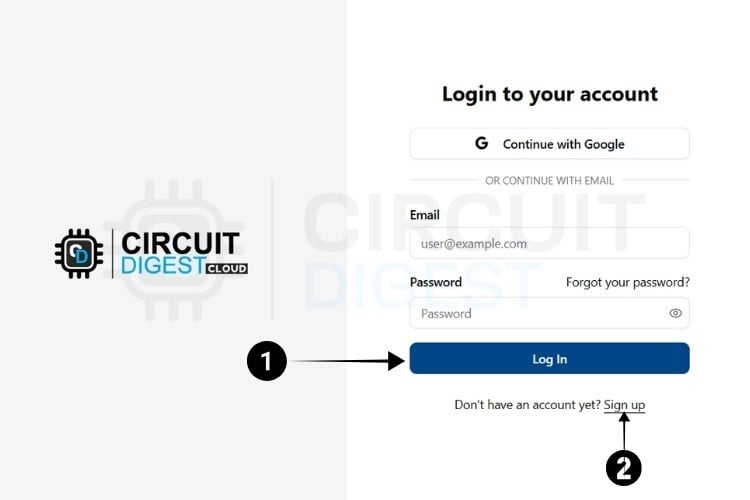
Visit Circuit Digest Cloud and in the top right corner, click Sign in.
If you are new to CircuitDigest Cloud, you need to register a new account by following the steps below.
The next step is to generate the API Key.
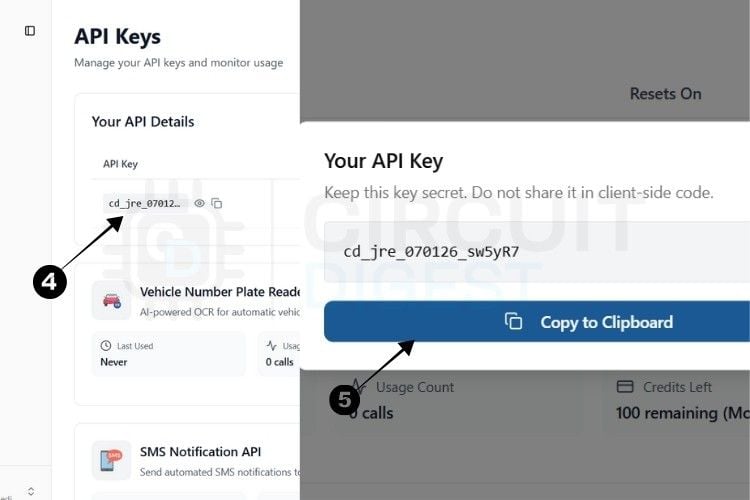
Step 4: You will be directed to a page where you can generate your API Key.
Step 5: By pressing the copy icon near the API Key, your key gets instantly copied to the clipboard.
Currently, there is a usage limit of 100 requests applies per API key for both the SMS and ANPR APIs and 10,000 data points for GPS tracking. Once you reach this limit, you can generate another key, which provides an additional 100 uses.
This usage limit is in place to prevent server overload.
With this, we are ready to move to hardware.
* Note : A 10-second rate limit applies to all API calls, allowing one request every 10 seconds.
ESP32 GPS Tracker Circuit Diagram
The circuit diagram is quite self-explanatory, as there are only a few connections, making it simple to understand. The complete circuit diagram to build a GPS tracker using ESP32 is shown below.
The ESP32 is powered via its USB port, while the GPS module receives a stable 3.3V supply from the ESP32. Communication between the two modules is established through UART, where the GPS module's TX (Transmit) pin connects to the ESP32's RX (IO16), and the GPS RX (Receive) pin connects to the ESP32's TX (IO17). If you need more help you can also check out our article on how to use NEO-6M GPS module with ESP32 and learn more.
With this, the circuit connections are complete. Below, you can see the assembly of the hardware components.
While assembling the components, carefully check for proper connections between the components and the breadboard, as improper wiring might cause unidentified issues.
Next, we can move on to the coding part.
The coding part is simple and straightforward. There’s not much to work out.
Thanks to our newly launched GeoLinker Official Arduino Library, coding is made easy with all the required features. So let’s begin the explanation.
Purpose: Main library for GPS tracking and cloud connectivity Functionality:
Handles GPS data parsing (NMEA protocol)
Handles GPS data parsing (NMEA protocol)
Manages network communication (WiFi/GSM)
Manages network communication (WiFi/GSM)
Provides cloud service integration
Provides cloud service integration
Handles offline data storage
Handles offline data storage
Manages automatic reconnection
Manages automatic reconnection
Repo Link: https://github.com/Circuit-Digest/GeoLinker
The GPS module communication is established through a hardware serial interface using HardwareSerial gpsSerial(1), which creates a reliable serial instance using UART1.
The physical connections are defined with GPIO16 serving as the RX pin to receive data from the GPS module, while GPIO17 functions as the TX pin to send data to the GPS module.
The communication operates at a standard baud rate of 9600, which is the typical speed for NMEA GPS modules. Hardware serial is specifically chosen over software serial because it provides much more reliable communication for continuous GPS data streaming, ensuring that no critical location data is lost during transmission.
Network connectivity is established through two simple configuration variables: ssid and password. These string constants should be replaced with your actual WiFi network credentials to enable internet connectivity for the GPS tracker.
API Key: Authenticates your device with GeoLinker cloud service
Device ID : Unique identifier to distinguish this tracker from others
Data Transmission Settings
updateInterval : How often GPS data is sent to the cloud (5 seconds)
updateInterval : How often GPS data is sent to the cloud (5 seconds)
enableOfflineStorage : Boolean flag for offline data buffering
enableOfflineStorage : Boolean flag for offline data buffering
offlineBufferLimit : Maximum stored records when offline (memory management). In case of reaching the limit, old data will be replaced with newer ones. In other terms, it will store the latest (eg:20) data in the memory.
offlineBufferLimit : Maximum stored records when offline (memory management). In case of reaching the limit, old data will be replaced with newer ones. In other terms, it will store the latest (eg:20) data in the memory.
Connection Management
Auto-reconnect: Automatically attempts WiFi reconnection if disconnected Timezone Offset: Adjusts timestamps to local time (example: IST = UTC+5:30)
The main tracking operations are handled through a single GeoLinker geo object, which serves as the primary interface for all GPS tracking, data processing, and cloud communication functions.
Serial Initialization
Debug Serial: 115200 baud for fast debugging output
Debug Serial: 115200 baud for fast debugging output
Delay: Ensures serial port stabilizes
Delay: Ensures serial port stabilizes
GPS Serial: Configures custom pins with 8N1 format (8 data bits, no parity, 1 stop bit)
GPS Serial: Configures custom pins with 8N1 format (8 data bits, no parity, 1 stop bit)
GeoLinker Configuration Sequence
Initialize: Links GPS serial interface to GeoLinker
Initialize: Links GPS serial interface to GeoLinker
Authentication: Sets up cloud service access
Authentication: Sets up cloud service access
Device Identity : Establishes unique device tracking
At Circuit Digest Cloud, we’ve launched an easy-to-use, free API called GeoLinker. This API enables you to plot and route the location data sent from your device to a server, making it effortless to visualize and track positions.
In this tutorial, we’ll build a GPS tracker using a Neo-6M GPS module with ESP32, covering the hardware setup and GeoLinker as the software component. Let's dive in and get started! Explore our other GPS tracker projects, like an Arduino GPS tracker using SIM800L and Neo-6M and a Raspberry Pi Pico GPS tracker. We've built many other projects using an ESP32 that we think you'll enjoy.
GPS Tracker using ESP32 and GeoLinker API - Quick Overview
Build Time: 3-5 hours | Cost: $20-30 | Difficulty: Beginner-Intermediate
What You'll Learn: ESP32 programming, Neo-6M GPS module, GeoLinker API, UART communication
Applications: Vehicle tracking, Personal location monitoring, Asset management, Route visualization
How Does the ESP32 GPS Tracker Work?
In this project, we are going to build a simple GPS tracker that combines a GPS module for ESP32 with cloud connectivity, making it easier to implement at both the hardware and software levels. For hardware, we will be using the well-known ESP32 Development Board along with the Neo-6M GPS Module. On the software side, we will utilize the GeoLinker API, developed by Circuit Digest Cloud.
We will fetch GPS data from the Neo-6M GPS module using the ESP32 and send this data to a map plotting and routing API via a simple HTTP request. Each data point will be appended to the database. By logging into our Circuit Digest Cloud account, we can view the live plotted data along with the route tracking.
An extra feature implemented in this project is online/offline data handling. Specifically, when the internet is unavailable, the data is stored in a local variable. Once the connection is restored, the stored data is pushed to the server first, followed by the newly fetched data. This is quite an interesting and useful feature, especially in areas where internet connectivity is unreliable.
With this, let's move on to the components required for this project.
Only a minimal number of components are required for this project. However, it is important to verify the functionality of each component before use. As always, selecting components is your choice, depending on your budget and creativity, with no limitations on customization. Below are the components we have used to build a GPS tracker using esp32.
ESP32 Development Board - 1
ESP32 Development Board - 1
Neo-6M GPS Module - 1
Neo-6M GPS Module - 1
Connecting Wires - As required
Connecting Wires - As required
There is no specific reason for selecting the Neo-6M GPS module apart from its cost-effectiveness. If you are using the Neo-6M, as I did, and if your GPS module is not working check out the linked article for troubleshooting. You can also use any other GPS module for ESP32 to complete this project. Keeping theory Things apart let's move to the actual project, starting from software.
GeoLinker Setup for GPS Tracker
Like most CircuitDigest Cloud APIs, GeoLinker also requires an API key for authorization. Follow the steps below to receive your free API key.
Visit Circuit Digest Cloud and in the top right corner, click Sign in.
If you are new to CircuitDigest Cloud, you need to register a new account by following the steps below.
The next step is to generate the API Key.
Step 4: You will be directed to a page where you can generate your API Key.
Step 5: By pressing the copy icon near the API Key, your key gets instantly copied to the clipboard.
Currently, there is a usage limit of 100 requests applies per API key for both the SMS and ANPR APIs and 10,000 data points for GPS tracking. Once you reach this limit, you can generate another key, which provides an additional 100 uses.
This usage limit is in place to prevent server overload.
With this, we are ready to move to hardware.
* Note : A 10-second rate limit applies to all API calls, allowing one request every 10 seconds.
ESP32 GPS Tracker Circuit Diagram
The circuit diagram is quite self-explanatory, as there are only a few connections, making it simple to understand. The complete circuit diagram to build a GPS tracker using ESP32 is shown below.
The ESP32 is powered via its USB port, while the GPS module receives a stable 3.3V supply from the ESP32. Communication between the two modules is established through UART, where the GPS module's TX (Transmit) pin connects to the ESP32's RX (IO16), and the GPS RX (Receive) pin connects to the ESP32's TX (IO17). If you need more help you can also check out our article on how to use NEO-6M GPS module with ESP32 and learn more.
With this, the circuit connections are complete. Below, you can see the assembly of the hardware components.
While assembling the components, carefully check for proper connections between the components and the breadboard, as improper wiring might cause unidentified issues.
Next, we can move on to the coding part.
The coding part is simple and straightforward. There’s not much to work out.
Thanks to our newly launched GeoLinker Official Arduino Library, coding is made easy with all the required features. So let’s begin the explanation.
Purpose: Main library for GPS tracking and cloud connectivity Functionality:
Handles GPS data parsing (NMEA protocol)
Handles GPS data parsing (NMEA protocol)
Manages network communication (WiFi/GSM)
Manages network communication (WiFi/GSM)
Provides cloud service integration
Provides cloud service integration
Handles offline data storage
Handles offline data storage
Manages automatic reconnection
Manages automatic reconnection
Repo Link: https://github.com/Circuit-Digest/GeoLinker
The GPS module communication is established through a hardware serial interface using HardwareSerial gpsSerial(1), which creates a reliable serial instance using UART1.
The physical connections are defined with GPIO16 serving as the RX pin to receive data from the GPS module, while GPIO17 functions as the TX pin to send data to the GPS module.
The communication operates at a standard baud rate of 9600, which is the typical speed for NMEA GPS modules. Hardware serial is specifically chosen over software serial because it provides much more reliable communication for continuous GPS data streaming, ensuring that no critical location data is lost during transmission.
Network connectivity is established through two simple configuration variables: ssid and password. These string constants should be replaced with your actual WiFi network credentials to enable internet connectivity for the GPS tracker.
API Key: Authenticates your device with GeoLinker cloud service
Device ID : Unique identifier to distinguish this tracker from others
Data Transmission Settings
updateInterval : How often GPS data is sent to the cloud (5 seconds)
updateInterval : How often GPS data is sent to the cloud (5 seconds)
enableOfflineStorage : Boolean flag for offline data buffering
enableOfflineStorage : Boolean flag for offline data buffering
offlineBufferLimit : Maximum stored records when offline (memory management). In case of reaching the limit, old data will be replaced with newer ones. In other terms, it will store the latest (eg:20) data in the memory.
offlineBufferLimit : Maximum stored records when offline (memory management). In case of reaching the limit, old data will be replaced with newer ones. In other terms, it will store the latest (eg:20) data in the memory.
Connection Management
Auto-reconnect: Automatically attempts WiFi reconnection if disconnected Timezone Offset: Adjusts timestamps to local time (example: IST = UTC+5:30)
The main tracking operations are handled through a single GeoLinker geo object, which serves as the primary interface for all GPS tracking, data processing, and cloud communication functions.
Serial Initialization
Debug Serial: 115200 baud for fast debugging output
Debug Serial: 115200 baud for fast debugging output
Delay: Ensures serial port stabilizes
Delay: Ensures serial port stabilizes
GPS Serial: Configures custom pins with 8N1 format (8 data bits, no parity, 1 stop bit)
GPS Serial: Configures custom pins with 8N1 format (8 data bits, no parity, 1 stop bit)
GeoLinker Configuration Sequence
Initialize: Links GPS serial interface to GeoLinker
Initialize: Links GPS serial interface to GeoLinker
Authentication: Sets up cloud service access
Authentication: Sets up cloud service access
Device Identity : Establishes unique device tracking
Technologies used
Hardware components
- ESP32 Development Board- 1
- LEDs - 2
- 1K Resistor - 2
- BreadBoard - 1
- Neo-6M GPS Module- 1
- Connecting Wires - As required
Project demo video
What you get
- Working project / hardware kit, tested before delivery
- Complete source code with explanation
- Project demo and guidance for your viva
- Project report, PPT and IEEE paper support (on request)
Delivery & Payment
Delivery takes a minimum of two weeks from the date your inquiry is confirmed.
Payment is in two parts:
• 50% advance to start the project
• Remaining 50% before delivery
Note:
• Documentation and PPT are not included by default
• If you need documentation/PPT, it can be arranged for extra time and cost
We'll confirm the exact timeline and cost with you after reviewing your requirements.
Related Embedded projects

Embedded
ESP32 Fingerprint Attendance System with Live Web Dashboard
Build a biometric attendance system using ESP32 with AS608 fingerprint sensor that logs attendance with timestamp to web dashboard and Googl...
View project
Embedded
Mars Rover Robot Replica using ESP32 CAM and Arduino
Build a Mars Rover robot replica using ESP32-CAM and Arduino with a rocker-bogie suspension system, live video streaming, and smartphone app...
View project
Embedded
ESP32 CAN Bus Tutorial Interfacing MCP2515 with ESP32
Learn CAN bus communication with ESP32 and MCP2515 CAN controller to send and receive data in automotive and industrial applications.
View project
Embedded
ESP32 MP3 Music Player with SD Card and I2S Amplifier
Build a standalone ESP32 MP3 music player that reads audio from SD card and outputs high-quality audio via I2S DAC amplifier with web contro...
View project