


Hand Gesture Controlled Robotic Arm using Arduino Nano
In this DIY session we will build a Hand gesture controlled robotic ARM using Arduino Nano, MPU6050 Gyroscope and flex sensor.
- Suitable forB.Tech Embedded students
- Build time5-7 weeks
- LevelAdvanced
- Available atAjvika Labs, Kakinada
About this project
Robotic Arms are one of the fascinating engineering creations and it is always fascinating to watch these things tilt and pan to get complex things done just like a human arm would. These robotic arms can be commonly found in industries at the assembly line performing intense mechanical work like welding, drilling, painting, etc., recently advanced robotic arms with high precision are also being developed to perform complex surgical operations. Previously we 3D printed a robotic Arm and built a DIY Pick and Place Robotic arm using ARM7 Microcontroller. We will again use the same 3D printed Robotic Arm to make a Hand gesture controlled robotic ARM using Arduino Nano, MPU6050 Gyroscope and flex sensor.
This 3D printed robotic arm position is controlled through a hand glove that is attached with an MPU6050 Gyroscope and a flex sensor. The Flex sensor is used to control the gripper servo of Robotic Arm and the MPU6050 is used for the movement of robotic in X and Y-axis. If you do not have a printer, you can also build your arm with simple cardboard as we built for our Arduino Robotic Arm Project. For inspiration, you can also refer to the Record and Play Robotic Arm that we built earlier using Arduino.
Before going into detail, first, let’s learn about the MPU6050 sensor and flex sensor.
MPU6050 Gyroscopic & Accelerometer Sensor
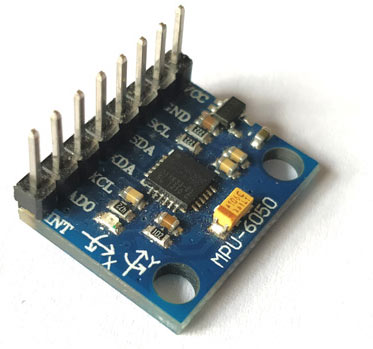
MPU6050 is based on Micro-Mechanical Systems (MEMS) technology. This sensor has a 3-axis accelerometer, a 3-axis gyroscope, and an in-built temperature sensor. It can be used to measure parameters like Acceleration, Velocity, Orientation, Displacement, etc. We have previously interfaced MPU6050 with Arduino and Raspberry pi and also built a few projects using it like- Self Balancing robot, Arduino Digital Protractor, and Arduino Inclinometer.
Features in MPU6050 Sensor:
Communication: I2C protocol with configurable I2C Address
Input Power Supply: 3-5V
Built-in 16-bit ADC provides high accuracy
Built-in DMP provides high computational power
Can be used to interface with other I2C devices like a magnetometer
In-built temperature sensor
Pin-Out details of MPU6050:
Flex Sensors are nothing but a variable resistor. The flex sensor resistance changes when the sensor is bent. They are usually available in two sizes 2.2 inches and 4.5 inches.
Why we use flex sensors in our project?
In this Gesture controlled Robotic Arm, a flex sensor is used to control the gripper of the robotic arm. When the flex sensor on the hand glove is bent, the servo motor attached to the gripper rotates and the gripper opens.
Flex sensors can be useful in many applications and we have built few projects using Flex sensor like a game controller, Tone generator, etc.
Getting ready the 3D printed Robotic ARM:
The 3D printed Robotic Arm used in this tutorial was made by following the design given by EEZYbotARM which is available in the Thingiverse. The complete procedure for making the 3D printed robotic arm and the assembling detail with video is present in the Thingiverse link, which is shared above.
Above is the image of my 3D printed Robotic Arm after assembling with 4 Servo Motors.
Components Required:
The following image shows the circuit connections for Arduino based gesture controlled Robotic Arm.
Circuit Connection between MPU6050 & Arduino Nano:
Circuit Connection between Servo Motors & Arduino Nano:
Servo 1 Orange (PWM Pin)
Servo 1,2,3,4 Brown (GND Pin)
A flex sensor contains two pins. It doesn’t contain polarized terminals. So the pin one P1 is connected to the Arduino Nano’s Analog Pin A0 with a pull-up resistor of 10k and the pin two P2 is grounded to Arduino.
Mounting MPU6050 & Flex Sensor to Gloves
We have mounted the MPU6050 and Flex Sensor on to a hand glove. Here a wired connection is used to connect Glove and robotic arm but it can be made wireless by using an RF connection or a Bluetooth connection.
After every connection, the final setup for gesture-controlled Robotic Arm looks like the below image:
Programming Arduino Nano for Robotic Arm
As usual, complete code along with a working video is given at the end of this tutorial. Here a few important lines of code are explained.
1. First, include the necessary library files. Wire.h library is used for I2C communication between Arduino Nano & MPU6050 and servo.h for controlling servo motor.
2. Next, the objects for the class servo is declared. As we use four servo motors, four objects such as servo_1, servo_2, servo_3, servo_4 are created.
3. Next, the I2C address of MPU6050 & the variables to be used is declared.
4. Next in the void setup, a baud rate of 9600 is set for Serial communication.
And I2C communication between the Arduino Nano & MPU6050 is established:
Also, four PWM pins are defined for servo motor connections.
5. Next in the void loop function, again establish I2C connection between the MPU6050 and Arduino Nano and then start to read the X, Y, Z-Axis data from the register of MPU6050 and store them in corresponding variables.
After that, map the min and max value of the axis data from the MPU6050 sensor in the range of -90 to 90.
Then use the following formula to calculate the x, y, z values in terms of 0 to 360.
Then read the flex sensor Analog output data at the Arduino Nano’s A0 pin and according to the digital value of the flex sensor set the servo angle of the gripper. So if the flex sensor data is greater than 750 the servo motor angle of the gripper is 0 degree and if less than 750 it is 180 degrees.
Then the movement of MPU6050 on the X-axis from 0 to 60 is mapped in terms of 0 to 90 degrees for the servo motor’s Forward/Reverse motion the Robotic arm.
And the movement of MPU6050 on the X-axis from 250 to 360 is mapped in terms of 0 to 90 degrees for the servo motor’s UP/DOWN motion Robotic arm.
Movement of MPU6050 on the Y-axis from 0 to 60 is mapped in terms of 90 to 180 degrees for the servo motor’s Left Movement of the Robotic arm.
Movement of MPU6050 in the Y-axis from 300 to 360 is mapped in terms of 0 to 90 degrees for the servo motor’s Right Movement of the Robotic arm.
Working of Gesture controlled Robotic Arm using Arduino
Finally, upload the code to Arduino Nano and wear the hand glove mounted with the MPU6050 & Flex Sensor.
1. Now move the hand down to move the robotic arm forward and move up to move the robotic arm up.
2. Then tilt the hand left or right to turn the robotic arm left or right.
3. Bend the flex cable attached with the hand glove’s finger to open the gripper and then release it to close it.
The complete working is demonstrated in the video given below.
Complete Project Code
This 3D printed robotic arm position is controlled through a hand glove that is attached with an MPU6050 Gyroscope and a flex sensor. The Flex sensor is used to control the gripper servo of Robotic Arm and the MPU6050 is used for the movement of robotic in X and Y-axis. If you do not have a printer, you can also build your arm with simple cardboard as we built for our Arduino Robotic Arm Project. For inspiration, you can also refer to the Record and Play Robotic Arm that we built earlier using Arduino.
Before going into detail, first, let’s learn about the MPU6050 sensor and flex sensor.
MPU6050 Gyroscopic & Accelerometer Sensor
MPU6050 is based on Micro-Mechanical Systems (MEMS) technology. This sensor has a 3-axis accelerometer, a 3-axis gyroscope, and an in-built temperature sensor. It can be used to measure parameters like Acceleration, Velocity, Orientation, Displacement, etc. We have previously interfaced MPU6050 with Arduino and Raspberry pi and also built a few projects using it like- Self Balancing robot, Arduino Digital Protractor, and Arduino Inclinometer.
Features in MPU6050 Sensor:
Communication: I2C protocol with configurable I2C Address
Input Power Supply: 3-5V
Built-in 16-bit ADC provides high accuracy
Built-in DMP provides high computational power
Can be used to interface with other I2C devices like a magnetometer
In-built temperature sensor
Pin-Out details of MPU6050:
Flex Sensors are nothing but a variable resistor. The flex sensor resistance changes when the sensor is bent. They are usually available in two sizes 2.2 inches and 4.5 inches.
Why we use flex sensors in our project?
In this Gesture controlled Robotic Arm, a flex sensor is used to control the gripper of the robotic arm. When the flex sensor on the hand glove is bent, the servo motor attached to the gripper rotates and the gripper opens.
Flex sensors can be useful in many applications and we have built few projects using Flex sensor like a game controller, Tone generator, etc.
Getting ready the 3D printed Robotic ARM:
The 3D printed Robotic Arm used in this tutorial was made by following the design given by EEZYbotARM which is available in the Thingiverse. The complete procedure for making the 3D printed robotic arm and the assembling detail with video is present in the Thingiverse link, which is shared above.
Above is the image of my 3D printed Robotic Arm after assembling with 4 Servo Motors.
Components Required:
The following image shows the circuit connections for Arduino based gesture controlled Robotic Arm.
Circuit Connection between MPU6050 & Arduino Nano:
Circuit Connection between Servo Motors & Arduino Nano:
Servo 1 Orange (PWM Pin)
Servo 1,2,3,4 Brown (GND Pin)
A flex sensor contains two pins. It doesn’t contain polarized terminals. So the pin one P1 is connected to the Arduino Nano’s Analog Pin A0 with a pull-up resistor of 10k and the pin two P2 is grounded to Arduino.
Mounting MPU6050 & Flex Sensor to Gloves
We have mounted the MPU6050 and Flex Sensor on to a hand glove. Here a wired connection is used to connect Glove and robotic arm but it can be made wireless by using an RF connection or a Bluetooth connection.
After every connection, the final setup for gesture-controlled Robotic Arm looks like the below image:
Programming Arduino Nano for Robotic Arm
As usual, complete code along with a working video is given at the end of this tutorial. Here a few important lines of code are explained.
1. First, include the necessary library files. Wire.h library is used for I2C communication between Arduino Nano & MPU6050 and servo.h for controlling servo motor.
2. Next, the objects for the class servo is declared. As we use four servo motors, four objects such as servo_1, servo_2, servo_3, servo_4 are created.
3. Next, the I2C address of MPU6050 & the variables to be used is declared.
4. Next in the void setup, a baud rate of 9600 is set for Serial communication.
And I2C communication between the Arduino Nano & MPU6050 is established:
Also, four PWM pins are defined for servo motor connections.
5. Next in the void loop function, again establish I2C connection between the MPU6050 and Arduino Nano and then start to read the X, Y, Z-Axis data from the register of MPU6050 and store them in corresponding variables.
After that, map the min and max value of the axis data from the MPU6050 sensor in the range of -90 to 90.
Then use the following formula to calculate the x, y, z values in terms of 0 to 360.
Then read the flex sensor Analog output data at the Arduino Nano’s A0 pin and according to the digital value of the flex sensor set the servo angle of the gripper. So if the flex sensor data is greater than 750 the servo motor angle of the gripper is 0 degree and if less than 750 it is 180 degrees.
Then the movement of MPU6050 on the X-axis from 0 to 60 is mapped in terms of 0 to 90 degrees for the servo motor’s Forward/Reverse motion the Robotic arm.
And the movement of MPU6050 on the X-axis from 250 to 360 is mapped in terms of 0 to 90 degrees for the servo motor’s UP/DOWN motion Robotic arm.
Movement of MPU6050 on the Y-axis from 0 to 60 is mapped in terms of 90 to 180 degrees for the servo motor’s Left Movement of the Robotic arm.
Movement of MPU6050 in the Y-axis from 300 to 360 is mapped in terms of 0 to 90 degrees for the servo motor’s Right Movement of the Robotic arm.
Working of Gesture controlled Robotic Arm using Arduino
Finally, upload the code to Arduino Nano and wear the hand glove mounted with the MPU6050 & Flex Sensor.
1. Now move the hand down to move the robotic arm forward and move up to move the robotic arm up.
2. Then tilt the hand left or right to turn the robotic arm left or right.
3. Bend the flex cable attached with the hand glove’s finger to open the gripper and then release it to close it.
The complete working is demonstrated in the video given below.
Complete Project Code
Technologies used
Hardware components
- Arduino
- Servo Motor
- DC Motor
- L298N
- Ultrasonic Sensor
- ESP32
Software & tools
- Arduino IDE
- ROS
- Python
- OpenCV
- VS Code
Project demo video
What you get
- Working project / hardware kit, tested before delivery
- Complete source code with explanation
- Project demo and guidance for your viva
- Project report, PPT and IEEE paper support (on request)
Delivery & Payment
Delivery takes a minimum of two weeks from the date your inquiry is confirmed.
Payment is in two parts:
• 50% advance to start the project
• Remaining 50% before delivery
Note:
• Documentation and PPT are not included by default
• If you need documentation/PPT, it can be arranged for extra time and cost
We'll confirm the exact timeline and cost with you after reviewing your requirements.
Related Embedded projects

Embedded
ESP32 Fingerprint Attendance System with Live Web Dashboard
Build a biometric attendance system using ESP32 with AS608 fingerprint sensor that logs attendance with timestamp to web dashboard and Googl...
View project
Embedded
Mars Rover Robot Replica using ESP32 CAM and Arduino
Build a Mars Rover robot replica using ESP32-CAM and Arduino with a rocker-bogie suspension system, live video streaming, and smartphone app...
View project
Embedded
ESP32 CAN Bus Tutorial Interfacing MCP2515 with ESP32
Learn CAN bus communication with ESP32 and MCP2515 CAN controller to send and receive data in automotive and industrial applications.
View project
Embedded
ESP32 MP3 Music Player with SD Card and I2S Amplifier
Build a standalone ESP32 MP3 music player that reads audio from SD card and outputs high-quality audio via I2S DAC amplifier with web contro...
View project