ESP32 Web Server (WebSocket) with Multiple Sliders: Control LEDs Brightness (PWM)
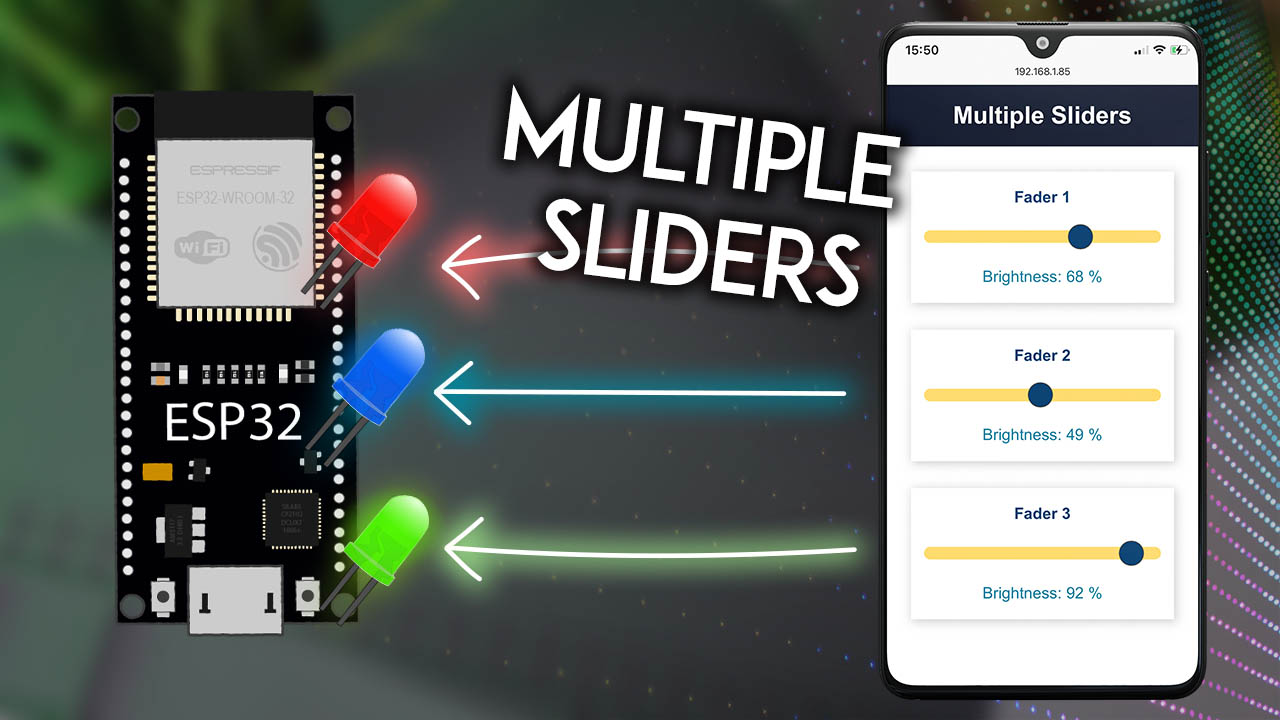
Build an ESP32 Web Server that displays a web page with multiple sliders to control the brightness of multiple LEDs using WebSocket protocol using Arduino IDE.
- Suitable forB.Tech/Diploma IoT/ESP32 students
- Build time1-2 weeks
- LevelIntermediate
- Available atAjvika Labs, Kakinada
About this project
This tutorial shows how to build an ESP32 web server that displays a web page with multiple sliders. The sliders control the duty cycle of different PWM channels to control the brightness of multiple LEDs. Instead of LEDs, you can use this project to control DC motors or other actuators that require a PWM signal. The communication between the clients and the ESP32 is done using WebSocket protocol. Additionally, whenever there’s a change, all clients update their slider values simultaneously.
You can also modify the code presented in this tutorial to add sliders to your projects to set threshold values or any other values you need to use in your code.
For this project, the ESP32 board will be programmed using the Arduino core. You can either use the
Arduino IDE
VS Code with PlatformIO
, or any other suitable IDE.
To better understand how this project works, we recommend taking a look at the following tutorials:
ESP32 PWM with Arduino IDE (Analog Output)
ESP32 WebSocket Server: Control Outputs (Arduino IDE)
ESP32 Web Server with Slider: Control LED Brightness (PWM)
*
* This project shows how to build a web server with one slider, but it uses HTTP requests—in this tutorial, we’ll use WebSocket protocol.
We have a similar tutorial for the ESP8266 NodeMCU board:
ESP8266 NodeMCU Web Server (WebSocket) with Multiple Sliders: Control LEDs Brightness (PWM)
Project Overview
The following image shows the web page we’ll build for this project:
The web page contains three cards;
Each card has a paragraph to display the card title (
Fader 1
Fader 2
Fader 3
);
There’s a range slider in each card that you can move to set the brightness of the corresponding LED;
In each card, another paragraph displays the current LED brightness (in percentage);
When you set a new position for the slider, it updates all clients (if you have multiple web browser tabs opened (or multiple devices), they update almost simultaneously whenever there’s a change).
How it Works?
The ESP hosts a web server that displays a web page with three sliders;
When you set a new position for a slider, the client sends the slider number and slider value to the server via WebSocket protocol. For example, if you set slider number 3 to position number 40, it would send this message
3s40
to the server.
The server (ESP) receives the slider number and corresponding value and adjusts the PWM duty cycle accordingly. Additionally, it also notifies all the other clients with the new current slider values—this allows us to have all clients updated almost instantaneously.
The ESP32 outputs the PWM signal with the corresponding duty cycle to control the LED brightness. A duty cycle of 0% means the LED is completely off, a duty cycle of 50% means the LED is half lit, and a duty cycle of 100% means the LED is lit;
Whenever you open a new web browser window (this is when a new client connects), it will send a message to the ESP32 (also through WebSocket protocol) with the message
getValues
. When the ESP32 gets this message, it sends the current slider values. This way, whenever you open a new tab, it always shows the current and updated values.
Prerequisites
Before proceeding with this tutorial, make sure you check all the following prerequisites.
1) Parts Required
To follow this project you need:
ESP32 Board
– read
ESP32 Development Boards Review and Comparison
3x
LEDs
3x
220Ohm resistors
Breadboard
Jumper wires
You don’t need three LEDs to test this project, you can simply see the results in the Serial Monitor or use other actuators that required a PWM signal to operate.
You can use the preceding links or go directly to
MakerAdvisor.com/tools
to find all the parts for your projects at the best price!
2) Arduino IDE and ESP32 Boards Add-on
We’ll program the ESP32 using Arduino IDE. So, you must have the ESP32 add-on installed. Follow the next tutorial if you haven’t already:
Installing ESP32 Board in Arduino IDE (Windows, Mac OS X, Linux)
If you want to use VS Code with the PlatformIO extension, follow the next tutorial instead to learn how to program the ESP32:
Getting Started with VS Code and PlatformIO IDE for ESP32 and ESP8266 (Windows, Mac OS X, Linux Ubuntu)
3) Filesystem Uploader Plugin
To upload the HTML, CSS, and JavaScript files needed to build this project to the ESP32 flash memory (LittleFS), we’ll use a plugin for Arduino IDE:
LittleFS
Filesystem uploader
. Follow the next tutorial to install the filesystem uploader plugin if you haven’t already:
Arduino IDE 2: Install ESP32 LittleFS Uploader (Upload Files to the Filesystem)
If you’re using VS Code with the PlatformIO extension, read the following tutorial to learn how to upload files to the filesystem:
ESP32 with VS Code and PlatformIO: Upload Files to LittleFS Filesystem
4) Libraries
To build this project, you need to install the following libraries:
Arduino_JSON library by Arduino version 0.1.0
(Arduino Library Manager)
ESPAsyncWebServer
by ESP32Async
AsyncTCP
by ESP32Async
You can install the libraries using the Arduino Library Manager. Go to
Sketch
>
Include Library
>
Manage Libraries
and search for the libraries’ names.
Schematic Diagram
Wire three LEDs to the ESP32. We’re using GPIOs 12, 13, and 14. You can use any other suitable GPIOs.
Recommended reading:
ESP32 Pinout Reference: Which GPIO pins should you use?
Organizing Your Files
To keep the project organized and make it easier to understand, we’ll create four files to build the web server:
Arduino sketch
that handles the web server;
index.html
: to define the content of the web page;
sytle.css
: to style the web page;
script.js
: to program the behavior of the web page—handle what happens when you move the slider, send, receive and interpret the messages received via WebSocket protocol.
You should save the HTML, CSS, and JavaScript files inside a folder called
data
inside the Arduino sketch folder, as shown in the previous diagram. We’ll upload these files to the ESP32 filesystem (LittleFS).
You can download all project files:
Download All the Arduino Project Files
HTML File
Copy the following to the
index.html
file.
<!DOCTYPE html>
<html>
<head>
<title>ESP IOT DASHBOARD</title>
<meta name=\"viewport\" content=\"width=device-width, initial-scale=1\">
<link rel=\"icon\" type=\"image/png\" href=\"favicon.png\">
<link rel=\"stylesheet\" type=\"text/css\" href=\"style.css\">
</head>
<body>
<div class=\"topnav\">
Multiple Sliders</h1>
</div>
<div class=\"content\">
<div class=\"card-grid\">
<div class=\"card\">
<p class=\"card-title\">Fader 1</p>
<p class=\"switch\">
<input type=\"range\" onchange=\"updateSliderPWM(this)\" id=\"slider1\" min=\"0\" max=\"100\" step=\"1\" value =\"0\" class=\"slider\">
</p>
<p class=\"state\">Brightness: <span id=\"sliderValue1\"></span> %</p>
</div>
<div class=\"card\">
<p class=\"card-title\"> Fader 2</p>
<p class=\"switch\">
<input type=\"range\" onchange=\"updateSliderPWM(this)\" id=\"slider2\" min=\"0\" max=\"100\" step=\"1\" value =\"0\" class=\"slider\">
</p>
<p class=\"state\">Brightness: <span id=\"sliderValue2\"></span> %</p>
</div>
<div class=\"card\">
<p class=\"card-title\"> Fader 3</p>
<p class=\"switch\">
<input type=\"range\" onchange=\"updateSliderPWM(this)\" id=\"slider3\" min=\"0\" max=\"100\" step=\"1\" value =\"0\" class=\"slider\">
</p>
<p class=\"state\">Brightness: <span id=\"sliderValue3\"></span> %</p>
</div>
</div>
</div>
<script src=\"script.js\"></script>
</body>
</html>
Let’s take a quick loo
You can also modify the code presented in this tutorial to add sliders to your projects to set threshold values or any other values you need to use in your code.
For this project, the ESP32 board will be programmed using the Arduino core. You can either use the
Arduino IDE
VS Code with PlatformIO
, or any other suitable IDE.
To better understand how this project works, we recommend taking a look at the following tutorials:
ESP32 PWM with Arduino IDE (Analog Output)
ESP32 WebSocket Server: Control Outputs (Arduino IDE)
ESP32 Web Server with Slider: Control LED Brightness (PWM)
*
* This project shows how to build a web server with one slider, but it uses HTTP requests—in this tutorial, we’ll use WebSocket protocol.
We have a similar tutorial for the ESP8266 NodeMCU board:
ESP8266 NodeMCU Web Server (WebSocket) with Multiple Sliders: Control LEDs Brightness (PWM)
Project Overview
The following image shows the web page we’ll build for this project:
The web page contains three cards;
Each card has a paragraph to display the card title (
Fader 1
Fader 2
Fader 3
);
There’s a range slider in each card that you can move to set the brightness of the corresponding LED;
In each card, another paragraph displays the current LED brightness (in percentage);
When you set a new position for the slider, it updates all clients (if you have multiple web browser tabs opened (or multiple devices), they update almost simultaneously whenever there’s a change).
How it Works?
The ESP hosts a web server that displays a web page with three sliders;
When you set a new position for a slider, the client sends the slider number and slider value to the server via WebSocket protocol. For example, if you set slider number 3 to position number 40, it would send this message
3s40
to the server.
The server (ESP) receives the slider number and corresponding value and adjusts the PWM duty cycle accordingly. Additionally, it also notifies all the other clients with the new current slider values—this allows us to have all clients updated almost instantaneously.
The ESP32 outputs the PWM signal with the corresponding duty cycle to control the LED brightness. A duty cycle of 0% means the LED is completely off, a duty cycle of 50% means the LED is half lit, and a duty cycle of 100% means the LED is lit;
Whenever you open a new web browser window (this is when a new client connects), it will send a message to the ESP32 (also through WebSocket protocol) with the message
getValues
. When the ESP32 gets this message, it sends the current slider values. This way, whenever you open a new tab, it always shows the current and updated values.
Prerequisites
Before proceeding with this tutorial, make sure you check all the following prerequisites.
1) Parts Required
To follow this project you need:
ESP32 Board
– read
ESP32 Development Boards Review and Comparison
3x
LEDs
3x
220Ohm resistors
Breadboard
Jumper wires
You don’t need three LEDs to test this project, you can simply see the results in the Serial Monitor or use other actuators that required a PWM signal to operate.
You can use the preceding links or go directly to
MakerAdvisor.com/tools
to find all the parts for your projects at the best price!
2) Arduino IDE and ESP32 Boards Add-on
We’ll program the ESP32 using Arduino IDE. So, you must have the ESP32 add-on installed. Follow the next tutorial if you haven’t already:
Installing ESP32 Board in Arduino IDE (Windows, Mac OS X, Linux)
If you want to use VS Code with the PlatformIO extension, follow the next tutorial instead to learn how to program the ESP32:
Getting Started with VS Code and PlatformIO IDE for ESP32 and ESP8266 (Windows, Mac OS X, Linux Ubuntu)
3) Filesystem Uploader Plugin
To upload the HTML, CSS, and JavaScript files needed to build this project to the ESP32 flash memory (LittleFS), we’ll use a plugin for Arduino IDE:
LittleFS
Filesystem uploader
. Follow the next tutorial to install the filesystem uploader plugin if you haven’t already:
Arduino IDE 2: Install ESP32 LittleFS Uploader (Upload Files to the Filesystem)
If you’re using VS Code with the PlatformIO extension, read the following tutorial to learn how to upload files to the filesystem:
ESP32 with VS Code and PlatformIO: Upload Files to LittleFS Filesystem
4) Libraries
To build this project, you need to install the following libraries:
Arduino_JSON library by Arduino version 0.1.0
(Arduino Library Manager)
ESPAsyncWebServer
by ESP32Async
AsyncTCP
by ESP32Async
You can install the libraries using the Arduino Library Manager. Go to
Sketch
>
Include Library
>
Manage Libraries
and search for the libraries’ names.
Schematic Diagram
Wire three LEDs to the ESP32. We’re using GPIOs 12, 13, and 14. You can use any other suitable GPIOs.
Recommended reading:
ESP32 Pinout Reference: Which GPIO pins should you use?
Organizing Your Files
To keep the project organized and make it easier to understand, we’ll create four files to build the web server:
Arduino sketch
that handles the web server;
index.html
: to define the content of the web page;
sytle.css
: to style the web page;
script.js
: to program the behavior of the web page—handle what happens when you move the slider, send, receive and interpret the messages received via WebSocket protocol.
You should save the HTML, CSS, and JavaScript files inside a folder called
data
inside the Arduino sketch folder, as shown in the previous diagram. We’ll upload these files to the ESP32 filesystem (LittleFS).
You can download all project files:
Download All the Arduino Project Files
HTML File
Copy the following to the
index.html
file.
<!DOCTYPE html>
<html>
<head>
<title>ESP IOT DASHBOARD</title>
<meta name=\"viewport\" content=\"width=device-width, initial-scale=1\">
<link rel=\"icon\" type=\"image/png\" href=\"favicon.png\">
<link rel=\"stylesheet\" type=\"text/css\" href=\"style.css\">
</head>
<body>
<div class=\"topnav\">
Multiple Sliders</h1>
</div>
<div class=\"content\">
<div class=\"card-grid\">
<div class=\"card\">
<p class=\"card-title\">Fader 1</p>
<p class=\"switch\">
<input type=\"range\" onchange=\"updateSliderPWM(this)\" id=\"slider1\" min=\"0\" max=\"100\" step=\"1\" value =\"0\" class=\"slider\">
</p>
<p class=\"state\">Brightness: <span id=\"sliderValue1\"></span> %</p>
</div>
<div class=\"card\">
<p class=\"card-title\"> Fader 2</p>
<p class=\"switch\">
<input type=\"range\" onchange=\"updateSliderPWM(this)\" id=\"slider2\" min=\"0\" max=\"100\" step=\"1\" value =\"0\" class=\"slider\">
</p>
<p class=\"state\">Brightness: <span id=\"sliderValue2\"></span> %</p>
</div>
<div class=\"card\">
<p class=\"card-title\"> Fader 3</p>
<p class=\"switch\">
<input type=\"range\" onchange=\"updateSliderPWM(this)\" id=\"slider3\" min=\"0\" max=\"100\" step=\"1\" value =\"0\" class=\"slider\">
</p>
<p class=\"state\">Brightness: <span id=\"sliderValue3\"></span> %</p>
</div>
</div>
</div>
<script src=\"script.js\"></script>
</body>
</html>
Let’s take a quick loo
Technologies used
Hardware components
- ESP32
- ESP8266
- Arduino
Software & tools
- Arduino IDE
- VS Code
- PlatformIO
- PlatformIO
What you get
- Working project / hardware kit, tested before delivery
- Complete source code with explanation
- Project demo and guidance for your viva
- Project report, PPT and IEEE paper support (on request)
Delivery & Payment
Delivery takes a minimum of two weeks from the date your inquiry is confirmed.
Payment is in two parts:
• 50% advance to start the project
• Remaining 50% before delivery
Note:
• Documentation and PPT are not included by default
• If you need documentation/PPT, it can be arranged for extra time and cost
We'll confirm the exact timeline and cost with you after reviewing your requirements.
Related IoT/ESP32 projects

IoT/ESP32
ESP32 External Wake Up from Deep Sleep
This article shows how to put the ESP32 in deep sleep mode and wake it with an external wake up like a button press. We'll cover how to use...
View project
IoT/ESP32
ESP32: Upload Files to LittleFS using Arduino IDE
Upload files to the ESP32 Filesystem (LittleFS) by using a plugin for Arduino IDE (1.8.X). The plugin lets you use three different filesyste...
View project
IoT/ESP32
ESP32: Guide for MicroSD Card Module using Arduino IDE
Use a microSD card with the ESP32: you'll learn how to read and write files to the microSD card. To interface a microSD card with an ESP32 b...
View project
IoT/ESP32
ESP32 Save Data Permanently using Preferences Library
Save data permanently on the ESP32 flash memory using Preferences.h library. The data held in the flash memory persists across resets or pow...
View project