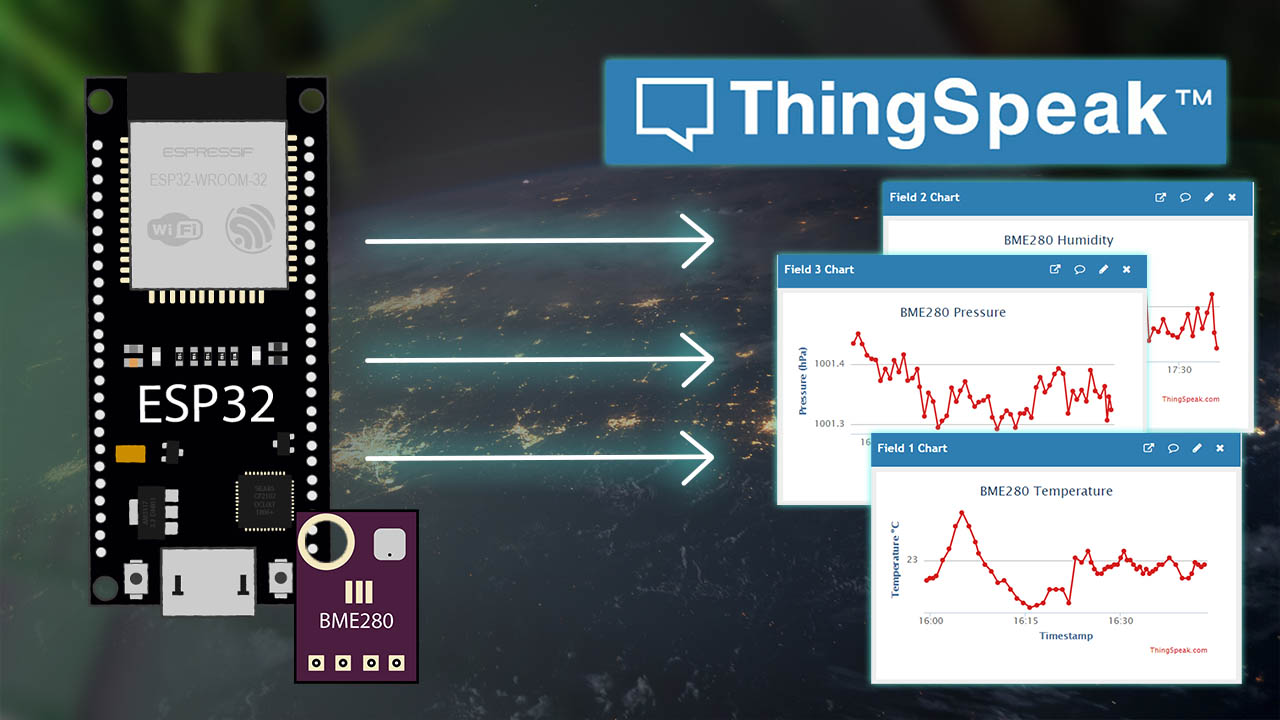
ESP32 Publish Sensor Readings to ThingSpeak (easiest way)
Publish sensor readings with the ESP32 board to ThingSpeak web service. We'll use a BME280 sensor and ESP32 will be programmed using the Arduino Core.
- Suitable forB.Tech/Diploma IoT/ESP32 students
- Build time1-2 weeks
- LevelIntermediate
- Available atAjvika Labs, Kakinada
About this project
In this guide, you’ll learn how to send sensor readings with the ESP32 to ThingSpeak. For demonstration purposes, we’ll use a
BME280 sensor
, but you can easily modify the examples to use any other sensor. The ESP32 board will be programmed using the Arduino core.
ThingSpeak allows you to publish your sensor readings to their website and plot them in charts with timestamps. Then, you can access your readings from anywhere in the world.
We have a similar tutorial for the ESP8266 board:
ESP8266 NodeMCU Publish Sensor Readings to ThingSpeak (easiest way)
Project Overview
There are many ways to send sensor readings to ThingSpeak. In this tutorial, we’ll use one of the easiest ways—using the
thingspeak-arduino library
. This library provides methods to easily publish sensor readings to single fields or multiple fields. You can check the library examples on its GitHub page.
To exemplify, we’ll use the BME280 sensor, but you can use any other sensor (you need to modify the code).
Recommended reading:
ESP32 with BME280 Sensor using Arduino IDE (Pressure, Temperature, Humidity)
We’ll cover how to publish to a
single field
and how to publish to
multiple fields
Preparing Arduino IDE
For this tutorial we’ll program the ESP32 using the Arduino core. So, make sure you have the ESP32 add-on installed in your Arduino IDE:
Installing the ESP32 Board in Arduino IDE (Windows, Mac OS X, Linux)
If you want to program the ESP32 using VS Code with the PlatformIO extension, follow the next tutorial instead:
Getting Started with VS Code and PlatformIO IDE for ESP32 and ESP8266
Installing the ThingSpeak Library
To send sensor readings to ThingSpeak, we’ll use the thingspeak-arduino library. You can install this library through the Arduino Library Manager. Go to
Sketch
>
Include Library
>
Manage Libraries…
and search for “
ThingSpeak
” in the Library Manager. Install the ThingSpeak library by MathWorks.
Installing BME280 Libraries
As mentioned previously, we’ll publish sensor readings from a BME280 sensor. So, you also need to install the libraries to interface with the BME280 sensor.
Adafruit_BME280 library
Adafruit_Sensor library
You can install the libraries using the Arduino Library Manager. Go to
Sketch
>
Include Library
>
Manage Libraries
and search for the library name.
Installing Libraries (VS Code + PlatformIO)
If you’re using VS Code with the PlatformIO extension, copy the following to the
platformio.ini
file to include the libraries.
lib_deps = mathworks/ThingSpeak@^2.0.0
adafruit/Adafruit Unified Sensor @ ^1.1.4
adafruit/Adafruit BME280 Library @ ^2.1.2
Building the Circuit
To exemplify how to send data to ThingSpeak, we’ll send sensor readings from a BME280 sensor. So, you need to wire a BME280 sensor to your ESP32.
Parts Required
To complete this tutorial you need the following parts:
BME280 sensor module
ESP32
(read
Best ESP32 development boards
)
Breadboard
Jumper wires
You can use the preceding links or go directly to
MakerAdvisor.com/tools
to find all the parts for your projects at the best price!
Schematic Diagram
We’re going to use I2C communication with the BME280 sensor module. For that, wire the sensor to the default ESP32 SCL (
GPIO 22
) and SDA (
GPIO 21
) pins, as shown in the following schematic diagram.
Recommended reading:
ESP32 Pinout Reference: Which GPIO pins should you use?
ThingSpeak – Getting Started
Go to ThingSpeak
an click the “
Get Started For Free
” button to create a new account. This account is linked to a Mathworks account. So, if you already have a Mathworks account, you should log in with that account.
Creating New Channel
After your account is ready, sign in, open the “
Channels
” tab and select “
My Channels
“.
Press the “New Channel” button to create a new channel.
Type a name for your channel and add a description. In this example, we’ll just publish temperature. If you want to publish multiple readings (like humidity and pressure), you can enable more fields as you’ll see later in this tutorial.
Click the
Save Channel
button to create and save your channel.
Customizing Chart
The chart can be customized, go to your
Private View
tab and click on the edit icon.
You can give a title to your chart, customize the background color, x and y axis, and much more.
When you’re done, press the “
Save
” button.
API Key
To send values from the ESP32 to ThingSpeak, you need the Write API Key. Open the “
API Keys
”
tab and copy the Write API Key to a safe place because you’ll need it in a moment.
ESP32 Publish Sensor Readings to ThingSpeak – Code
Copy the following code to your Arduino IDE (or to the
main.cpp
file if you’re using PlatformIO).
/*
Adapted from WriteSingleField Example from ThingSpeak Library (Mathworks)
Permission is hereby granted, free of charge, to any person obtaining a copy of this software and associated documentation files.
The above copyright notice and this permission notice shall be included in all copies or substantial portions of the Software.
*/
#include `WiFi.h`
#include \"ThingSpeak.h\"
#include `Adafruit_BME280.h`
#include `Adafruit_Sensor.h`
const char* ssid = \"REPLACE_WITH_YOUR_SSID\"; // your network SSID (name)
const char* password = \"REPLACE_WITH_YOUR_PASSWORD\"; // your network password
WiFiClient client;
unsigned long myChannelNumber = X;
const char * myWriteAPIKey = \"XXXXXXXXXXXXXXXX\";
// Timer variables
unsigned long lastTime = 0;
unsigned long timerDelay = 30000;
// Variable to hold temperature readings
float temperatureC;
//uncomment if you want to get temperature in Fahrenheit
//float temperatureF;
// Create a sensor object
Adafruit_BME280 bme; //BME280 connect to ESP32 I2C (GPIO 21 = SDA, GPIO 22 = SCL)
void initBME(){
if (!bme.begin(0x76)) {
Serial.println(\"Could not find a valid BME280 sensor, check wiring!\");
while (1);
}
}
void setup() {
Serial.begin(115200); //Initialize serial
initBME();
WiFi.mode(WIFI_STA);
ThingSpeak.begin(client); // Initialize ThingSpeak
}
void loop() {
if ((millis() - lastTime) > timerDelay) {
// Connect or reconnect to WiFi
if(WiFi.status() != WL_CONNECTED){
Serial.print(\"Attempting to connect\");
while(WiFi.status() != WL_CONNECTED){
WiFi.begin(ssid, password);
delay(5000);
}
Serial.println(\"\
Connected.\");
}
// Get a new temperature reading
temperatureC = bme.readTemperature();
Serial.print(\"Temperature (ºC): \");
Serial.println(temperatureC);
//uncomment if you want to get temperature in Fahrenheit
/*temperatureF = 1.8 * bme.readTemperature() + 32;
Serial.print(\"Temperature (ºF): \");
Serial.println(temperatureF);*/
// Write to ThingSpeak. There are up to 8 fields in a channel, allowing you to store up to 8 different
// pieces of information in a channel. Here, we write to field 1.
int x = ThingSpeak.writeField(myChannelNumber, 1, temperatureC, myWriteAPIKey);
//uncomment if you want to get temperature in Fahrenheit
//int x = ThingSpeak.writeField(myChannelNumber, 1, temperatureF, myWriteAPIKey);
if(x == 200){
Serial.println(\"Channel update successful.\");
}
else{
Serial.println(\"Problem updating channel. HTTP error code \" + String(x));
}
lastTime = millis();
}
}
To make the code work, you need to insert your network credentials in the following variables:
const char* ssid = \"REPLACE_WITH_YOUR_SSID\";
const char* password = \"REPLACE_WITH_YOUR_PASSWORD\";
You need to insert the number of the channel that you’re publishing to. If you only have one channel created in ThingSpeak, the channel number is 1. Otherwise, you can see the number of the channel on the
Private View
tab.
unsigned long myChannelNumber = 1;
Finally,
Technologies used
Hardware components
- ESP32
- ESP8266
- Arduino
- BME280
Software & tools
- Arduino IDE
- VS Code
- PlatformIO
- ThingSpeak
- PlatformIO
What you get
- Working project / hardware kit, tested before delivery
- Complete source code with explanation
- Project demo and guidance for your viva
- Project report, PPT and IEEE paper support (on request)
Delivery & Payment
Delivery takes a minimum of two weeks from the date your inquiry is confirmed.
Payment is in two parts:
• 50% advance to start the project
• Remaining 50% before delivery
Note:
• Documentation and PPT are not included by default
• If you need documentation/PPT, it can be arranged for extra time and cost
We'll confirm the exact timeline and cost with you after reviewing your requirements.
Related IoT/ESP32 projects
IoT/ESP32
ESP32 External Wake Up from Deep Sleep
This article shows how to put the ESP32 in deep sleep mode and wake it with an external wake up like a button press. We'll cover how to use...
View project
IoT/ESP32
ESP32: Upload Files to LittleFS using Arduino IDE
Upload files to the ESP32 Filesystem (LittleFS) by using a plugin for Arduino IDE (1.8.X). The plugin lets you use three different filesyste...
View project
IoT/ESP32
ESP32: Guide for MicroSD Card Module using Arduino IDE
Use a microSD card with the ESP32: you'll learn how to read and write files to the microSD card. To interface a microSD card with an ESP32 b...
View project
IoT/ESP32
ESP32 Save Data Permanently using Preferences Library
Save data permanently on the ESP32 flash memory using Preferences.h library. The data held in the flash memory persists across resets or pow...
View project