ESP32-CAM Currency Recognition System using Edge Impulse
Master ESP32 CAM currency recognition with our Arduino guide. Step-by-step: Edge Impulse training, circuit setup, code deployment for Indian note detection.
- Suitable forB.Tech Embedded students
- Build time3-4 weeks
- LevelBeginner
- Available atAjvika Labs, Kakinada
About this project
Ever wondered if a small, low-cost board like the ESP32-CAM can actually recognise objects or even identify Indian currency notes? In this project, the answer is a clear yes. We combine the ESP32-CAM with the powerful Edge Impulse platform to build a system capable of object detection and image classification right at the edge. By using the Edge Impulse at every step from collecting image data and labelling different currency denominations, to training the machine-learning model, and finally deploying it directly onto the ESP32-CAM. Once deployed, the ESP32-CAM processes images in real time and predicts the denomination of the currency note placed in front of it. To make the output easy to understand, LEDs are used as visual indicators. Each denomination has its own LED, and when a note is detected, the corresponding LED glows. At the same time, the detected denomination is displayed on the Serial Monitor, giving both visual and textual confirmation. Previously, we built a similar Object Detection using ESP32-CAM and Edge Impulse project focused on vegetable detection, and this project extends the concept to currency recognition. Kindly explore other ESP32-CAM projects to further enhance your understanding and curiosity about embedded AI and edge computing. This comprehensive guide demonstrates how to build an ESP32-CAM currency recognition system using Edge Impulse and Arduino programming
Indian Currency Note Recognition using ESP32-CAM & Edge Impulse - Quick Overview
Build Time: 8-14 hours | Cost: $15-28 | Difficulty: Intermediate
What You'll Learn: TinyML / Edge AI, ESP32-CAM camera interfacing, Edge Impulse workflow, Image classification & object detection on microcontroller, Arduino library deployment
Applications: Assistive device for the visually impaired, Fake note detection (future scope), Automated retail/POS currency validation, Vending machine note acceptor, Currency counting system
What is ESP32-CAM Currency Recognition?
└ Hardware Connection Guide
└ Dataset Collection Methods
Edge Impulse Model Training
└ Impulse Design Configuration
└ Model Training and Evaluation
└ Real-World Performance Results
What is ESP32-CAM Currency Recognition?
ESP32-CAM currency recognition utilising Machine Learning to Identify & Classify Indian Rupee Notes in Real-Time embraces the power of the ESP32-CAM as well as Machine Learning (ML) technology and uses an embedded AI Project to perform highly advanced image classification activities using inexpensive microcontrollers that do not require any internet connection or cloud services to operate.
The Edge Impulse Platform (one of the best TinyML Development Platforms) allows for training of a custom object recognition model to specifically recognise Indian Rupee notes. Once deployed, the ESP32 currency recognition programming processes images locally, providing instant visual feedback through LED indicators while displaying results on the Serial Monitor.
Understanding AI on Edge and Object Recognition Technology
What exactly is AI on Edge? In simple terms, AI on Edge, also known as edge computing, means running artificial intelligence algorithms directly on embedded devices such as microcontrollers and microprocessors, instead of sending data to cloud servers for processing. This local processing brings several advantages: lower latency, reduced communication costs, improved data privacy, and faster real-time responses. You might wonder, wasn’t cloud computing supposed to handle all AI tasks? That was true earlier, mainly because cloud platforms were easier to deploy and had powerful resources. However, with today’s advancements in embedded hardware, even compact devices are capable of handling AI workloads efficiently at the device level. One of its most important applications is object recognition, a computer vision technique that allows machines to identify and classify objects in images or video streams. This gives devices the ability to see and interpret visual information much like humans do. You may often hear terms like object detection and image recognition ; they are closely related and commonly used interchangeably in this context. You can also explore our other AI projects to implement more ideas of your own.
For ESP32 currency recognition, this technology analyses visual features like patterns, colours, text, and security elements unique to each denomination, achieving accurate classification through trained neural networks.
Components Required for ESP32 Currency Recognition System
Below are the components which are essential to build the currency recognition system.
Acts as a main microcontroller and camera module. It captures images of Indian currency notes and runs the Edge Impulse
USB to Serial Converter
Used to load the program to the controller
Red, Green, Yellow, Blue-Each 1
Provides the visual indication of the detected currency denomination
Limit the current flowing through the LEDs to prevent damage
Used for connecting everything without soldering and easy testing
Used to interconnect between ESP32-CAM, LEDs, Resistors, and Breadboard
Used to compile and deploy the Code to the module
Used to collect, train and label the datasets
Circuit Diagram of Currency Recognition System:
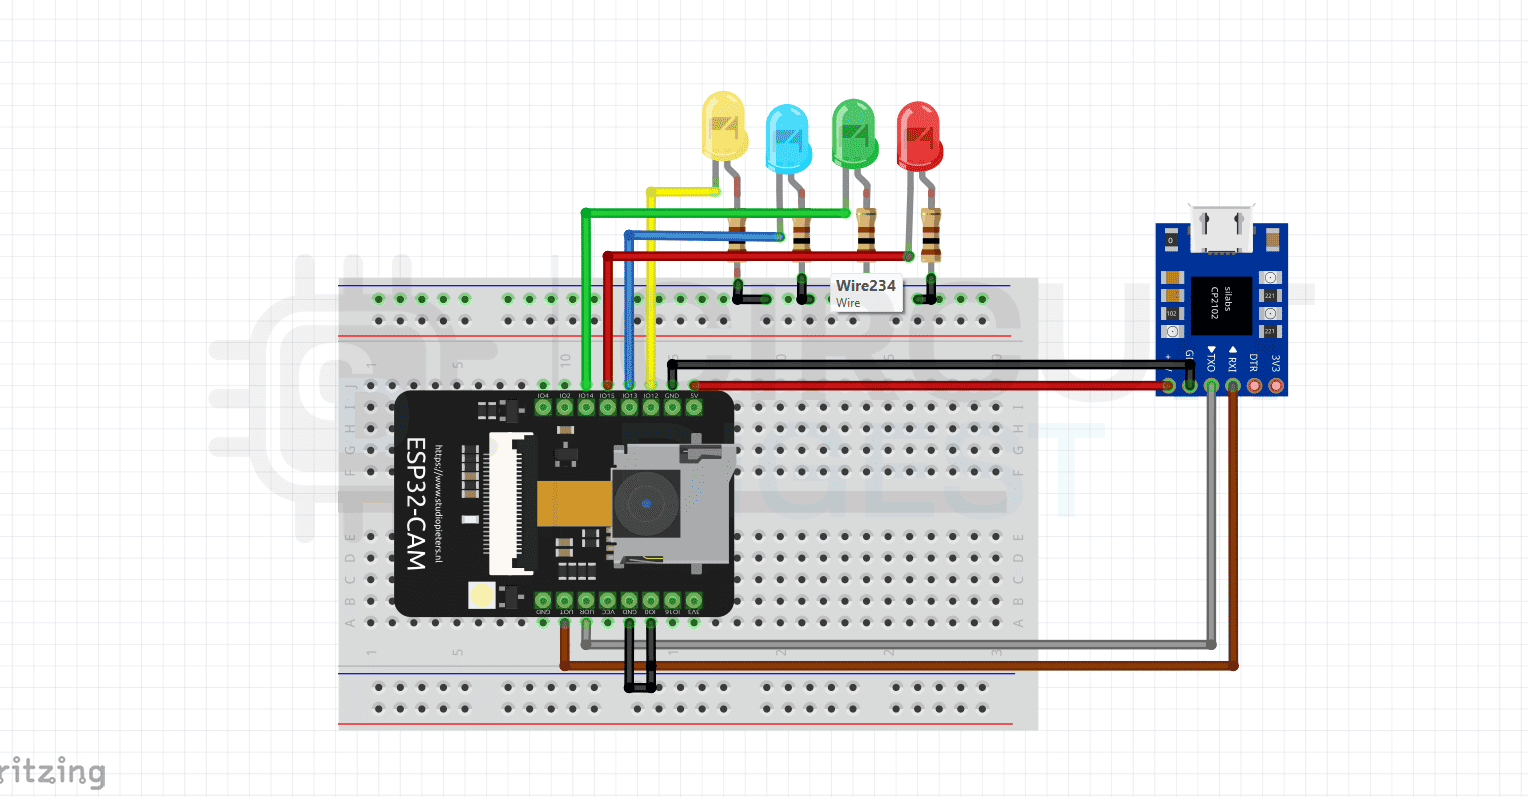
The circuit diagram illustrates the interfacing of the ESP32-CAM module with a USB-to-Serial converter. Since the ESP32-CAM does not have a built-in USB interface, the USB-to-Serial converter provides the necessary TX, RX, 5V, and GND connections to upload the program and monitor data.
Additionally, four LEDs are connected to the GPIO pins of the ESP32-CAM, with each LED representing a different currency denomination. When an ESP32 currency recognition systemspecific denomination is detected or recognized by the ESP32-CAM, the corresponding LED glows to indicate successful identification. Each LED is connected through a resistor (100 Ω) to protect it from excessive current and ensure safe operation.
Hardware Setup of Currency Recognition System
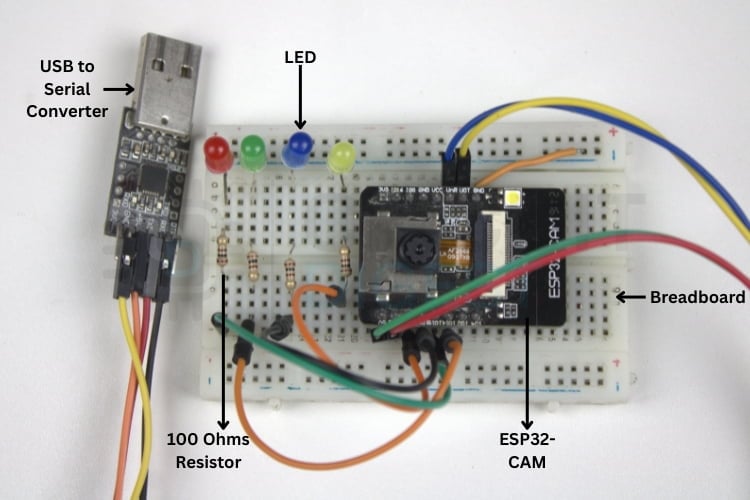
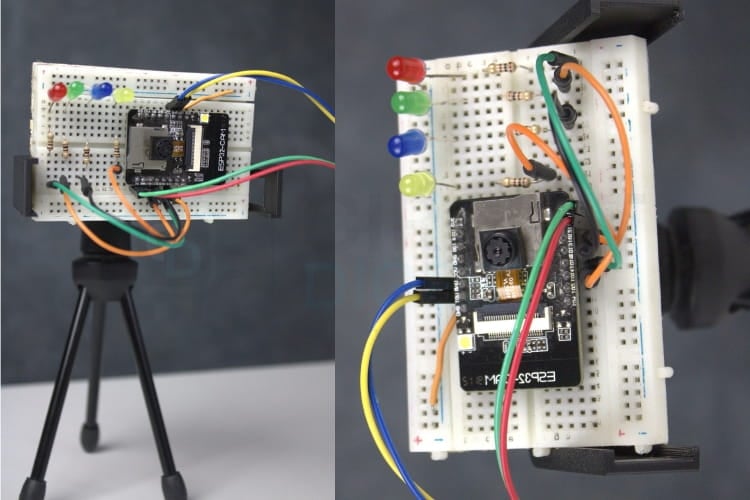
This image shows an ESP32-CAM build setup on a breadboard, where the ESP32-CAM module is connected to a USB-to-Serial converter for programming and communication. Multiple LEDs with current-limiting resistors (100 Ω) are used as status indicators, all interconnected using jumper wires on the breadboard for easy prototyping and testing.
Connect components following these steps for proper ESP32-CAM currency recognition operation:
∗ Connect the FTDI TX to the ESP32-CAM RX pin ∗ Connect the FTDI RX to the ESP32-CAM TX pin ∗ Connect FTDI 5V to ESP32-CAM 5V pin ∗ Connect FTDI GND to ESP32-CAM GND pin ∗ For programming mode: Connect GPIO0 to GND ∗ Connect LED anodes to GPIO pins through 100Ω resistors ∗ Connect all LED cathodes to the common GND
Complete ESP32 Currency Recognition Programming Workflow
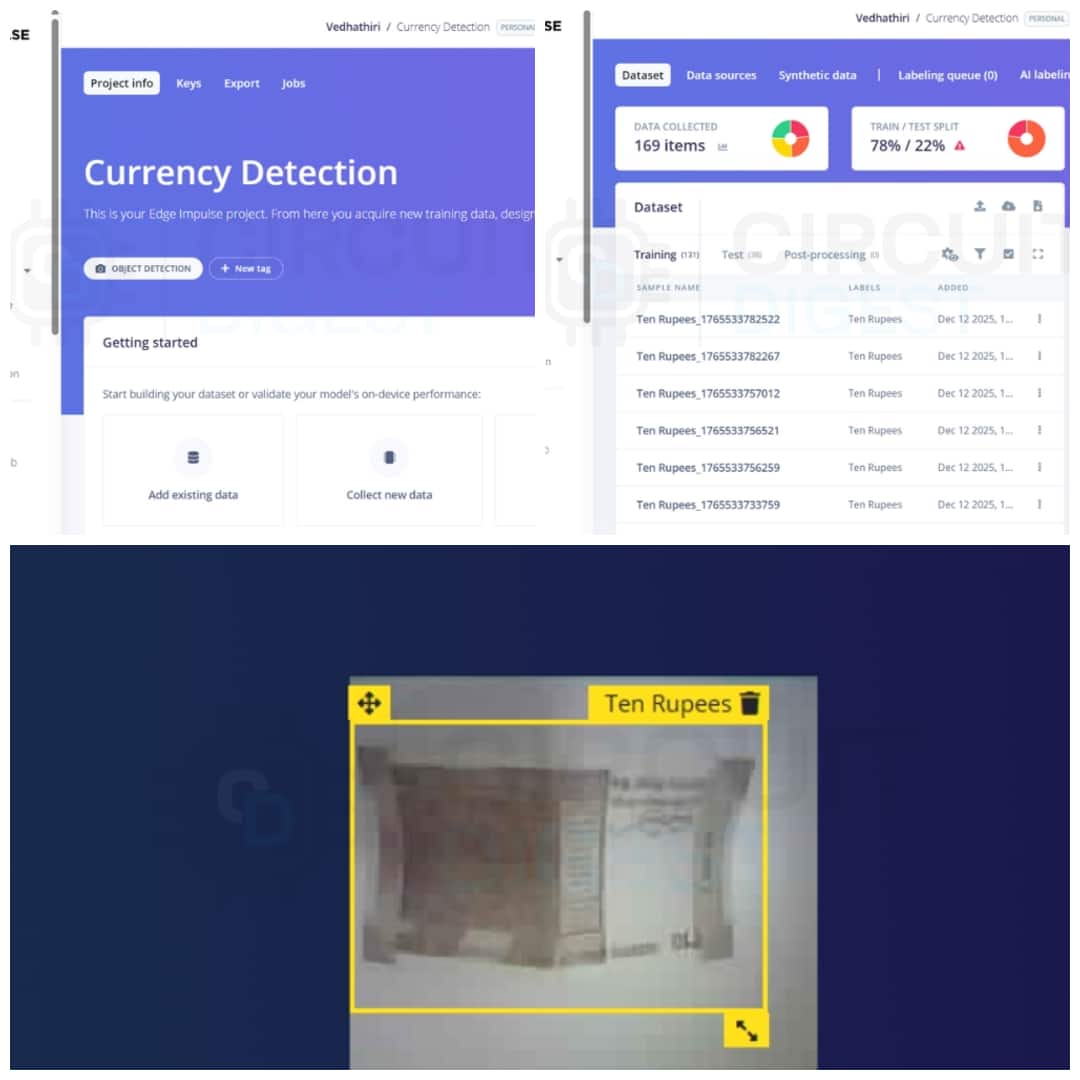
The overall procedure can be divided into three stages: data acquisition, machine learning model development using Edge Impulse, and prototype testing. For data acquisition, images can be collected using any preferred method. Ensure that at least 50 images per object are captured, as a larger dataset generally improves classification accuracy. While images can include different backgrounds, a plain background is recommended for better results. Additionally, selecting an optimal image resolution helps reduce training time. The 256×256 pixels provide a good balance between accuracy and efficiency. Each phase requires careful attention to ensure accurate ESP32-CAM currency recognition performance.
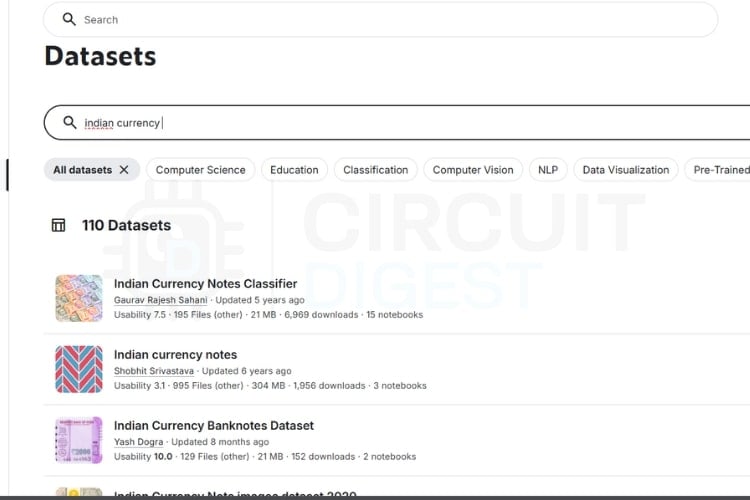
As discussed earlier, you can search for suitable datasets on these platforms and select one that meets your requirements while following the data collection checklist. The image above shows sample search results obtained from Kaggle. Choosing the right dataset may take some time; however, in this project, data will not be collected using this method due to certain limitations. We are going to collect our own image.
Edge Impulse Model Training for ESP32 Currency Recognition
Edge Impulse streamlines the entire machine learning workflow for embedded devices. Follow these steps to train your ESP32-CAM currency recognition model:
If you are just getting started with the ESP32-CAM module, we recommend checking out our guides “How to Program the ESP32-CAM?” and Object Detection using ESP32-CAM and Edge Impulse which together explain the complete workflow in a simple and easy-to-follow manner. You can check out these two to get the full process done. Even though the guidance is already provided, the steps are also listed below for reference.
* Note: To program and make the system work, you need to wire the ESP32 cam in the right way while uploading and after uploading, so check the links to do it perfectly.
Project Setup and Data Upload ⇒ Step 1: Installing the Required Library First, install the EloquentEsp32cam library from the Arduino Library Manager. This library simplifies image capture and data collection using the ESP32-CAM. ⇒ Step 2: Opening the Example Code and Making Required Changes Open the example sketch located at: Examples->EloquentEsp32cam->Collect_Images_for_EdgeImpulse In the code, enter your Wi-Fi hotspot details by modifying the following lines at the beginning of the program: #define WIFI_SSID \"SSID\" #define WIFI_PASS \"PASSWORD\" #define HOSTNAME \"esp32cam\" Replace SSID and PASSWORD with your Wi-Fi credentials. Also, change the line camera.pinout wroom_s3() to camera.pinout.aithinker(). Note that the ESP32-CAM supports only 2.4 GHz Wi-Fi networks. Once the details are updated, the code is ready to be uploaded to the ESP32-CAM. ⇒ Step 3: Accessing the ESP32-CAM Web Server and Capturing Images After a successful boot, open the Serial Monitor at a 115200 baud rate to find the IP address assigned to the ESP32-CAM. Copy this IP address and paste it into a web browser on any device connected to the same Wi-Fi network. This will open the web interface hosted by the ESP32-CAM. Once connected, click “START COLLECTING” to begin capturing images. Additional options such as “Clear” and “Download” will appear. After collecting sufficient images, click “Download”, enter the label name, and a ZIP file containing the captured images will be downloaded. Ensure proper lighting and a clear view of the currency note during image capture. Using a plain, single-colour background, preferably white, will improve data quality. Repeat this process for all required Indian currency denominations. After completing data collection, proceed to the Edge Impulse model training stage.
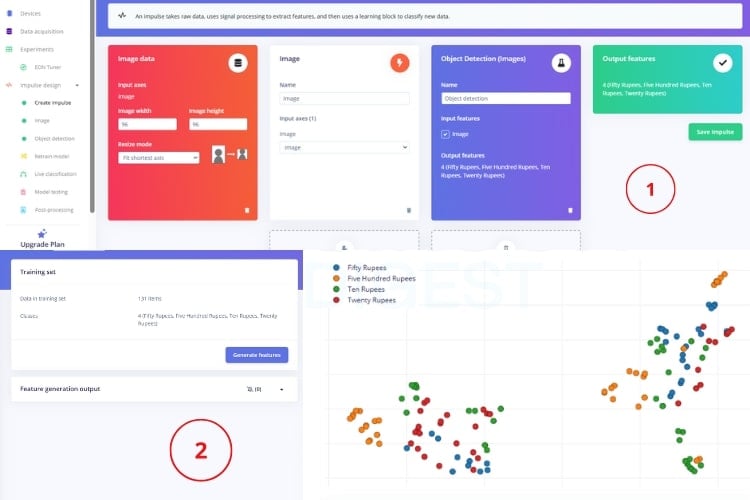
Use Track objects between frames and Label Suggestions (YOLOv5) to reduce manual labelling effort. Go to Create Impulse, set the image size to 96×96, select Image as the processing block, and Object Detection as the learning block, then save the impulse. In the Image processing block, enable Grayscale and generate features. Verify feature separation in the feature explorer to ensure good model accuracy.
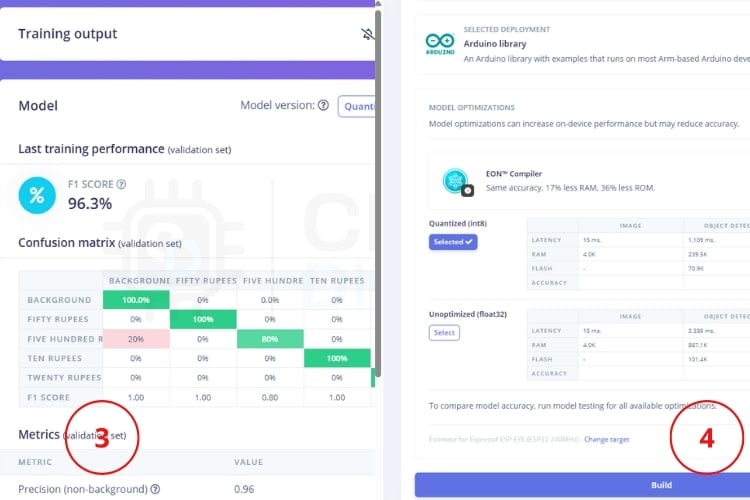
Open the Object Detection tab, configure training cycles and learning rate, and start model training. Evaluate model performance using the F1 score after training completes. Then, navigate to Deployment, choose Arduino Library as the deployment option, select Espressif ESP-EYE (ESP32 240 MHz) as the target, and build the library. Download and install the generated Arduino library to deploy the model on the ESP32-CAM.
ESP32 Currency Recognition Arduino Programming
Deploy the trained model to your ESP32-CAM hardware following these programming steps:
Extract the ZIP file downloaded from Edge Impulse after the build process (for example: ei-indian-currency-identification-arduino-1.0.1.zip). Open the extracted folder and locate the directory named after your project, followed by _inferencing. Copy the inferencing folder and paste it into Documents -> Arduino -> libraries. Restart the Arduino IDE to refresh the installed libraries. After restarting, open the example sketch provided with the installed Edge Impulse library. In the code, comment out the line #define CAMERA_MODEL_ESP_EYE. Uncomment the line #define CAMERA_MODEL_AI_THINKER to match the ESP32-CAM board. Select the correct board and COM port in the Arduino IDE. Upload the code to the ESP32-CAM.
Testing Your ESP32-CAM Currency Recognition System
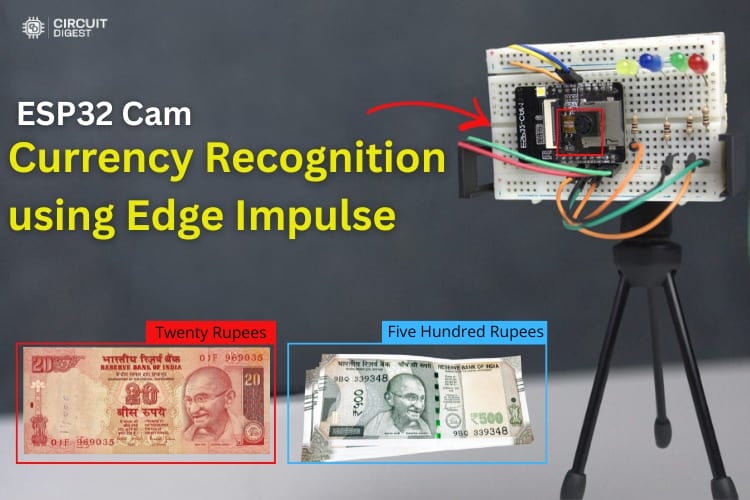
As shown in the picture below, the ESP32-CAM module is mounted on a breadboard and fixed on a small tripod stand for reliable and accurate currency denomination recognition. The camera angle must be fixed and precisely aligned with the currency note. Maintaining a consistent angle ensures that the entire note is captured clearly without shadows or errors.
A perfect, stable angle helps the model correctly recognise key visual features such as patterns, numbers, and text, which directly improves recognition accuracy. Any tilt, rotation, or variation in distance can reduce recognition performance, leading to error. Therefore, fixing the camera at an optimal, well-calibrated angle significantly enhances the accuracy and overall reliability of denomination recognition.
Practical Applications of ESP32 Currency Recognition
Assistive Technology for the Visually Impaired
Assistive Technology for the Visually Impaired
By combining this system with audio output, it can help visually impaired individuals identify Indian currency denominations easily and independently. Even though visually impaired individuals can identify currency notes by touch, the sensitivity and accuracy of tactile recognition are often limited, especially for worn, damaged, or similar-sized notes. This limitation can lead to confusion and errors.
Retail and Point-of-Sale Systems Retail shops can use this system to verify Indian currency during transactions, minimising human errors and speeding up the billing process.
Retail and Point-of-Sale Systems Retail shops can use this system to verify Indian currency during transactions, minimising human errors and speeding up the billing process.
Automated Currency Counters Shops, Banks and financial institutions can use this system to count and classify currency notes automatically, reducing manual effort and saving time.
Automated Currency Counters Shops, Banks and financial institutions can use this system to count and classify currency notes automatically, reducing manual effort and saving time.
Vending Machine This system can be integrated into vending machines to automatically recognise inserted currency notes and validate the denomination, enabling accurate product dispensing without human intervention
Vending Machine This system can be integrated into vending machines to automatically recognise inserted currency notes and validate the denomination, enabling accurate product dispensing without human intervention
Future Enhancements for ESP32 Currency Recognition
This system can be further enhanced in several ways to improve functionality, usability and real-world applicability.
Support for more denominations, like Indian coins and more Indian currency. This can be improved to detect fake currency by training the model with both genuine and fake currency images.
Support for more denominations, like Indian coins and more Indian currency. This can be improved to detect fake currency by training the model with both genuine and fake currency images.
An LCD or OLED display can be added to visually display the detected currency denominations.
An LCD or OLED display can be added to visually display the detected currency denominations.
By integrating a speaker or buzzer with voice playback, this system can announce the detected currency denomination. This feature would greatly benefit the visually impaired persons.
By integrating a speaker or buzzer with voice playback, this system can announce the detected currency denomination. This feature would greatly benefit the visually impaired persons.
Troubleshooting Common ESP32 Currency Recognition Issues
The common issues that may occur while building or running the ESP32-CAM-based Indian Currency Recognition System, along with their possible causes and solutions. Issue 1: ESP32-CAM Code Upload Failure If the ESP32-CAM fails to upload the program, the most common reason is that GPIO0 is not connected to GND during the upload process or the incorrect board and COM port are selected in the Arduino IDE. To resolve this, connect GPIO0 to GND before starting the upload, select the AI Thinker ESP32-CAM board, choose the correct COM port, and press the RESET button when the upload begins.
Issue 2: No Output in Serial Monitor When no data appears in the Serial Monitor, the issue is usually caused by an incorrect baud rate or improper TX and RX connections. Ensure that the Serial Monitor baud rate is set to 115200, verify that TX of the USB-to-Serial converter is connected to RX of the ESP32-CAM and RX to TX, and press the RESET button after opening the Serial Monitor.
Issue 3: ESP32-CAM Not Connecting to Wi-Fi If the ESP32-CAM does not connect to Wi-Fi, it is often due to incorrect network credentials or the use of a 5 GHz Wi-Fi network, which is unsupported. Recheck the SSID and password in the code, confirm that a 2.4 GHz network is used, and keep the device close to the router for stable connectivity.
Issue 4: Web Server Not Opening in Browser When the ESP32-CAM web interface does not load, the problem may be an incorrect IP address or a network mismatch. Check the IP address displayed in the Serial Monitor and ensure that the accessing device is connected to the same Wi-Fi network. Restarting the ESP32-CAM and refreshing the browser can also help.
Issue 5: Camera Not Detected or Black Image A black image or camera detection failure usually indicates an incorrect camera model selection or a loose camera ribbon cable. Make sure that the camera model is defined as CAMERA_MODEL_AI_THINKER in the code and that the camera cable is firmly inserted. Restart the ESP32-CAM after verifying the connection.
Indian Currency Note Recognition using ESP32-CAM & Edge Impulse - Quick Overview
Build Time: 8-14 hours | Cost: $15-28 | Difficulty: Intermediate
What You'll Learn: TinyML / Edge AI, ESP32-CAM camera interfacing, Edge Impulse workflow, Image classification & object detection on microcontroller, Arduino library deployment
Applications: Assistive device for the visually impaired, Fake note detection (future scope), Automated retail/POS currency validation, Vending machine note acceptor, Currency counting system
What is ESP32-CAM Currency Recognition?
└ Hardware Connection Guide
└ Dataset Collection Methods
Edge Impulse Model Training
└ Impulse Design Configuration
└ Model Training and Evaluation
└ Real-World Performance Results
What is ESP32-CAM Currency Recognition?
ESP32-CAM currency recognition utilising Machine Learning to Identify & Classify Indian Rupee Notes in Real-Time embraces the power of the ESP32-CAM as well as Machine Learning (ML) technology and uses an embedded AI Project to perform highly advanced image classification activities using inexpensive microcontrollers that do not require any internet connection or cloud services to operate.
The Edge Impulse Platform (one of the best TinyML Development Platforms) allows for training of a custom object recognition model to specifically recognise Indian Rupee notes. Once deployed, the ESP32 currency recognition programming processes images locally, providing instant visual feedback through LED indicators while displaying results on the Serial Monitor.
Understanding AI on Edge and Object Recognition Technology
What exactly is AI on Edge? In simple terms, AI on Edge, also known as edge computing, means running artificial intelligence algorithms directly on embedded devices such as microcontrollers and microprocessors, instead of sending data to cloud servers for processing. This local processing brings several advantages: lower latency, reduced communication costs, improved data privacy, and faster real-time responses. You might wonder, wasn’t cloud computing supposed to handle all AI tasks? That was true earlier, mainly because cloud platforms were easier to deploy and had powerful resources. However, with today’s advancements in embedded hardware, even compact devices are capable of handling AI workloads efficiently at the device level. One of its most important applications is object recognition, a computer vision technique that allows machines to identify and classify objects in images or video streams. This gives devices the ability to see and interpret visual information much like humans do. You may often hear terms like object detection and image recognition ; they are closely related and commonly used interchangeably in this context. You can also explore our other AI projects to implement more ideas of your own.
For ESP32 currency recognition, this technology analyses visual features like patterns, colours, text, and security elements unique to each denomination, achieving accurate classification through trained neural networks.
Components Required for ESP32 Currency Recognition System
Below are the components which are essential to build the currency recognition system.
Acts as a main microcontroller and camera module. It captures images of Indian currency notes and runs the Edge Impulse
USB to Serial Converter
Used to load the program to the controller
Red, Green, Yellow, Blue-Each 1
Provides the visual indication of the detected currency denomination
Limit the current flowing through the LEDs to prevent damage
Used for connecting everything without soldering and easy testing
Used to interconnect between ESP32-CAM, LEDs, Resistors, and Breadboard
Used to compile and deploy the Code to the module
Used to collect, train and label the datasets
Circuit Diagram of Currency Recognition System:
The circuit diagram illustrates the interfacing of the ESP32-CAM module with a USB-to-Serial converter. Since the ESP32-CAM does not have a built-in USB interface, the USB-to-Serial converter provides the necessary TX, RX, 5V, and GND connections to upload the program and monitor data.
Additionally, four LEDs are connected to the GPIO pins of the ESP32-CAM, with each LED representing a different currency denomination. When an ESP32 currency recognition systemspecific denomination is detected or recognized by the ESP32-CAM, the corresponding LED glows to indicate successful identification. Each LED is connected through a resistor (100 Ω) to protect it from excessive current and ensure safe operation.
Hardware Setup of Currency Recognition System
This image shows an ESP32-CAM build setup on a breadboard, where the ESP32-CAM module is connected to a USB-to-Serial converter for programming and communication. Multiple LEDs with current-limiting resistors (100 Ω) are used as status indicators, all interconnected using jumper wires on the breadboard for easy prototyping and testing.
Connect components following these steps for proper ESP32-CAM currency recognition operation:
∗ Connect the FTDI TX to the ESP32-CAM RX pin ∗ Connect the FTDI RX to the ESP32-CAM TX pin ∗ Connect FTDI 5V to ESP32-CAM 5V pin ∗ Connect FTDI GND to ESP32-CAM GND pin ∗ For programming mode: Connect GPIO0 to GND ∗ Connect LED anodes to GPIO pins through 100Ω resistors ∗ Connect all LED cathodes to the common GND
Complete ESP32 Currency Recognition Programming Workflow
The overall procedure can be divided into three stages: data acquisition, machine learning model development using Edge Impulse, and prototype testing. For data acquisition, images can be collected using any preferred method. Ensure that at least 50 images per object are captured, as a larger dataset generally improves classification accuracy. While images can include different backgrounds, a plain background is recommended for better results. Additionally, selecting an optimal image resolution helps reduce training time. The 256×256 pixels provide a good balance between accuracy and efficiency. Each phase requires careful attention to ensure accurate ESP32-CAM currency recognition performance.
As discussed earlier, you can search for suitable datasets on these platforms and select one that meets your requirements while following the data collection checklist. The image above shows sample search results obtained from Kaggle. Choosing the right dataset may take some time; however, in this project, data will not be collected using this method due to certain limitations. We are going to collect our own image.
Edge Impulse Model Training for ESP32 Currency Recognition
Edge Impulse streamlines the entire machine learning workflow for embedded devices. Follow these steps to train your ESP32-CAM currency recognition model:
If you are just getting started with the ESP32-CAM module, we recommend checking out our guides “How to Program the ESP32-CAM?” and Object Detection using ESP32-CAM and Edge Impulse which together explain the complete workflow in a simple and easy-to-follow manner. You can check out these two to get the full process done. Even though the guidance is already provided, the steps are also listed below for reference.
* Note: To program and make the system work, you need to wire the ESP32 cam in the right way while uploading and after uploading, so check the links to do it perfectly.
Project Setup and Data Upload ⇒ Step 1: Installing the Required Library First, install the EloquentEsp32cam library from the Arduino Library Manager. This library simplifies image capture and data collection using the ESP32-CAM. ⇒ Step 2: Opening the Example Code and Making Required Changes Open the example sketch located at: Examples->EloquentEsp32cam->Collect_Images_for_EdgeImpulse In the code, enter your Wi-Fi hotspot details by modifying the following lines at the beginning of the program: #define WIFI_SSID \"SSID\" #define WIFI_PASS \"PASSWORD\" #define HOSTNAME \"esp32cam\" Replace SSID and PASSWORD with your Wi-Fi credentials. Also, change the line camera.pinout wroom_s3() to camera.pinout.aithinker(). Note that the ESP32-CAM supports only 2.4 GHz Wi-Fi networks. Once the details are updated, the code is ready to be uploaded to the ESP32-CAM. ⇒ Step 3: Accessing the ESP32-CAM Web Server and Capturing Images After a successful boot, open the Serial Monitor at a 115200 baud rate to find the IP address assigned to the ESP32-CAM. Copy this IP address and paste it into a web browser on any device connected to the same Wi-Fi network. This will open the web interface hosted by the ESP32-CAM. Once connected, click “START COLLECTING” to begin capturing images. Additional options such as “Clear” and “Download” will appear. After collecting sufficient images, click “Download”, enter the label name, and a ZIP file containing the captured images will be downloaded. Ensure proper lighting and a clear view of the currency note during image capture. Using a plain, single-colour background, preferably white, will improve data quality. Repeat this process for all required Indian currency denominations. After completing data collection, proceed to the Edge Impulse model training stage.
Use Track objects between frames and Label Suggestions (YOLOv5) to reduce manual labelling effort. Go to Create Impulse, set the image size to 96×96, select Image as the processing block, and Object Detection as the learning block, then save the impulse. In the Image processing block, enable Grayscale and generate features. Verify feature separation in the feature explorer to ensure good model accuracy.
Open the Object Detection tab, configure training cycles and learning rate, and start model training. Evaluate model performance using the F1 score after training completes. Then, navigate to Deployment, choose Arduino Library as the deployment option, select Espressif ESP-EYE (ESP32 240 MHz) as the target, and build the library. Download and install the generated Arduino library to deploy the model on the ESP32-CAM.
ESP32 Currency Recognition Arduino Programming
Deploy the trained model to your ESP32-CAM hardware following these programming steps:
Extract the ZIP file downloaded from Edge Impulse after the build process (for example: ei-indian-currency-identification-arduino-1.0.1.zip). Open the extracted folder and locate the directory named after your project, followed by _inferencing. Copy the inferencing folder and paste it into Documents -> Arduino -> libraries. Restart the Arduino IDE to refresh the installed libraries. After restarting, open the example sketch provided with the installed Edge Impulse library. In the code, comment out the line #define CAMERA_MODEL_ESP_EYE. Uncomment the line #define CAMERA_MODEL_AI_THINKER to match the ESP32-CAM board. Select the correct board and COM port in the Arduino IDE. Upload the code to the ESP32-CAM.
Testing Your ESP32-CAM Currency Recognition System
As shown in the picture below, the ESP32-CAM module is mounted on a breadboard and fixed on a small tripod stand for reliable and accurate currency denomination recognition. The camera angle must be fixed and precisely aligned with the currency note. Maintaining a consistent angle ensures that the entire note is captured clearly without shadows or errors.
A perfect, stable angle helps the model correctly recognise key visual features such as patterns, numbers, and text, which directly improves recognition accuracy. Any tilt, rotation, or variation in distance can reduce recognition performance, leading to error. Therefore, fixing the camera at an optimal, well-calibrated angle significantly enhances the accuracy and overall reliability of denomination recognition.
Practical Applications of ESP32 Currency Recognition
Assistive Technology for the Visually Impaired
Assistive Technology for the Visually Impaired
By combining this system with audio output, it can help visually impaired individuals identify Indian currency denominations easily and independently. Even though visually impaired individuals can identify currency notes by touch, the sensitivity and accuracy of tactile recognition are often limited, especially for worn, damaged, or similar-sized notes. This limitation can lead to confusion and errors.
Retail and Point-of-Sale Systems Retail shops can use this system to verify Indian currency during transactions, minimising human errors and speeding up the billing process.
Retail and Point-of-Sale Systems Retail shops can use this system to verify Indian currency during transactions, minimising human errors and speeding up the billing process.
Automated Currency Counters Shops, Banks and financial institutions can use this system to count and classify currency notes automatically, reducing manual effort and saving time.
Automated Currency Counters Shops, Banks and financial institutions can use this system to count and classify currency notes automatically, reducing manual effort and saving time.
Vending Machine This system can be integrated into vending machines to automatically recognise inserted currency notes and validate the denomination, enabling accurate product dispensing without human intervention
Vending Machine This system can be integrated into vending machines to automatically recognise inserted currency notes and validate the denomination, enabling accurate product dispensing without human intervention
Future Enhancements for ESP32 Currency Recognition
This system can be further enhanced in several ways to improve functionality, usability and real-world applicability.
Support for more denominations, like Indian coins and more Indian currency. This can be improved to detect fake currency by training the model with both genuine and fake currency images.
Support for more denominations, like Indian coins and more Indian currency. This can be improved to detect fake currency by training the model with both genuine and fake currency images.
An LCD or OLED display can be added to visually display the detected currency denominations.
An LCD or OLED display can be added to visually display the detected currency denominations.
By integrating a speaker or buzzer with voice playback, this system can announce the detected currency denomination. This feature would greatly benefit the visually impaired persons.
By integrating a speaker or buzzer with voice playback, this system can announce the detected currency denomination. This feature would greatly benefit the visually impaired persons.
Troubleshooting Common ESP32 Currency Recognition Issues
The common issues that may occur while building or running the ESP32-CAM-based Indian Currency Recognition System, along with their possible causes and solutions. Issue 1: ESP32-CAM Code Upload Failure If the ESP32-CAM fails to upload the program, the most common reason is that GPIO0 is not connected to GND during the upload process or the incorrect board and COM port are selected in the Arduino IDE. To resolve this, connect GPIO0 to GND before starting the upload, select the AI Thinker ESP32-CAM board, choose the correct COM port, and press the RESET button when the upload begins.
Issue 2: No Output in Serial Monitor When no data appears in the Serial Monitor, the issue is usually caused by an incorrect baud rate or improper TX and RX connections. Ensure that the Serial Monitor baud rate is set to 115200, verify that TX of the USB-to-Serial converter is connected to RX of the ESP32-CAM and RX to TX, and press the RESET button after opening the Serial Monitor.
Issue 3: ESP32-CAM Not Connecting to Wi-Fi If the ESP32-CAM does not connect to Wi-Fi, it is often due to incorrect network credentials or the use of a 5 GHz Wi-Fi network, which is unsupported. Recheck the SSID and password in the code, confirm that a 2.4 GHz network is used, and keep the device close to the router for stable connectivity.
Issue 4: Web Server Not Opening in Browser When the ESP32-CAM web interface does not load, the problem may be an incorrect IP address or a network mismatch. Check the IP address displayed in the Serial Monitor and ensure that the accessing device is connected to the same Wi-Fi network. Restarting the ESP32-CAM and refreshing the browser can also help.
Issue 5: Camera Not Detected or Black Image A black image or camera detection failure usually indicates an incorrect camera model selection or a loose camera ribbon cable. Make sure that the camera model is defined as CAMERA_MODEL_AI_THINKER in the code and that the camera cable is firmly inserted. Restart the ESP32-CAM after verifying the connection.
Technologies used
Hardware components
- ESP32
- Arduino
- MPU
- LCD
- OLED
- LED
- Buzzer
- Button
- Module
- Board
- Speaker
- Camera
Software & tools
- Arduino IDE
Project demo video
What you get
- Working project / hardware kit, tested before delivery
- Complete source code with explanation
- Project demo and guidance for your viva
- Project report, PPT and IEEE paper support (on request)
Delivery & Payment
Delivery takes a minimum of two weeks from the date your inquiry is confirmed.
Payment is in two parts:
• 50% advance to start the project
• Remaining 50% before delivery
Note:
• Documentation and PPT are not included by default
• If you need documentation/PPT, it can be arranged for extra time and cost
We'll confirm the exact timeline and cost with you after reviewing your requirements.
Related Embedded projects

Embedded
ESP32 Fingerprint Attendance System with Live Web Dashboard
Build a biometric attendance system using ESP32 with AS608 fingerprint sensor that logs attendance with timestamp to web dashboard and Googl...
View project
Embedded
Mars Rover Robot Replica using ESP32 CAM and Arduino
Build a Mars Rover robot replica using ESP32-CAM and Arduino with a rocker-bogie suspension system, live video streaming, and smartphone app...
View project
Embedded
ESP32 CAN Bus Tutorial Interfacing MCP2515 with ESP32
Learn CAN bus communication with ESP32 and MCP2515 CAN controller to send and receive data in automotive and industrial applications.
View project
Embedded
ESP32 MP3 Music Player with SD Card and I2S Amplifier
Build a standalone ESP32 MP3 music player that reads audio from SD card and outputs high-quality audio via I2S DAC amplifier with web contro...
View project