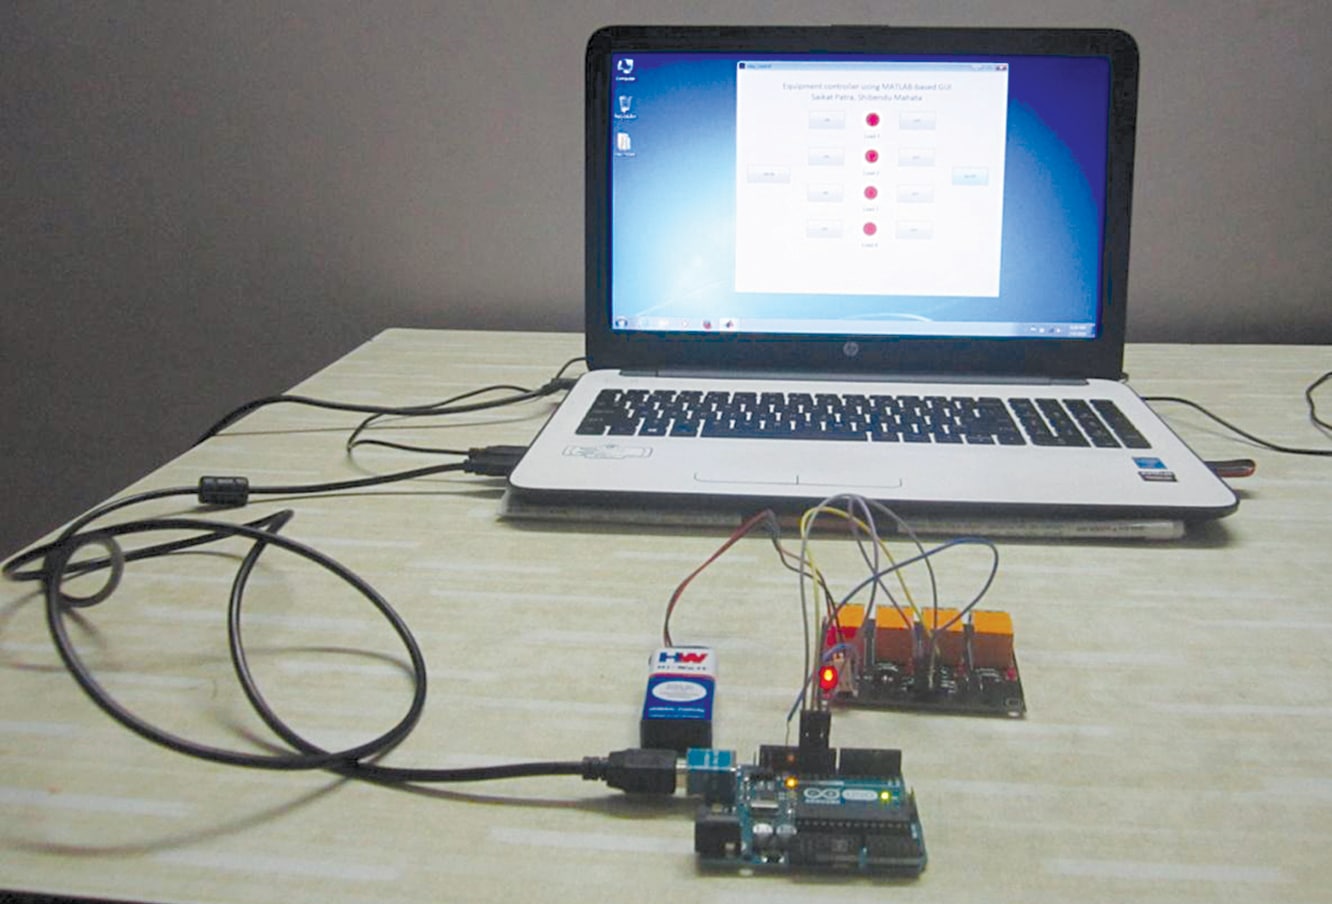
Equipment Controller Using MATLAB-Based GUI
In this project, a MATLAB platform to control up to 4 equipment is presented. A equipment controller is used from remote location for this project.
- Suitable forM.Tech Embedded students
- Build time3-4 weeks
- LevelBeginner
- Available atAjvika Labs, Kakinada
About this project
In this project, a MATLAB platform to control up to four electrical equipment is presented. Controlling electrical equipment from a remote location using a control panel is employed in many applications. An important application is in a process plant where an operator in a control room, sitting in front of a computer terminal and running a human-machine interface (HMI) application program for process monitoring and controlling, can effectively send hard, real-time control commands/signals to multiple actuators present on the field. A graphical user interface (GUI)-based HMI application enhances the user-friendliness of such an approach.
The authors’ prototype and the MATLAB-based GUI front panel are shown in Figs 1 and 2, respectively.
Components used for this project are described below.
Arduino Uno is an AVR ATmega328P microcontroller (MCU)-based development board with six analogue input pins and 14 digital I/O pins. The MCU has 32kB ISP flash memory, 2kB RAM and 1kB EEPROM. The board provides the capability of serial communication via UART, SPI and I2C. The MCU can operate at a clock frequency of 16MHz. In this project, digital I/O pins 9, 10, 11 and 12 of Arduino are configured as output pins.
A relay is an electromechanical switch. Relays used here are of single-pole, double-throw (SPDT) type. In this type of relay, output side has three terminals: normally-open (NO), normally-closed (NC) and common (C).
When the relays are not energised, NC and C terminals are short-circuited, and NO and C terminals are open-circuited. When relay coil is energised, NC and C terminals are open-circuited, and NO and C terminals are short-circuited. The prototype of the relay board is shown in Fig. 3.
Block and circuit diagrams for controlling the relays are shown in Figs 4 and 5, respectively.
In this project, when you click on a particular pushbutton in the GUI, MATLAB program executes a callback function corresponding to that pushbutton in relay_control.m MATLAB program. Within that function, instructions to set/reset digital I/O pins 9, 10, 11 and 12 of Arduino are executed to drive the relay as desired.
When a particular digital I/O pin is set high by clicking on the corresponding pushbutton using a mouse, the corresponding relay is energised. Four BC547 bipolar junction transistors (T1-T4) are additionally used as drivers because digital pins of Arduino cannot directly source sufficient current to energise the relays.
Diodes D1 through D4 are used as protection diodes to prevent the sinking of current into Arduino digital pins. D5 through D8 are fly-back diodes that are used to prevent damage to electronic components due to back electromagnetic force (EMF) produced by inductive action of the coils of the relays.
LED1 shows power-on status of the circuit, whereas LED2 through LED5 are used as indicators to show status of the four relays (RL-RL4). Power to the relay board is provided separately from a +9V battery.
1. Arduino IDE is used for programming Arduino Uno. The latest IDE can be downloaded for free from Arduino’s official website. After downloading Arduino IDE, install it. Note the directory of Arduino IDE installation.
2. Download Legacy MATLAB and Simulink Support for Arduino package from MathWorks website. Extract the compressed folder named ArduinoIO. From ArduinoIO folder, copy pde folder and paste it in C:\Program Files (or Program files x86)\Arduino\libraries. (Path may be different depending on the installation directory of the IDE.)
After pasting pde folder in the correct location, open Arduino IDE. If you have pasted the folder in the correct location, you will find pde in FileExamplespde. Open the code from FileExamplespdeadioes.
3. Connect Arduino Uno board to the PC. From Device Manager, note the COM port at which Arduino Uno is installed. From Tools in Arduino IDE, select the board as Arduino Uno and select the COM port number noted earlier. Upload adioes code to Arduino Uno by clicking Upload in the IDE.
4. Copy the entire contents of the extracted ArduinoIO folder to a folder in My Documents (for Windows PC).
5. Our GUI application program has been developed in R2014a version of MATLAB. After installing this version of MATLAB on the PC, open install_arduino.m file present in the directory where you have copied the contents of ArduinoIO folder. Now, run install_arduino.m file. This code should install correctly and save the path of Arduino support package.
6. Open the source code file for this project, titled relay_control.m. Edit a=arduino (‘COM9’) line with the COM port number in the PC where Arduino Uno has been installed.
After running the project file, MATLAB will try to communicate with the board. After successful communication is established, you will be able to control the equipment by clicking on the appropriate pushbutton in the GUI.
A PCB layout of the equipment controller circuit is shown in Fig. 6 and its components layout in Fig. 7.
After uploading Arduino code into Board1 as explained earlier, run MATLAB GUI program. Connect 9V battery to the circuit. LED1 glows to indicate the presence of power in the circuit. From GUI program, click on On/Off button to switch on/off the corresponding electrical device. The on status of the devices is indicated by the glowing of LED2 through LED5. That is, if On button corresponding to Load1 is clicked, RL1 will get energised and load connected at CON2 will get turned on. If Off button is clicked, RL1 will get de-energised and Load1 will be turned off.
Saikat Patra is passionate about electronics and MCU-based embedded system applications
Shibendu Mahata is an M.Tech (gold medallist) in instrumentation and electronics engineering from Jadavpur University. He has a keen interest in MCU-based real-time embedded signal processing and process control systems
Ajit yadav April 19, 2020 At 4:31 pm Dear sir can we change the state of digital output in arduino means without help of program. Like any input key so that we can chnahe output low or high as per reqiurement Log in to leave a comment
Dear sir can we change the state of digital output in arduino means without help of program. Like any input key so that we can chnahe output low or high as per reqiurement
Rohit April 27, 2020 At 2:08 am sir, this PCB design can be replaced by a relay module or not? Log in to leave a comment
sir, this PCB design can be replaced by a relay module or not?
efylab April 27, 2020 At 2:44 pm Yes, the given PCB is basically the relay driver section and so you can replace it with a 4-channel relay module readily available in the market. Log in to leave a comment
Yes, the given PCB is basically the relay driver section and so you can replace it with a 4-channel relay module readily available in the market.
SHARE YOUR THOUGHTS & COMMENTS Register or Login to leave a comment.
Smart Speed Monitoring System For Road Safety
Real-Time Face Tracking Using Raspberry Pi 4 Versus Raspberry Pi 5 With Hailo-8L
High-Voltage Capacitor Discharger
Real-time Web-based Home Automation
World’s Smallest Open-Source LoRa + GPS Module for Wearables and IoT (Only 3cm!)
Smallest Spy Video Streaming Camera
Wirelessly Control Multiple AC Appliances with Web Interface
Ultra-Low-Loss Isolated Current Sensor
STMicroelectronics has Introduced First Automotive Microcontroller With built-in AI Acceleration
Samsung Launched 200MP Image Sensor Called ISOCELL HP5
Aeva Introduced 4D LiDAR Sensor for Physical AI Systems
Racetrack Shaped Resonators Enhances Light Trapping
AI Chip Uses Light Instead Of Electricity
AI Mini PC Targets Edge Computing Workloads
Battery-Free In-Tire Sensors For Autonomous Vehicles
DIY: Audio Signal–Controlled LED Display Using LM3914
State Reduction In Sequential Circuits
Make Your Own Musical Temperature Alarm
Buck Converter vs Linear Voltage Regulator
Ultra-Compact RGB LED For Space-Constrained Designs
Compact Varistors For High Surge Protection
Gold Plated Reed Relays For High Voltage Systems
28nm Automotive MCU For Zonal E/E Architectures
JOB: Electronics Specialist At ABB In Bengaluru
DSP / Audio Firmware Engineer (Intern) At Chordy.ai In Bengaluru
JOB: System Engineer At General Electric In Chennai
JOB: Analog Layout Engineer At Accenture In Bengaluru
Circuit Design Calculators for Engineers and Students
Broadside Coupled Stripline Impedance Calculator
Technologies used
Hardware components
- Arduino
- Raspberry Pi
- Relay
- MPU
- LED
- Button
- Switch
- Sensor
- Module
- Board
- Capacitor
- Transistor
- Diode
- Battery
- Camera
Software & tools
- Arduino IDE
- MATLAB
- Simulink
- Git
What you get
- Working project / hardware kit, tested before delivery
- Complete source code with explanation
- Project demo and guidance for your viva
- Project report, PPT and IEEE paper support (on request)
Delivery & Payment
Delivery takes a minimum of two weeks from the date your inquiry is confirmed.
Payment is in two parts:
• 50% advance to start the project
• Remaining 50% before delivery
Note:
• Documentation and PPT are not included by default
• If you need documentation/PPT, it can be arranged for extra time and cost
We'll confirm the exact timeline and cost with you after reviewing your requirements.
Related Embedded projects

Embedded
ESP32 Fingerprint Attendance System with Live Web Dashboard
Build a biometric attendance system using ESP32 with AS608 fingerprint sensor that logs attendance with timestamp to web dashboard and Googl...
View project
Embedded
Mars Rover Robot Replica using ESP32 CAM and Arduino
Build a Mars Rover robot replica using ESP32-CAM and Arduino with a rocker-bogie suspension system, live video streaming, and smartphone app...
View project
Embedded
ESP32 CAN Bus Tutorial Interfacing MCP2515 with ESP32
Learn CAN bus communication with ESP32 and MCP2515 CAN controller to send and receive data in automotive and industrial applications.
View project
Embedded
ESP32 MP3 Music Player with SD Card and I2S Amplifier
Build a standalone ESP32 MP3 music player that reads audio from SD card and outputs high-quality audio via I2S DAC amplifier with web contro...
View project