

Build a Smart ESP32 GPS Tracker with SIM800L and NEO6M Module
Build a real-time ESP32 GPS Tracker with SIM800L & NEO-6M Module. Track vehicles, assets via GSM with this complete DIY IoT project featuring code, circuit diagram & testing guide.
- Suitable forB.Tech Embedded students
- Build time3-4 weeks
- LevelBeginner
- Available atAjvika Labs, Kakinada
About this project
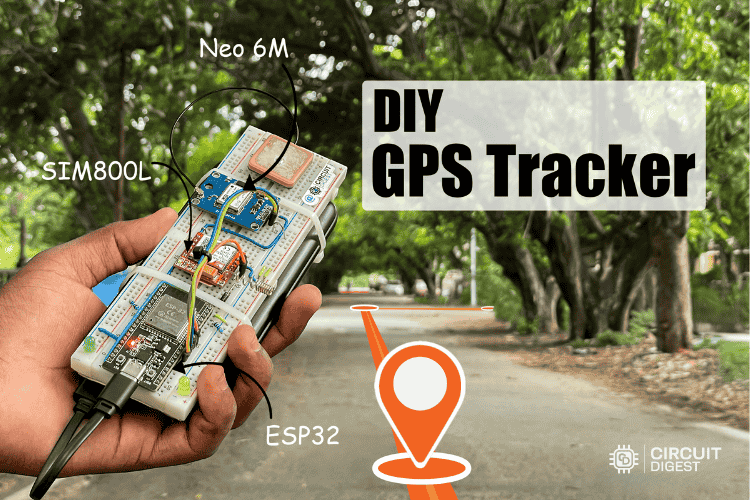
Combining the dual-core processing capabilities of the ESP32 with the reliability of GSM connectivity, the ESP32 GPS tracker with SIM800L is the perfect solution for real-time position tracking. Unlike Wi-Fi-only solutions, this ESP32 GSM GPS system will work anywhere there is cellular coverage, because it does not rely on Wi-Fi. The NEO 6M GPS module with ESP32, in conjunction with the ESP32, will provide reliable and accurate position data via satellites within view of the receiver, while the SIM800L will transmit information in real-time over the mobile data network via GPRS. The result is a powerful and robust GPS module for ESP32 applications. Our complete ESP32 GPS navigation project uses the GeoLinker cloud platform for you to visualise your data reliably and quickly, without having to set up complex servers.
Tracking the geolocation of something in real time might sound complicated, but with a few basic parts and the right tools, it's easier than you think. Today, in this project, we are going to build a compact, easy-to-use ESP32 GPS tracker with our free, stunning Cloud Dashboard.
What makes this ESP32 GPS Tracker with SIM800L and NEO6M Module special is how easily it connects with our custom GeoLinker platform, which handles the location data and displays it on the cloud in real time. Whether you want to track your vehicle, monitor a delivery, or just explore how the GPS works, this project gives you a hands-on way to bring location tracking to life. Feel free to explore our other GPS tracker projects, like an Arduino GPS tracker using SIM800L and Neo-6M, a GPS tracker using ESP32 and a Raspberry Pi Pico GPS tracker.
ESP32 GPS Tracker Overview
Component Comparison Table
GeoLinker Cloud Platform
Circuit Diagram: Wiring SIM800L and NEO-6M
Complete Arduino Code Guide
Testing and Real-World Performance
ESP32 GPS Tracker Overview: How It Works
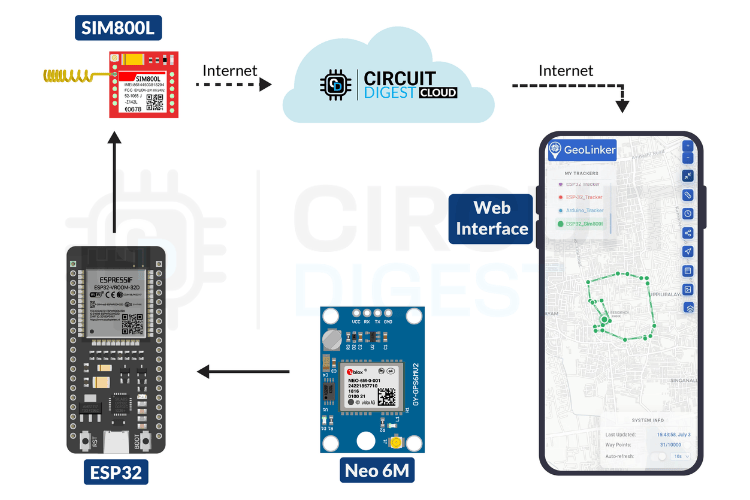
This GPS tracker ESP32 GeoLinker project is straightforward to recreate, both in terms of hardware and software. To build an ESP32 GPS tracker, we need some essential hardware like a GPS or GNSS module to fetch the location data, and a GSM/GPRS, Wi-Fi, or any internet connectivity medium to share our data with GeoLinker.
Finally, you need to know that we are using our latest platform, GeoLinker, for visualising the GPS data. This simplifies the process of handling the data, plotting it on a map, and routing it. As you already know, we are using the ESP32 module as the main processing unit for this ESP32 GPS navigation system.
The reason behind this ESP32 with GSM and GPS project is that Wi-Fi might not be reliable in some remote applications, so now, using the SIM800L solves that problem.
Required Components for ESP32 GPS Tracker with SIM800L and NEO-6M
This ESP32 GPS tracker project requires only a few basic components, but you can add sensors or extra modules to meet your specific requirements. Still, to keep things simple, we will focus on the GPS and internet connectivity parts.
ESP32 Development Board – 1 (Main Processing Unit)
SIM800L Module – 1 (For GPRS Connectivity)
Neo6M GPS Module – 1 (Standalone GPS Module for Getting Current Location Data)
LED 5mm – 2 (For Status Indication)
Resistor 470Ω – 2 (For Current Limiting for LEDs)
Breadboard – 1 (For Connecting All Components)
Connecting Wires – Required Quantity
There is no specific reason for selecting each of the above components. It’s simply because they are commonly used, inexpensive, and also supported by the GPS tracker ESP32 GeoLinker library.
ESP32 GPS Tracker Component Comparison Table
ESP32 Development Board
ESP32 Development Board
Main processing unit & Wi-Fi
Main processing unit & Wi-Fi
GPRS cellular connectivity
GPRS cellular connectivity
Satellite location tracking
Satellite location tracking
Setting Up GeoLinker Cloud Platform for GPS Tracking
Like most CircuitDigest Cloud APIs, GeoLinker also requires an API key for authorisation. Follow the steps below to receive your free API key for your ESP32 GPS navigation project.
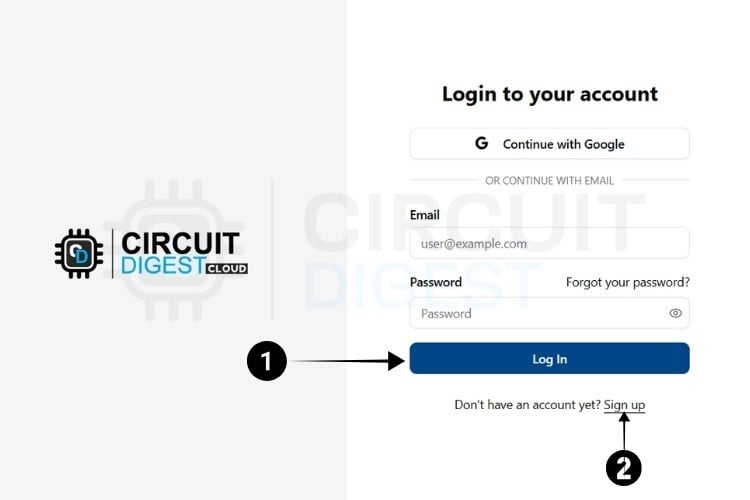
Visit Circuit Digest. Cloud and in the top right corner, click Sign in.
If you are new to CircuitDigest Cloud, you need to register a new account by following the steps below.
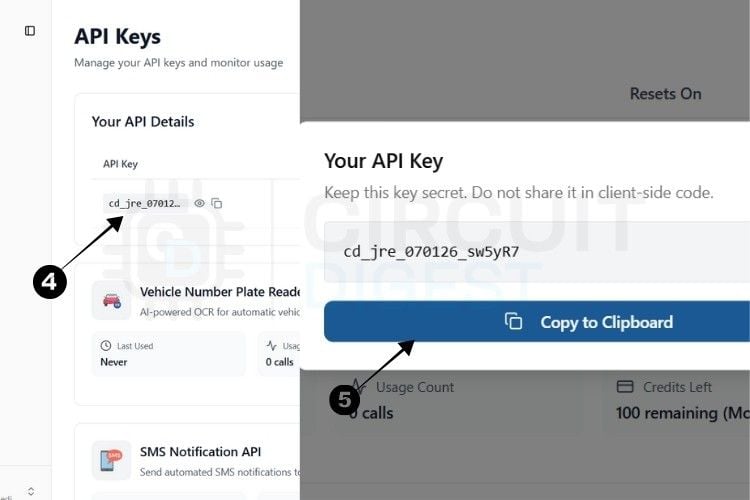
The next step is to generate the API Key.
⇒ Step 4: You will be directed to a page where you can generate your API Key.
⇒ Step 5: By pressing the copy icon near the API Key, your key gets instantly copied to the clipboard.
Currently, there is a usage limit of 100 requests per API key for both the SMS and ANPR APIs and 10,000 data points for GPS tracking. Once you reach this limit, you can generate another key, which provides an additional 100 uses.
This usage limit is in place to prevent server overload.
With this, we are ready to move to hardware.
With this, we are ready to move to hardware for our ESP32 GPS Tracker with SIM800L.
* Note : A 10-second rate limit applies to all API calls, allowing one request every 10 seconds.
ESP32 GPS Tracker Circuit Diagram: Wiring SIM800L and NEO-6M
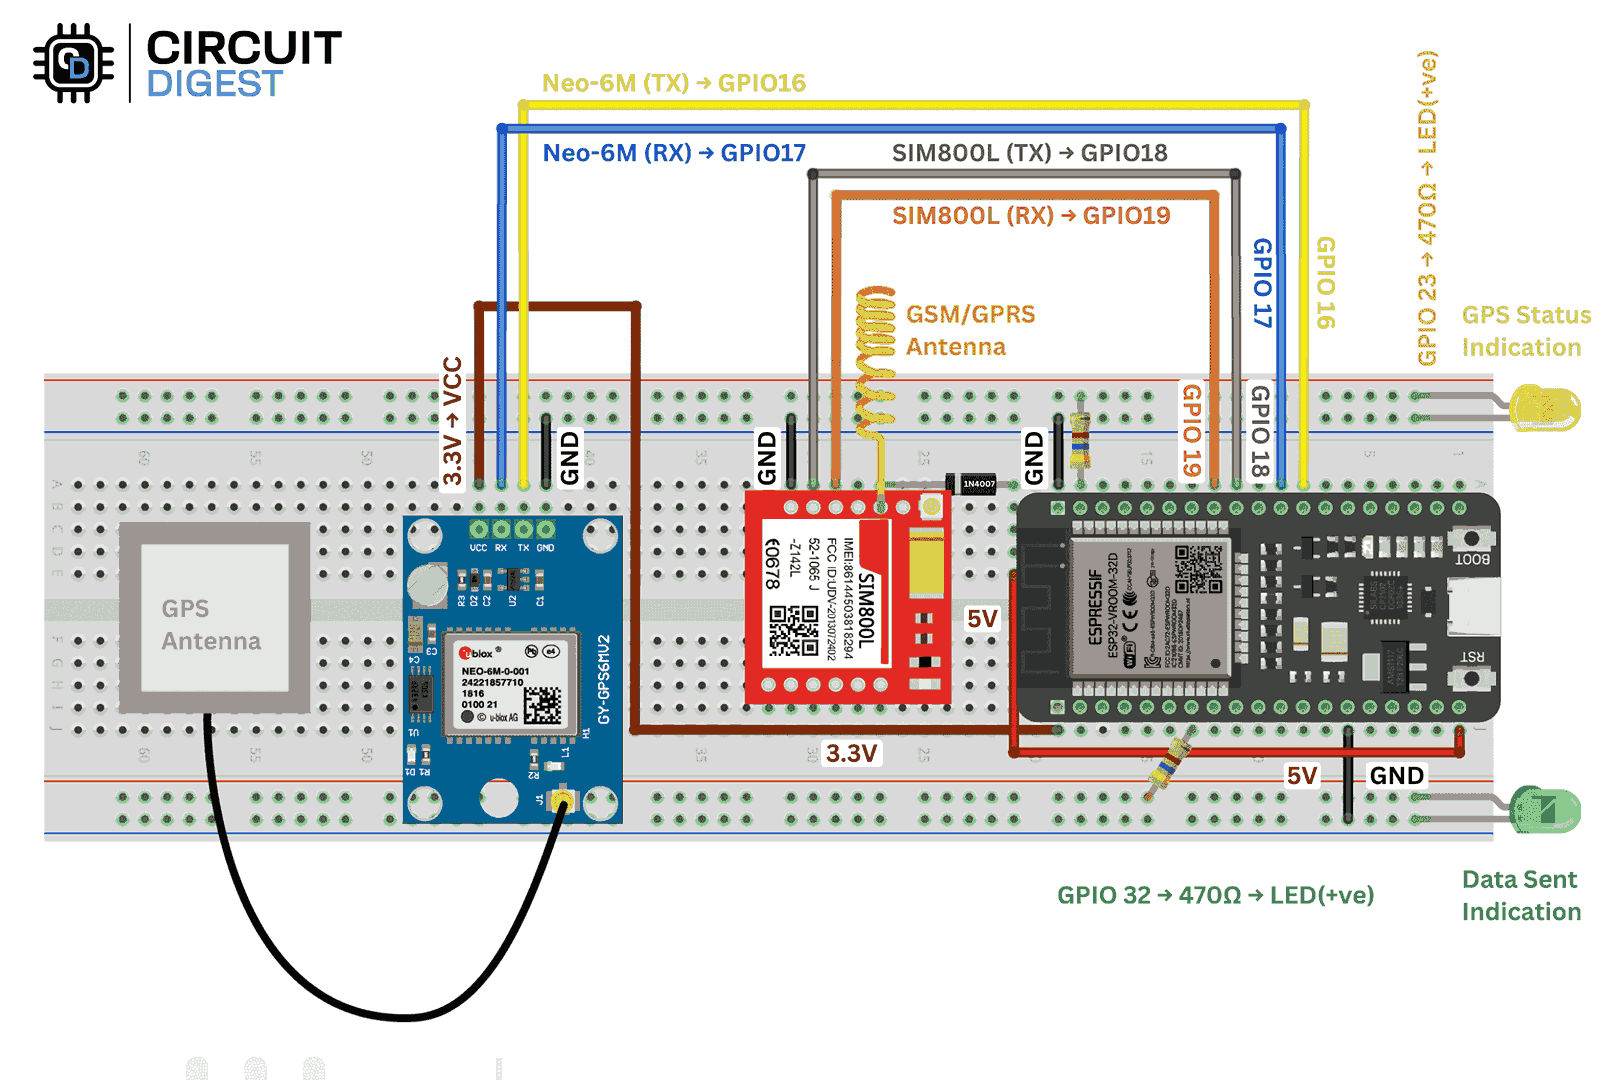
The circuit diagram for the ESP32 GPS tracker with SIM800L project might look a little complex, but believe me, it's so simple to understand and easy to replicate.
Let's start with the ESP32, which is the main microcontroller used here. I selected a breadboard-friendly development board for this project. The next two main components are the GSM and GPS modules.
Here, the SIM800L was used for ESP32 with GSM and GPS setup. With this, we get GPRS, and using that, we can implement the TCP/IP protocol. Powering it might be a little tricky, as its optimal operating voltage is around 3.7 to 4.2V. So, using a separate Lithium-Ion or LiPo battery works great. But a quick and simple way is to use a diode that drops around 0.7V when forward-biased, providing about 4.3V to the SIM800L. It still works without any issue. However, the most recommended method is to use a separate buck converter, LDO, or battery.
Now, the communication is established using one of the hardware UARTs in the ESP32 (TX → GPIO18, RX → GPIO19).
The GPS module used here was the Neo6M GPS module with ESP32, which is a simple and cost-efficient module. This module communicates with the ESP32 via one of its hardware serial ports (TX → GPIO16, RX → GPIO17). It is powered via the 3.3V supply pin from the ESP32 development board. In my case, it works well with 3.3V. If this doesn’t work for you, you can power it with 5V as well. But remember to shift the voltage level in the communication lines (TX and RX), or else it may cause potential damage to the GPIO.
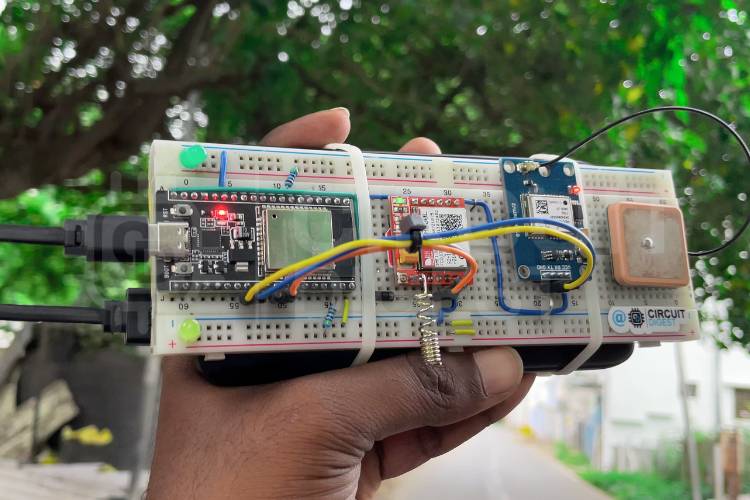
Lastly, there are two LEDs for status indication. The yellow LED, connected to GPIO23, indicates GPS status. The green LED, connected to GPIO32, indicates data sent status. With this, the circuit connections are complete. Below, you can see the fully assembled image of this project.
Important: While assembling the components, carefully check for proper connections between the components and the breadboard, as improper wiring might cause unidentified issues.
Next, we can move on to the coding part for the ESP32 with GSM and GPS implementation.
Programming ESP32 GPS Tracker: Complete Arduino Code Guide
The coding part is simple and straightforward for this project. There’s not much to work out.
Thanks to our newly launched GeoLinker Official Arduino Library, coding is made easy with all the required features. So let’s begin the explanation.
1. Libraries and Dependencies
Purpose: Primary library for GPS tracking, data handling, and cloud communication. Core Functions:
Parses NMEA data from the GPS module.
Manages GSM/GPRS communication via SIM800L.
Handles cloud uploads to the GeoLinker dashboard.
Buffers data when offline and syncs when back online.
Handles auto-reconnect, time offsets, and debug output.
2. Neo 6M GPS module with ESP32 Configuration
A second hardware serial (UART1) is configured to talk with the Neo 6M GPS module with ESP32.
GPIO16 (RX) receives data from GPS, and GPIO17 (TX) sends (though TX is often unused).
The standard GPS baud rate is 9600, perfect for continuous data like NMEA sentences.
3. GSM Module Configuration
The third hardware serial (UART2) connects the SIM800L GSM module.
RX/TX pins are assigned as GPIO18 and GPIO19, respectively.
Optional power/reset pins are declared but set to -1 since not used here.
4. Cellular Network Configuration
These credentials allow your GSM module to access the internet via mobile data.
Most SIM cards work without a username/password, hence nullptr is used.
5. GeoLinker Cloud Configuration
Your API Key links the device to your GeoLinker account.
Device ID helps you track this specific unit on the dashboard.
Data Transmission and Buffer Settings:
Sends location every 30 seconds.
If the network drops, it stores up to 20 records offline.
Tracking the geolocation of something in real time might sound complicated, but with a few basic parts and the right tools, it's easier than you think. Today, in this project, we are going to build a compact, easy-to-use ESP32 GPS tracker with our free, stunning Cloud Dashboard.
What makes this ESP32 GPS Tracker with SIM800L and NEO6M Module special is how easily it connects with our custom GeoLinker platform, which handles the location data and displays it on the cloud in real time. Whether you want to track your vehicle, monitor a delivery, or just explore how the GPS works, this project gives you a hands-on way to bring location tracking to life. Feel free to explore our other GPS tracker projects, like an Arduino GPS tracker using SIM800L and Neo-6M, a GPS tracker using ESP32 and a Raspberry Pi Pico GPS tracker.
ESP32 GPS Tracker Overview
Component Comparison Table
GeoLinker Cloud Platform
Circuit Diagram: Wiring SIM800L and NEO-6M
Complete Arduino Code Guide
Testing and Real-World Performance
ESP32 GPS Tracker Overview: How It Works
This GPS tracker ESP32 GeoLinker project is straightforward to recreate, both in terms of hardware and software. To build an ESP32 GPS tracker, we need some essential hardware like a GPS or GNSS module to fetch the location data, and a GSM/GPRS, Wi-Fi, or any internet connectivity medium to share our data with GeoLinker.
Finally, you need to know that we are using our latest platform, GeoLinker, for visualising the GPS data. This simplifies the process of handling the data, plotting it on a map, and routing it. As you already know, we are using the ESP32 module as the main processing unit for this ESP32 GPS navigation system.
The reason behind this ESP32 with GSM and GPS project is that Wi-Fi might not be reliable in some remote applications, so now, using the SIM800L solves that problem.
Required Components for ESP32 GPS Tracker with SIM800L and NEO-6M
This ESP32 GPS tracker project requires only a few basic components, but you can add sensors or extra modules to meet your specific requirements. Still, to keep things simple, we will focus on the GPS and internet connectivity parts.
ESP32 Development Board – 1 (Main Processing Unit)
SIM800L Module – 1 (For GPRS Connectivity)
Neo6M GPS Module – 1 (Standalone GPS Module for Getting Current Location Data)
LED 5mm – 2 (For Status Indication)
Resistor 470Ω – 2 (For Current Limiting for LEDs)
Breadboard – 1 (For Connecting All Components)
Connecting Wires – Required Quantity
There is no specific reason for selecting each of the above components. It’s simply because they are commonly used, inexpensive, and also supported by the GPS tracker ESP32 GeoLinker library.
ESP32 GPS Tracker Component Comparison Table
ESP32 Development Board
ESP32 Development Board
Main processing unit & Wi-Fi
Main processing unit & Wi-Fi
GPRS cellular connectivity
GPRS cellular connectivity
Satellite location tracking
Satellite location tracking
Setting Up GeoLinker Cloud Platform for GPS Tracking
Like most CircuitDigest Cloud APIs, GeoLinker also requires an API key for authorisation. Follow the steps below to receive your free API key for your ESP32 GPS navigation project.
Visit Circuit Digest. Cloud and in the top right corner, click Sign in.
If you are new to CircuitDigest Cloud, you need to register a new account by following the steps below.
The next step is to generate the API Key.
⇒ Step 4: You will be directed to a page where you can generate your API Key.
⇒ Step 5: By pressing the copy icon near the API Key, your key gets instantly copied to the clipboard.
Currently, there is a usage limit of 100 requests per API key for both the SMS and ANPR APIs and 10,000 data points for GPS tracking. Once you reach this limit, you can generate another key, which provides an additional 100 uses.
This usage limit is in place to prevent server overload.
With this, we are ready to move to hardware.
With this, we are ready to move to hardware for our ESP32 GPS Tracker with SIM800L.
* Note : A 10-second rate limit applies to all API calls, allowing one request every 10 seconds.
ESP32 GPS Tracker Circuit Diagram: Wiring SIM800L and NEO-6M
The circuit diagram for the ESP32 GPS tracker with SIM800L project might look a little complex, but believe me, it's so simple to understand and easy to replicate.
Let's start with the ESP32, which is the main microcontroller used here. I selected a breadboard-friendly development board for this project. The next two main components are the GSM and GPS modules.
Here, the SIM800L was used for ESP32 with GSM and GPS setup. With this, we get GPRS, and using that, we can implement the TCP/IP protocol. Powering it might be a little tricky, as its optimal operating voltage is around 3.7 to 4.2V. So, using a separate Lithium-Ion or LiPo battery works great. But a quick and simple way is to use a diode that drops around 0.7V when forward-biased, providing about 4.3V to the SIM800L. It still works without any issue. However, the most recommended method is to use a separate buck converter, LDO, or battery.
Now, the communication is established using one of the hardware UARTs in the ESP32 (TX → GPIO18, RX → GPIO19).
The GPS module used here was the Neo6M GPS module with ESP32, which is a simple and cost-efficient module. This module communicates with the ESP32 via one of its hardware serial ports (TX → GPIO16, RX → GPIO17). It is powered via the 3.3V supply pin from the ESP32 development board. In my case, it works well with 3.3V. If this doesn’t work for you, you can power it with 5V as well. But remember to shift the voltage level in the communication lines (TX and RX), or else it may cause potential damage to the GPIO.
Lastly, there are two LEDs for status indication. The yellow LED, connected to GPIO23, indicates GPS status. The green LED, connected to GPIO32, indicates data sent status. With this, the circuit connections are complete. Below, you can see the fully assembled image of this project.
Important: While assembling the components, carefully check for proper connections between the components and the breadboard, as improper wiring might cause unidentified issues.
Next, we can move on to the coding part for the ESP32 with GSM and GPS implementation.
Programming ESP32 GPS Tracker: Complete Arduino Code Guide
The coding part is simple and straightforward for this project. There’s not much to work out.
Thanks to our newly launched GeoLinker Official Arduino Library, coding is made easy with all the required features. So let’s begin the explanation.
1. Libraries and Dependencies
Purpose: Primary library for GPS tracking, data handling, and cloud communication. Core Functions:
Parses NMEA data from the GPS module.
Manages GSM/GPRS communication via SIM800L.
Handles cloud uploads to the GeoLinker dashboard.
Buffers data when offline and syncs when back online.
Handles auto-reconnect, time offsets, and debug output.
2. Neo 6M GPS module with ESP32 Configuration
A second hardware serial (UART1) is configured to talk with the Neo 6M GPS module with ESP32.
GPIO16 (RX) receives data from GPS, and GPIO17 (TX) sends (though TX is often unused).
The standard GPS baud rate is 9600, perfect for continuous data like NMEA sentences.
3. GSM Module Configuration
The third hardware serial (UART2) connects the SIM800L GSM module.
RX/TX pins are assigned as GPIO18 and GPIO19, respectively.
Optional power/reset pins are declared but set to -1 since not used here.
4. Cellular Network Configuration
These credentials allow your GSM module to access the internet via mobile data.
Most SIM cards work without a username/password, hence nullptr is used.
5. GeoLinker Cloud Configuration
Your API Key links the device to your GeoLinker account.
Device ID helps you track this specific unit on the dashboard.
Data Transmission and Buffer Settings:
Sends location every 30 seconds.
If the network drops, it stores up to 20 records offline.
Technologies used
Hardware components
- ESP32 Development Board– 1 (Main Processing Unit)
- SIM800L Module– 1 (For GPRS Connectivity)
- Neo6M GPS Module– 1 (Standalone GPS Module for Getting Current Location Data)
- LED 5mm– 2 (For Status Indication)
- Resistor 470Ω– 2 (For Current Limiting for LEDs)
- Breadboard– 1 (For Connecting All Components)
- Connecting Wires– Required Quantity
What you get
- Working project / hardware kit, tested before delivery
- Complete source code with explanation
- Project demo and guidance for your viva
- Project report, PPT and IEEE paper support (on request)
Delivery & Payment
Delivery takes a minimum of two weeks from the date your inquiry is confirmed.
Payment is in two parts:
• 50% advance to start the project
• Remaining 50% before delivery
Note:
• Documentation and PPT are not included by default
• If you need documentation/PPT, it can be arranged for extra time and cost
We'll confirm the exact timeline and cost with you after reviewing your requirements.
Related Embedded projects

Embedded
ESP32 Fingerprint Attendance System with Live Web Dashboard
Build a biometric attendance system using ESP32 with AS608 fingerprint sensor that logs attendance with timestamp to web dashboard and Googl...
View project
Embedded
Mars Rover Robot Replica using ESP32 CAM and Arduino
Build a Mars Rover robot replica using ESP32-CAM and Arduino with a rocker-bogie suspension system, live video streaming, and smartphone app...
View project
Embedded
ESP32 CAN Bus Tutorial Interfacing MCP2515 with ESP32
Learn CAN bus communication with ESP32 and MCP2515 CAN controller to send and receive data in automotive and industrial applications.
View project
Embedded
ESP32 MP3 Music Player with SD Card and I2S Amplifier
Build a standalone ESP32 MP3 music player that reads audio from SD card and outputs high-quality audio via I2S DAC amplifier with web contro...
View project