Biometric Electronic Voting System with Real-Time Authentication and Keypad
This project presents a secure, low-cost electronic voting system using Arduino Uno, an R305 fingerprint sensor, a keypad-based button interface, and an LCD
- Suitable forB.Tech Embedded students
- Build time3-4 weeks
- LevelIntermediate
- Available atAjvika Labs, Kakinada
About this project
This project presents a secure, low-cost electronic voting system using Arduino Uno, an R305 fingerprint sensor, a keypad-based button interface, and an LCD display. Voters authenticate via fingerprint and can vote only once by selecting a candidate using dedicated push buttons, with a buzzer confirming successful vote registration. Vote counts remain hidden until the authorised administrator authenticates to reveal results. The system prevents duplicate voting, enhances transparency, and is suitable for institutions, campuses, housing societies, and small-scale elections, with scalability possible by upgrading the controller hardware.
A secure electronic voting system with real-time authentication and keypad enables accurate, tamper-proof voting through identity verification and controlled access. Voters authenticate using unique credentials before casting votes through a keypad interface. The system enhances transparency, prevents duplication or fraud, and records votes securely, making the electoral process faster, more reliable, and suitable for modern democratic environments.
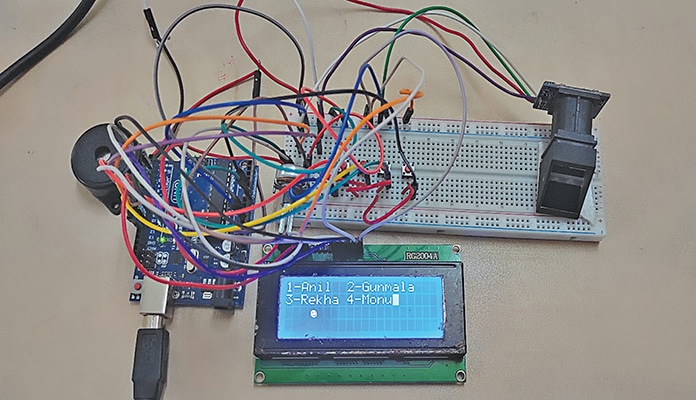
The system offers a secure, efficient, and practical biometric voting approach by combining fingerprint authentication with keypad-based candidate selection. The prototype is shown in Fig. 1, and the components used are listed in the Bill of Materials table.
Electronic Voting System Circuit and Working
Fig. 2 shows the circuit diagram of the electronic voting system. It employs an Arduino Uno, an R305 fingerprint sensor, a 20×4 LCD display, four push buttons, and a buzzer to support a tamper-proof and user-friendly voting process. Each of the 14 authorised users (10 voters and 4 candidates) is pre-registered and permitted to vote only once.
(EFY note: A 20×4 LCD with a 4/8-bit interface has been used in this system. It may be replaced with a 16×2 I2C LCD to reduce wiring. In such a case, the code must be adjusted accordingly. The system has also been tested with an I2C display and found to work reliably.)
After successful fingerprint authentication, the system displays the voter’s name on the LCD and prompts the selection of one of four candidates: Anil, Gunmala, Rekha, or Monu. A buzzer confirms that the vote has been recorded. The vote count remains concealed until the authorised administrator (Rakesh Jain) authenticates via fingerprint, after which the final tally is displayed.
Pressing the Arduino reset button clears previous data and reinitialises the system. This prevents duplicate voting and supports transparency, making the system suitable for institutional voting, small-scale elections, and pilot e-governance implementations. Its simplicity and low hardware requirements contribute to practicality and ease of deployment.
The system operates through three main processes: Fingerprint enrolment, fingerprint deletion, and the main voting process. User fingerprints are added using the fingerprint enrolment sketch software. When removal is required, the fingerprint deletion sketch erases stored fingerprint templates.
The main voting program manages the voting sequence. The system includes one administrator (Rakesh Jain), four candidates (Anil, Gunmala, Rekha, and Monu), and ten registered voters (Niket, Garima, Sonu, Neetu, Tinu, Vikas, Chintu, Sarita, Harita, and Deepak). Each voter is permitted to vote once, and the administrator does not participate in voting.
After authentication, the LCD displays:
The voter selects a candidate using one of four push buttons connected to pins 8, 9, A0, and A1. The buzzer connected to pin 12 sounds briefly to confirm recording. The system tracks fingerprint IDs to ensure that no user votes more than once.
When all votes have been cast, the administrator authenticates to view the final results.
Biometric Electronic Voting Machine: Working Steps
Oops! This is an EFY++ article, which means it's our Premium Content. You need to be a Registered User of our website to read its complete content.
Already a registered member? If YES, then simply login to you account below. (TIP: Use 'forgot password' feature and reset and save your new password in your browser, if you forgot the last one!)
SHARE YOUR THOUGHTS & COMMENTS Register or Login to leave a comment.
Smart Speed Monitoring System For Road Safety
Real-Time Face Tracking Using Raspberry Pi 4 Versus Raspberry Pi 5 With Hailo-8L
High-Voltage Capacitor Discharger
Real-time Web-based Home Automation
World’s Smallest Open-Source LoRa + GPS Module for Wearables and IoT (Only 3cm!)
Smallest Spy Video Streaming Camera
Wirelessly Control Multiple AC Appliances with Web Interface
Ultra-Low-Loss Isolated Current Sensor
STMicroelectronics has Introduced First Automotive Microcontroller With built-in AI Acceleration
Samsung Launched 200MP Image Sensor Called ISOCELL HP5
Aeva Introduced 4D LiDAR Sensor for Physical AI Systems
Blockchain Black Box For Drones
Integrated EV Drive For Higher Power Density
Hybrid Cooling System Targets Power Efficiency
Electric Field Tunes Heat Transport In Solids
DIY: Audio Signal–Controlled LED Display Using LM3914
State Reduction In Sequential Circuits
Make Your Own Musical Temperature Alarm
Buck Converter vs Linear Voltage Regulator
Ultra-Compact RGB LED For Space-Constrained Designs
Compact Varistors For High Surge Protection
Gold Plated Reed Relays For High Voltage Systems
28nm Automotive MCU For Zonal E/E Architectures
DSP / Audio Firmware Engineer (Intern) At Chordy.ai In Bengaluru
JOB: System Engineer At General Electric In Chennai
JOB: Analog Layout Engineer At Accenture In Bengaluru
JOB: HVDC HMI Engineer At Quest Global In Bengaluru
Circuit Design Calculators for Engineers and Students
Broadside Coupled Stripline Impedance Calculator
Edge Coupled Stripline Impedance Calculator
Asymmetric Stripline Impedance Calculator
A secure electronic voting system with real-time authentication and keypad enables accurate, tamper-proof voting through identity verification and controlled access. Voters authenticate using unique credentials before casting votes through a keypad interface. The system enhances transparency, prevents duplication or fraud, and records votes securely, making the electoral process faster, more reliable, and suitable for modern democratic environments.
The system offers a secure, efficient, and practical biometric voting approach by combining fingerprint authentication with keypad-based candidate selection. The prototype is shown in Fig. 1, and the components used are listed in the Bill of Materials table.
Electronic Voting System Circuit and Working
Fig. 2 shows the circuit diagram of the electronic voting system. It employs an Arduino Uno, an R305 fingerprint sensor, a 20×4 LCD display, four push buttons, and a buzzer to support a tamper-proof and user-friendly voting process. Each of the 14 authorised users (10 voters and 4 candidates) is pre-registered and permitted to vote only once.
(EFY note: A 20×4 LCD with a 4/8-bit interface has been used in this system. It may be replaced with a 16×2 I2C LCD to reduce wiring. In such a case, the code must be adjusted accordingly. The system has also been tested with an I2C display and found to work reliably.)
After successful fingerprint authentication, the system displays the voter’s name on the LCD and prompts the selection of one of four candidates: Anil, Gunmala, Rekha, or Monu. A buzzer confirms that the vote has been recorded. The vote count remains concealed until the authorised administrator (Rakesh Jain) authenticates via fingerprint, after which the final tally is displayed.
Pressing the Arduino reset button clears previous data and reinitialises the system. This prevents duplicate voting and supports transparency, making the system suitable for institutional voting, small-scale elections, and pilot e-governance implementations. Its simplicity and low hardware requirements contribute to practicality and ease of deployment.
The system operates through three main processes: Fingerprint enrolment, fingerprint deletion, and the main voting process. User fingerprints are added using the fingerprint enrolment sketch software. When removal is required, the fingerprint deletion sketch erases stored fingerprint templates.
The main voting program manages the voting sequence. The system includes one administrator (Rakesh Jain), four candidates (Anil, Gunmala, Rekha, and Monu), and ten registered voters (Niket, Garima, Sonu, Neetu, Tinu, Vikas, Chintu, Sarita, Harita, and Deepak). Each voter is permitted to vote once, and the administrator does not participate in voting.
After authentication, the LCD displays:
The voter selects a candidate using one of four push buttons connected to pins 8, 9, A0, and A1. The buzzer connected to pin 12 sounds briefly to confirm recording. The system tracks fingerprint IDs to ensure that no user votes more than once.
When all votes have been cast, the administrator authenticates to view the final results.
Biometric Electronic Voting Machine: Working Steps
Oops! This is an EFY++ article, which means it's our Premium Content. You need to be a Registered User of our website to read its complete content.
Already a registered member? If YES, then simply login to you account below. (TIP: Use 'forgot password' feature and reset and save your new password in your browser, if you forgot the last one!)
SHARE YOUR THOUGHTS & COMMENTS Register or Login to leave a comment.
Smart Speed Monitoring System For Road Safety
Real-Time Face Tracking Using Raspberry Pi 4 Versus Raspberry Pi 5 With Hailo-8L
High-Voltage Capacitor Discharger
Real-time Web-based Home Automation
World’s Smallest Open-Source LoRa + GPS Module for Wearables and IoT (Only 3cm!)
Smallest Spy Video Streaming Camera
Wirelessly Control Multiple AC Appliances with Web Interface
Ultra-Low-Loss Isolated Current Sensor
STMicroelectronics has Introduced First Automotive Microcontroller With built-in AI Acceleration
Samsung Launched 200MP Image Sensor Called ISOCELL HP5
Aeva Introduced 4D LiDAR Sensor for Physical AI Systems
Blockchain Black Box For Drones
Integrated EV Drive For Higher Power Density
Hybrid Cooling System Targets Power Efficiency
Electric Field Tunes Heat Transport In Solids
DIY: Audio Signal–Controlled LED Display Using LM3914
State Reduction In Sequential Circuits
Make Your Own Musical Temperature Alarm
Buck Converter vs Linear Voltage Regulator
Ultra-Compact RGB LED For Space-Constrained Designs
Compact Varistors For High Surge Protection
Gold Plated Reed Relays For High Voltage Systems
28nm Automotive MCU For Zonal E/E Architectures
DSP / Audio Firmware Engineer (Intern) At Chordy.ai In Bengaluru
JOB: System Engineer At General Electric In Chennai
JOB: Analog Layout Engineer At Accenture In Bengaluru
JOB: HVDC HMI Engineer At Quest Global In Bengaluru
Circuit Design Calculators for Engineers and Students
Broadside Coupled Stripline Impedance Calculator
Edge Coupled Stripline Impedance Calculator
Asymmetric Stripline Impedance Calculator
Technologies used
Hardware components
- Arduino
- Raspberry Pi
- Relay
- MPU
- LCD
- LED
- Buzzer
- Button
- Sensor
- Module
- Capacitor
- Camera
- GPS
- LoRa
- RF
Project demo video
What you get
- Working project / hardware kit, tested before delivery
- Complete source code with explanation
- Project demo and guidance for your viva
- Project report, PPT and IEEE paper support (on request)
Delivery & Payment
Delivery takes a minimum of two weeks from the date your inquiry is confirmed.
Payment is in two parts:
• 50% advance to start the project
• Remaining 50% before delivery
Note:
• Documentation and PPT are not included by default
• If you need documentation/PPT, it can be arranged for extra time and cost
We'll confirm the exact timeline and cost with you after reviewing your requirements.
Related Embedded projects

Embedded
ESP32 Fingerprint Attendance System with Live Web Dashboard
Build a biometric attendance system using ESP32 with AS608 fingerprint sensor that logs attendance with timestamp to web dashboard and Googl...
View project
Embedded
Mars Rover Robot Replica using ESP32 CAM and Arduino
Build a Mars Rover robot replica using ESP32-CAM and Arduino with a rocker-bogie suspension system, live video streaming, and smartphone app...
View project
Embedded
ESP32 CAN Bus Tutorial Interfacing MCP2515 with ESP32
Learn CAN bus communication with ESP32 and MCP2515 CAN controller to send and receive data in automotive and industrial applications.
View project
Embedded
ESP32 MP3 Music Player with SD Card and I2S Amplifier
Build a standalone ESP32 MP3 music player that reads audio from SD card and outputs high-quality audio via I2S DAC amplifier with web contro...
View project