AI-Powered Object Detection and Distance Measurement using Raspberry Pi
This real-time setup detects objects ahead and estimates their distances from the vehicle.
- Suitable forB.Tech & M.Tech Embedded students
- Build time3-4 weeks
- LevelBeginner
- Available atAjvika Labs, Kakinada
About this project
Imagine a vehicle cruising at 54 kilometres per hour, roughly the speed of an object moving 0.5 metres per frame at 30 frames per second (0.5×30×3.6=54 km/hr). Mounted on the vehicle’s roof is a compact, high-performance vision system built around a Raspberry Pi 5 board and a Hailo-8L AI accelerator.
This real-time setup detects objects ahead and estimates their distances from the vehicle. When an object enters a predefined safety zone, the system can instantly issue warnings or activate emergency braking, enhancing both situational awareness and reaction time.
Programming and Code Installation guide Accessing Raspberry Pi Enabling PCIe Gen 3.0 speeds Install Hailo software stack Installation Instructions
Where can this project be used? Car dashboard monitoring Reverse gear monitoring with advisory Smart door entry monitoring Occupancy and crowd analysis in buildings Warehouse safety systems Robot vision for indoor navigation School zone or gate surveillance Traffic monitoring at toll booths or bridges School bus gate monitoring
Reverse gear monitoring with advisory
Occupancy and crowd analysis in buildings
Robot vision for indoor navigation
School zone or gate surveillance
Traffic monitoring at toll booths or bridges
Related Object tracking and Detection projects:
Built using an AI Accelerator HAT on a Raspberry Pi 5, the system operates as a production-grade AI platform capable of running at a minimum of 30 frames per second. Designed for vehicle mounting, it continuously scans the road, identifies objects in real time, and calculates their distances. These live readings are displayed on the terminal. If any object crosses a predefined proximity threshold, the system may trigger alerts via GPIO pins.
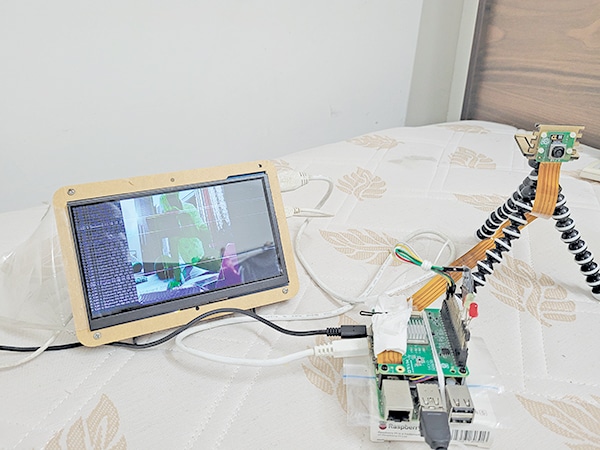
Although the alert mechanism is straightforward to implement, it remains unbuilt in the current version. The components required for assembling the system are listed in the Bill of Materials table. Fig. 1 shows the authors’ working prototype.
The AI accelerator can be mounted on top of the Raspberry Pi, as shown in Fig. 2. Note that since the AI HAT fully covers the main processor, the Raspberry Pi 5 tends to heat up significantly. To prevent overheating, it is strongly recommended to use an additional cooling method. In this system, only a specific fixed-type cooler fits within the narrow space available once the AI HAT is mounted. The complete setup and its individual components are shown in Fig. 2. The Raspberry Pi 5 must also be powered by a high-quality 5V, 4A power adaptor to maintain stable performance.
With active cooling, the Raspberry Pi 5 can be safely overclocked to extract additional performance, at the cost of slightly increased power consumption and heat generation. The cooler’s fan connector should be plugged into the designated fan header on the Pi 5 board. When paired with the AI HAT, the heavy lifting of YOLO-based AI processing is handled by the accelerator, allowing the Pi 5 to focus on computations and control logic. This division of labour ensures smooth and efficient operation, even at 30 frames per second.
First, ensure that 64-bit Raspberry Pi OS Bookworm is installed. This system does not function on a 32-bit Pi OS. A high-quality Camera Module 3 or better is recommended for best results.
https://www.raspberrypi.com/documentation/computers/ai.html#getting-started
The most convenient method for operating the Raspberry Pi is by accessing it from a desktop or laptop via SSH:
When prompted, enter the password. Once authenticated, access to the Raspberry Pi 5 terminal will be granted.
SSH access is optional; a direct connection using a display, keyboard and mouse is also supported.
By default, the Raspberry Pi 5 operates at Gen 2.0 PCIe speeds. To enable Gen 3.0:
Navigate to Advanced Options → PCIE Speed
Choose ‘Yes’ to enable Gen 3 mode
Select ‘Finish,’ and when prompted, reboot the system.
After rebooting, install the Hailo drivers and tools:
This command installs the Hailo kernel device driver, firmware, HailoRT, Hailo applications, libraries, and `rpicam-apps.` Then reboot the system:
Reboot to apply all changes. Verify Hailo Installation. After reboot, run:
This ensures all changes take effect.
The last five lines ensure that the Hailo-8L board has been successfully installed. In some instances, the serial or part number may not be displayed, but the board will continue to function correctly. Test rpicam-hello:
Once all components are installed, install the `rpicam-apps` package to enable Hailo AI accelerator features:
High-speed object detection examples can now be executed:
These commands demonstrate how to use `rpicam-hello` with different YOLO AI models.
Hailo RPi5 Examples – Installation Guide:
Step 2: Navigate into the directory
This directory contains two key files: `setup_env.sh` and `requirements.txt.`
As the Hailo-8L requires specific Python package versions, it is advisable to use a virtual environment to avoid conflicts. This allows for the installation of the necessary package versions locally without interfering with the system-wide Python environment. The next step is to activate the special environment as recommended by the Hailo-8L package.
Step 3: Activate the virtual environment
Once activated, the terminal prompt will change to indicate entry inside the virtual environment: (venv_hailo_rpi5_examples) bera@raspberrypi:~/hailo-rpi5-examples $
Step 4: Install required Python packages
(venv_hailo_rpi5_examples) bera@raspberrypi:~/hailo-rpi5-examples $ pip install -r requirements.txt
The requirements.txt file contains a list of Python packages required for the Hailo examples. To view the file contents:
numpy<2.0.0 setproctitle opencv-python
Step 5: Download the necessary Hailo models
To install additional Python resources, visit: https://github.com/hailo-ai/hailo-apps-infra
This repository provides Hailo Applications Infrastructure for Raspberry Pi 5. Some parts of it are optional for the current code.
The ‘git clone’ command downloads additional Python utilities for Hailo. The last pip command is entirely optional; it may be run or skipped. At this stage, all software components required for the system should be in place. Note that all of these tools fall under the category of open source software.
Begin experimenting with the Hailo-8L accelerator using Python scripts in the `basic_pipelines` directory:
Now the process can move on to working with the Hailo-8L accelerator, trying out some sample Python scripts, and eventually building individual measure_distance3.py. Two sample Python scripts are already available in the basic_pipelines subdirectory:
These can accept input from pre-defined sources such as MP4 files, the Raspberry Pi camera, or a USB camera. Example usage:
–labels-json resources/barcode-labels.json \
–hef-path resources/yolov8s-hailo8l-barcode.hef \
Distance is estimated by comparing an object’s known width with its perceived width in the captured image.
Based on the pinhole camera model, an object farther from the camera appears smaller. If the camera’s focal length, the object’s real-world width, and the observed image width are known, the distance can be calculated using similar triangles.
Standard widths and a default width are defined at the beginning of the code.
The segmentation model `yolov5n_seg_h8l_mz.hef` helps identify full objects, even when partially visible. The segmented image is used to estimate the object’s width, which is then compared to known dimensions to determine the distance.
The model yolov5n_seg_h8l_mz.hef supports around 80 object classes, but in this implementation, focus is only on 26 specific objects listed in the previous dictionary. These are the objects for which the standard physical widths have been provided, allowing for the estimation of their distance from the camera.
Fig. 3 illustrates the distance measurement technique, while Fig. 4 and Fig. 5 show pin details and mounting.
Power the system and run the script. Objects and their distances will be displayed in real time.
The Raspberry Pi 5, paired with the Hailo-8L AI HAT and powered by a 5V, 4A supply, is ideal for embedded or stationary applications that require real-time object detection and distance estimation.
Where can this project be used?
This system can be used for various purposes, such as:
This real-time setup detects objects ahead and estimates their distances from the vehicle. When an object enters a predefined safety zone, the system can instantly issue warnings or activate emergency braking, enhancing both situational awareness and reaction time.
Programming and Code Installation guide Accessing Raspberry Pi Enabling PCIe Gen 3.0 speeds Install Hailo software stack Installation Instructions
Where can this project be used? Car dashboard monitoring Reverse gear monitoring with advisory Smart door entry monitoring Occupancy and crowd analysis in buildings Warehouse safety systems Robot vision for indoor navigation School zone or gate surveillance Traffic monitoring at toll booths or bridges School bus gate monitoring
Reverse gear monitoring with advisory
Occupancy and crowd analysis in buildings
Robot vision for indoor navigation
School zone or gate surveillance
Traffic monitoring at toll booths or bridges
Related Object tracking and Detection projects:
Built using an AI Accelerator HAT on a Raspberry Pi 5, the system operates as a production-grade AI platform capable of running at a minimum of 30 frames per second. Designed for vehicle mounting, it continuously scans the road, identifies objects in real time, and calculates their distances. These live readings are displayed on the terminal. If any object crosses a predefined proximity threshold, the system may trigger alerts via GPIO pins.
Although the alert mechanism is straightforward to implement, it remains unbuilt in the current version. The components required for assembling the system are listed in the Bill of Materials table. Fig. 1 shows the authors’ working prototype.
The AI accelerator can be mounted on top of the Raspberry Pi, as shown in Fig. 2. Note that since the AI HAT fully covers the main processor, the Raspberry Pi 5 tends to heat up significantly. To prevent overheating, it is strongly recommended to use an additional cooling method. In this system, only a specific fixed-type cooler fits within the narrow space available once the AI HAT is mounted. The complete setup and its individual components are shown in Fig. 2. The Raspberry Pi 5 must also be powered by a high-quality 5V, 4A power adaptor to maintain stable performance.
With active cooling, the Raspberry Pi 5 can be safely overclocked to extract additional performance, at the cost of slightly increased power consumption and heat generation. The cooler’s fan connector should be plugged into the designated fan header on the Pi 5 board. When paired with the AI HAT, the heavy lifting of YOLO-based AI processing is handled by the accelerator, allowing the Pi 5 to focus on computations and control logic. This division of labour ensures smooth and efficient operation, even at 30 frames per second.
First, ensure that 64-bit Raspberry Pi OS Bookworm is installed. This system does not function on a 32-bit Pi OS. A high-quality Camera Module 3 or better is recommended for best results.
https://www.raspberrypi.com/documentation/computers/ai.html#getting-started
The most convenient method for operating the Raspberry Pi is by accessing it from a desktop or laptop via SSH:
When prompted, enter the password. Once authenticated, access to the Raspberry Pi 5 terminal will be granted.
SSH access is optional; a direct connection using a display, keyboard and mouse is also supported.
By default, the Raspberry Pi 5 operates at Gen 2.0 PCIe speeds. To enable Gen 3.0:
Navigate to Advanced Options → PCIE Speed
Choose ‘Yes’ to enable Gen 3 mode
Select ‘Finish,’ and when prompted, reboot the system.
After rebooting, install the Hailo drivers and tools:
This command installs the Hailo kernel device driver, firmware, HailoRT, Hailo applications, libraries, and `rpicam-apps.` Then reboot the system:
Reboot to apply all changes. Verify Hailo Installation. After reboot, run:
This ensures all changes take effect.
The last five lines ensure that the Hailo-8L board has been successfully installed. In some instances, the serial or part number may not be displayed, but the board will continue to function correctly. Test rpicam-hello:
Once all components are installed, install the `rpicam-apps` package to enable Hailo AI accelerator features:
High-speed object detection examples can now be executed:
These commands demonstrate how to use `rpicam-hello` with different YOLO AI models.
Hailo RPi5 Examples – Installation Guide:
Step 2: Navigate into the directory
This directory contains two key files: `setup_env.sh` and `requirements.txt.`
As the Hailo-8L requires specific Python package versions, it is advisable to use a virtual environment to avoid conflicts. This allows for the installation of the necessary package versions locally without interfering with the system-wide Python environment. The next step is to activate the special environment as recommended by the Hailo-8L package.
Step 3: Activate the virtual environment
Once activated, the terminal prompt will change to indicate entry inside the virtual environment: (venv_hailo_rpi5_examples) bera@raspberrypi:~/hailo-rpi5-examples $
Step 4: Install required Python packages
(venv_hailo_rpi5_examples) bera@raspberrypi:~/hailo-rpi5-examples $ pip install -r requirements.txt
The requirements.txt file contains a list of Python packages required for the Hailo examples. To view the file contents:
numpy<2.0.0 setproctitle opencv-python
Step 5: Download the necessary Hailo models
To install additional Python resources, visit: https://github.com/hailo-ai/hailo-apps-infra
This repository provides Hailo Applications Infrastructure for Raspberry Pi 5. Some parts of it are optional for the current code.
The ‘git clone’ command downloads additional Python utilities for Hailo. The last pip command is entirely optional; it may be run or skipped. At this stage, all software components required for the system should be in place. Note that all of these tools fall under the category of open source software.
Begin experimenting with the Hailo-8L accelerator using Python scripts in the `basic_pipelines` directory:
Now the process can move on to working with the Hailo-8L accelerator, trying out some sample Python scripts, and eventually building individual measure_distance3.py. Two sample Python scripts are already available in the basic_pipelines subdirectory:
These can accept input from pre-defined sources such as MP4 files, the Raspberry Pi camera, or a USB camera. Example usage:
–labels-json resources/barcode-labels.json \
–hef-path resources/yolov8s-hailo8l-barcode.hef \
Distance is estimated by comparing an object’s known width with its perceived width in the captured image.
Based on the pinhole camera model, an object farther from the camera appears smaller. If the camera’s focal length, the object’s real-world width, and the observed image width are known, the distance can be calculated using similar triangles.
Standard widths and a default width are defined at the beginning of the code.
The segmentation model `yolov5n_seg_h8l_mz.hef` helps identify full objects, even when partially visible. The segmented image is used to estimate the object’s width, which is then compared to known dimensions to determine the distance.
The model yolov5n_seg_h8l_mz.hef supports around 80 object classes, but in this implementation, focus is only on 26 specific objects listed in the previous dictionary. These are the objects for which the standard physical widths have been provided, allowing for the estimation of their distance from the camera.
Fig. 3 illustrates the distance measurement technique, while Fig. 4 and Fig. 5 show pin details and mounting.
Power the system and run the script. Objects and their distances will be displayed in real time.
The Raspberry Pi 5, paired with the Hailo-8L AI HAT and powered by a 5V, 4A supply, is ideal for embedded or stationary applications that require real-time object detection and distance estimation.
Where can this project be used?
This system can be used for various purposes, such as:
Technologies used
Hardware components
- Raspberry Pi
- MPU
- LED
- Module
- Board
- Camera
- RF
Software & tools
- Git
- GitHub
Project demo video
What you get
- Working project / hardware kit, tested before delivery
- Complete source code with explanation
- Project demo and guidance for your viva
- Project report, PPT and IEEE paper support (on request)
Delivery & Payment
Delivery takes a minimum of two weeks from the date your inquiry is confirmed.
Payment is in two parts:
• 50% advance to start the project
• Remaining 50% before delivery
Note:
• Documentation and PPT are not included by default
• If you need documentation/PPT, it can be arranged for extra time and cost
We'll confirm the exact timeline and cost with you after reviewing your requirements.
Related Embedded projects

Embedded
ESP32 Fingerprint Attendance System with Live Web Dashboard
Build a biometric attendance system using ESP32 with AS608 fingerprint sensor that logs attendance with timestamp to web dashboard and Googl...
View project
Embedded
Mars Rover Robot Replica using ESP32 CAM and Arduino
Build a Mars Rover robot replica using ESP32-CAM and Arduino with a rocker-bogie suspension system, live video streaming, and smartphone app...
View project
Embedded
ESP32 CAN Bus Tutorial Interfacing MCP2515 with ESP32
Learn CAN bus communication with ESP32 and MCP2515 CAN controller to send and receive data in automotive and industrial applications.
View project
Embedded
ESP32 MP3 Music Player with SD Card and I2S Amplifier
Build a standalone ESP32 MP3 music player that reads audio from SD card and outputs high-quality audio via I2S DAC amplifier with web contro...
View project